Table of Contents
Dreaming of fragrant lavender but feel intimidated by growing it from seed? You’re not alone. Many gardeners find starting lavender this way challenging, often facing slow germination or confusing steps like cold stratification. It’s certainly frustrating to invest time and seeds only to see little result.
If you’ve wondered about the best time to plant lavender seeds or felt uncertain about preparing them for success, this guide is for you. We understand the confusion surrounding different methods and conflicting advice.
We’ll provide clear, step-by-step guidance on when and how to plant lavender seeds, offering practical tips for success from sowing to seedling. We will specifically address the cold stratification debate, compare common methods to help you choose the right approach, and share valuable, community-tested troubleshooting tips to navigate potential issues.
Ready to turn those tiny seeds into thriving lavender plants? Let’s explore the perfect time to get started based on your location.
Getting Started: Understanding Lavender and When to Plant Your Seeds
Understanding lavender’s basic needs, like sun and soil, and crucially, when to plant your seeds, lays the groundwork for success. Getting the timing right is a common concern for beginners and is key to successful lavender cultivation.
Lavender’s Essential Needs: Sun, Soil, and Drainage
Lavender thrives when its essential needs are met. Here’s what your plants require:
- Full Sun: At least 6+ hours of direct sunlight daily
 for robust growth and oil production.
 - Soil: Well-draining and slightly alkaline soil. Consider testing your soil’s pH.
- Drainage: Absolutely vital to prevent root rot.
Poor drainage, for instance, can lead to stunted growth and fungal diseases. Using well-draining soil for lavender prevents beginner frustration and ensures plant longevity. As a PlantMD horticultural expert states, “Many gardeners new to lavender underestimate the critical role of well-draining soil. Get this right, and you’ve won half the battle against common issues like root rot, ensuring your lavender thrives.” Understanding these needs helps clarify why timing your planting matters.
 for robust growth and oil production.
Why Planting Time Matters for Lavender Success
Getting your lavender germination timing right significantly boosts your chances of success, helping to overcome the idea that lavender is hard to grow from seed. Proper timing ensures seeds sprout in favorable conditions and young seedlings establish strong roots before facing harsh weather like late frosts or extreme summer heat, which can easily damage them. This directly impacts their overall vigor and survival. Now, let’s explore specific planting windows for different areas.
When to Plant Lavender Seeds: A Zone-by-Zone Guide
Understanding when to plant lavender seeds depends largely on your climate zone. If you’re unsure of your zone, you can easily find it online. find your hardiness zone Here’s a general guide:
- Zones 3-7: For these colder regions, starting lavender seeds indoors 8-10 weeks before your last expected frost is best. This extends the shorter growing season and protects young plants from unpredictable spring weather.
- Zones 8+: You have more flexibility. Spring planting allows seedlings to establish before intense summer heat, while fall planting gives roots time to develop during milder winters.
Knowing your zone-specific timing is key. Next, we’ll delve into why starting seeds indoors can be so beneficial.
Indoor Seed Starting: Early Advantages and Considerations
Starting lavender seeds indoors offers several advantages, especially for beginners. It gives your seedlings a valuable head start, protects them from unpredictable early weather, and most importantly, provides you with greater control over crucial germination conditions like temperature and moisture. While this method does require a proper setup with adequate light and warmth, it’s an achievable step with basic supplies. This control significantly reduces variables that can lead to germination failure.
With a solid understanding of lavender’s needs and the best times to plant, you’re now ready to tackle the next crucial step: preparing your seeds through stratification.
The Cold Truth: Demystifying Lavender Seed Stratification
Lavender seed stratification can often seem confusing. We will explore what it is, why it’s sometimes needed, look at different methods, and help you decide if it’s right for your seeds.
What is Cold Stratification and Why Do Lavender Seeds Sometimes Need It?
Once you’ve determined the best time to plant, preparing your seeds is the next step. You might hear about cold stratification, which can sound technical, but it’s simply a process that mimics winter conditions.  This cold, moist treatment helps break seed dormancy – a natural state where seeds wait for favorable growing conditions – improving lavender seed germination. Some lavender varieties or older seeds particularly benefit from this step. But do all lavenders need this special treatment?
Do All Lavender Varieties Require Cold Stratification?
So, is lavender seed cold stratification a must for every type? The straightforward answer is no; there’s no universal rule. Necessity often depends on the specific species – for instance, Lavandula angustifolia, commonly known as English Lavender and a popular choice, frequently benefits. Seed age and source also play a role; fresh seeds might germinate readily without this step. Always check your seed packet first for any specific guidance from the supplier. Understanding this variability helps you decide if you need to explore different stratification methods.
Comparing Stratification Methods
If your seeds might benefit, what’s the best way to cold stratify lavender seeds? Community experiences vary, and the ‘best’ method often depends on your situation. The refrigerator method (seeds in a moist medium for 3-4 weeks) is popular for its control and ease, requiring minimal equipment. Winter sowing offers a natural, hands-off approach if you have outdoor space and suitable winter conditions. The lavender seed stratification fridge freezer debate continues; while some try the freezer, it’s a debated technique carrying higher risks of seed damage.
Ultimately, consider the ease, equipment, and risk level you’re comfortable with. Let’s look closer at the common refrigerator technique.
How to Cold Stratify Lavender Seeds in the Refrigerator: A Step-by-Step Guide
Learning how to cold stratify lavender seeds in your refrigerator is quite straightforward. Here’s a simple guide:
- Prepare Medium: Mix your lavender seeds with a small amount of moist (not wet!) sterile sand, vermiculite, or a damp paper towel. Emphasizing ‘moist, not wet’ is key to preventing mold.
- Bag & Label: Place the mixture into a small, sealable plastic bag or container. Crucially, label it clearly with the lavender variety and the date you started.
- Refrigerate: Store the bag in your refrigerator (not the freezer) for 3 to 4 weeks.
- Monitor: Check periodically to ensure the medium remains moist and there’s no mold.
With these steps, you’re well on your way, but a few extra tips can boost your success.
Stratification Success Tips (And When You Might Skip It)
To maximize success with stratification:
- Always start with fresh, viable seeds; this is foundational.
- Maintain consistent moisture in your medium – damp, never soggy.
- Clearly label everything with dates and varieties.
You might skip stratification if you have fresh seeds of an easy-to-germinate variety, if supplier instructions say so, or if you’re direct sowing in an area with reliable natural winter cold. These conditions can sometimes provide the necessary chill naturally. Hopefully, this demystifies the process for you!
Now that you’re equipped with the knowledge to tackle lavender seed stratification, it’s time to get those seeds into soil by learning how to plant lavender seeds indoors.
From Seed to Sprout: How to Plant Lavender Seeds Indoors
With your seeds prepared, let’s walk through planting them indoors, covering supplies, soil, sowing techniques, and ideal germination conditions.
Gathering Your Supplies: Pots, Trays, Soil, and Labels

With your lavender seeds prepared, let’s gather your essential “lavender seed starting supplies.” You’ll need:
- Seed trays or small pots with drainage holes – these are vital as lavender dislikes ‘wet feet,’ which can lead to root rot.
- Seed starting mix.
- Labels for your lavender varieties.
- A plastic dome or wrap to maintain humidity.
Starting with clean supplies is crucial; it helps prevent common seedling diseases like damping-off. Now, let’s consider the best soil.
Choosing the Best Soil Mix for Lavender Seedlings (Well-Draining is Crucial)
Selecting the “best soil for lavender seedlings” is paramount, and “well-draining soil” is non-negotiable. Opt for a sterile seed starting mix; this is ideal because it’s free of weed seeds and, crucially, harmful pathogens that can cause diseases in young plants. To further enhance drainage, consider amending your mix with perlite or coarse sand. Some experienced gardeners also find success with specific soil preparations; for instance, gardening resources like <a href="https://www.hgtv.com/outdoors/flowers-and-plants/herbs/growing-lavender">HGTV's soil preparation tips</a> offer guidance, and online communities share tips such as using <a href="https://www.reddit.com/r/gardening/comments/1332uqh/any_advice_for_growing_lavender_from_seed/">community suggestions like using cactus mix</a>. Ultimately, ensuring your chosen medium drains well is key. With your soil ready, let’s move on to sowing.
Sowing Your Lavender Seeds: A Step-by-Step Guide (Depth and Spacing)
Now for the exciting part of “how to plant lavender seeds indoors”! Follow these steps:
- Lightly pre-moisten your seed starting mix until it’s damp, not soggy.
- Sow seeds thinly on the surface or plant shallowly, about 1/8 inch deep. “ This “lavender seed planting depth” is critical; some varieties need light for germination, and tiny seeds lack energy to push through much soil.
- If not surface-sown, lightly cover with a fine layer of mix or vermiculite.
- Space seeds well. This ensures good air circulation, reducing disease risk, and lessens competition for light and nutrients. It also makes eventual transplanting easier. “
- Clearly label your pots or trays with the lavender variety and sowing date.
With seeds sown, let’s optimize conditions for germination.
Optimizing Germination: Ideal Temperature, Moisture, and Light
Providing optimal conditions is key for lavender seed sprouting. Aim for:
- Consistent Warmth: A “lavender germination temperature” of 70-80°F (21-27°C) is ideal; a seedling heat mat “ can help. Warmth activates enzymes and metabolic processes vital for sprouting.
- Consistent Moisture: Keep soil moist like a wrung-out sponge, never soggy.
- Light (Post-Sprouting): Once sprouted, provide bright, indirect light. For “starting lavender seeds indoors light,” grow lights “ work well. This is gentler than the full sun mature lavender needs, protecting young seedlings from scorching.
Now, let’s discuss what to expect regarding timing.
The Waiting Game: Lavender Germination Timeline and What to Expect
The “lavender germination timeline” is often slow and erratic, typically 3-4 weeks or more. Patience is key; reassure yourself that staggered sprouting is normal for lavender and not a sign of failure. As PlantMD horticultural expert advises, “Lavender teaches us patience right from the very start. Don’t be disheartened by slow or staggered germination over several weeks; it’s perfectly normal for these aromatic wonders as they take their time to awaken.”
With your lavender seeds successfully planted and germination underway, you’re now ready to learn about caring for your young lavender seedlings.
First Sprouts! Caring for Your Young Lavender Seedlings
Congratulations on your lavender sprouts! Now, let’s cover essential care for young seedlings, focusing on watering, light, and preparing them for their eventual move outdoors.
Watering Lavender Seedlings: The Golden Rule (Less is More!)
Now that your seeds have sprouted, proper watering is key. For watering lavender seedlings, remember the golden rule: less is more. Avoid overwatering lavender, as it’s prone to root rot and damping off in soggy soil. Always check if the top inch of soil feels dry or the pot feels lighter before watering again. general watering best practices Water directly at the base of the seedlings. This keeps foliage dry, reducing fungal disease risk, and ensures water reaches the roots effectively.  Next, let’s ensure they get enough light.
Light Requirements for Strong and Healthy Seedlings
Your tiny lavender plants need plenty of light to grow strong. Fulfilling lavender seedling light requirements means using grow lights or a sunny windowsill. Insufficient light causes ‘leggy’ seedlings—long, pale, weak stems with sparse leaves—making them less resilient. Rotate pots for even exposure. If using grow lights, keep them a few inches above the plants for 12-16 hours daily. Monitoring their development is the next step.
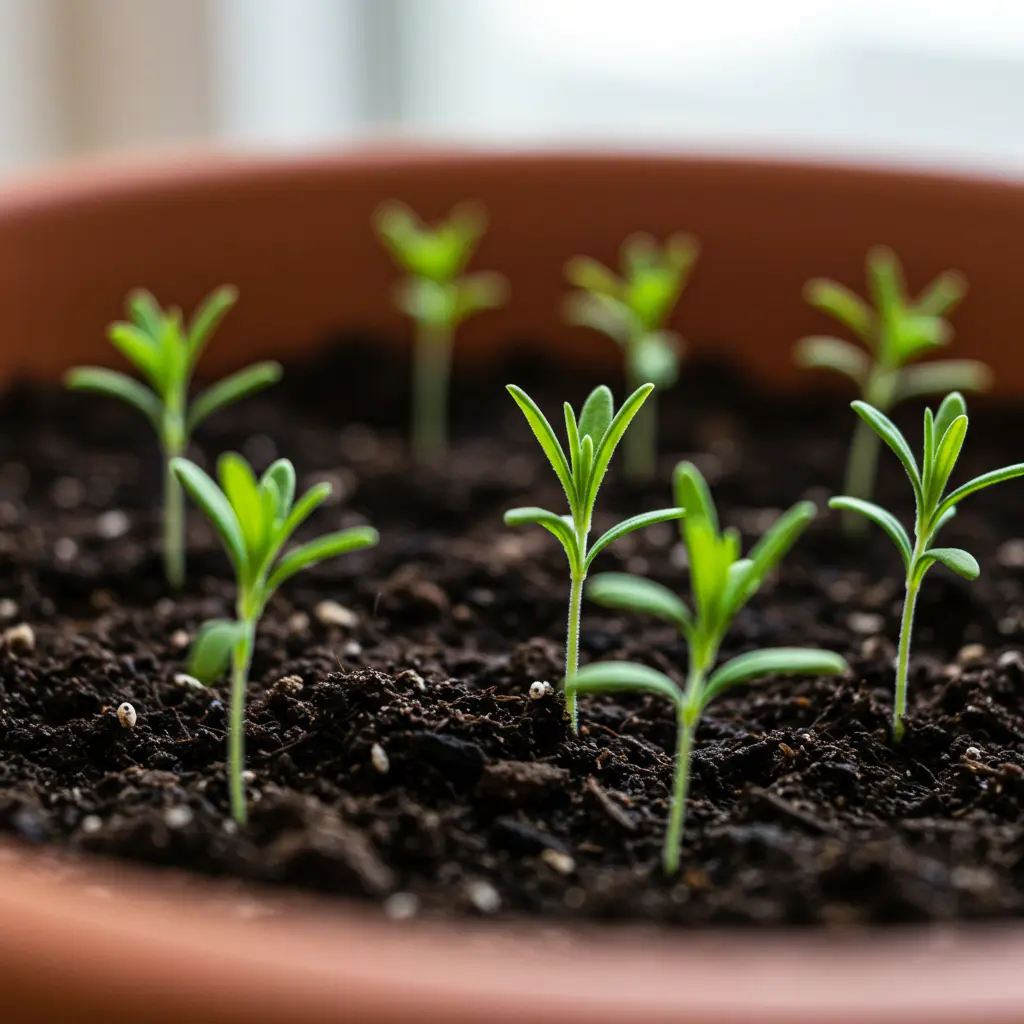
Monitoring Growth: Signs of Healthy Lavender Seedlings
Monitor your young plants for good health. You have healthy lavender seedlings when you see:
- Sturdy stems and vibrant green color.
- ‘True leaves’ developing. These appear after the initial ‘cotyledons’ (seed leaves) and look like miniature adult lavender leaves.
- No pests or disease.
Robust seedlings are ready for hardening off.
Hardening Off: Preparing Seedlings for Outdoor Life
Before moving your lavender outdoors permanently, hardening off lavender seedlings is crucial. This process gradually acclimates them to sun, wind, and temperature changes over 7-10 days, preventing transplant shock—the stress plants feel when moved. Start with 1-2 hours in a sheltered, shady spot, gradually increasing exposure to gentle morning sun and outdoor conditions daily. This ensures their survival. Soon they’ll be ready for individual pots.
Transplanting Seedlings to Individual Pots: When and How
Once hardened off and with a few sets of true leaves, it’s time for transplanting lavender seedlings into individual pots. Handle them extremely gently to avoid damaging delicate roots. Crucially, use a well-draining potting mix in their new homes; this is vital for lavender. Following these practices helps nurture your young plants.
Now that you know how to care for your young lavender seedlings, let’s look at troubleshooting common issues.
Help! Troubleshooting Common Lavender Seed Starting Issues
Even with careful attention, challenges can arise when starting lavender from seed. We’ll address common problems like germination failure and leggy seedlings, offering solutions and community-sourced advice to get you back on track.
Why Aren’t My Lavender Seeds Germinating? (Common Causes & Solutions)
A PlantMD horticultural expert reassures, “If your lavender seeds aren’t sprouting, please don’t give up! It’s often a simple fix like adjusting temperature, moisture, or trying stratification if you skipped it. Review your conditions, and remember every gardener has faced this hurdle.” It’s a common worry when lavender seeds not germinating is the issue.
So, why are my lavender seeds not germinating? Consider this checklist:
- Seed Viability: Old seeds? A paper towel viability test can check.
- Temperature: Ensure consistent warmth.
- Moisture: Avoid soil that’s too wet or too dry.
- Stratification: Was it required and done correctly?
- Planting Depth: Seeds sown too deep may not sprout.
Reviewing these points often reveals the solution.
Fixing Leggy Seedlings: What Causes Them and How to Help
Tall, spindly plants indicate leggy lavender seedlings, typically from insufficient light. To help, provide a stronger light source—move them closer to a grow light or sunnier window.  Ensure good air circulation too; this encourages stronger, sturdier stem development. Gently brushing seedling tops daily with your hand mimics wind, promoting thicker, shorter stems. Addressing legginess is crucial, as weak seedlings are more vulnerable to other problems.
Damping Off: Identifying and Preventing This Seedling Disease
Damping off, a fungal disease, causes lavender seedlings to suddenly wilt, their stems constricting and collapsing at the soil line, sometimes with fuzzy mold. Sadly, there’s no cure for affected damping off lavender seedlings; remove them immediately to prevent spread. Prevention is absolutely key. Use a sterile seed-starting mix, ensure good air circulation, avoid overwatering, and don’t overcrowd your seedlings. Understanding these potential issues can help prevent wider problems in your seedling trays.
Top Mistakes in Growing Lavender from Seed (And How to Avoid Them)
What are common mistakes when growing lavender from seed? Knowing these can help ensure success. Here’s how to avoid frequent pitfalls:
- Overwatering: Lavender dislikes constantly wet soil. Learn about avoiding common overwatering mistakes.
- Wrong Soil: Always use a well-draining seed starting mix.
- Insufficient Light: Provide bright light for strong seedlings.
- Incorrect Temperature: Ensure consistent warmth for germination.
- Skipping Stratification: Don’t omit this if your variety requires it.
- Impatience: A common tip shared is patience; lavender can be slow.
Avoiding these common mistakes growing lavender from seed boosts your success rate. Sometimes, despite all efforts, a fresh start is needed.
Knowing When to Adjust Your Strategy or Start Anew
If widespread failure persists despite troubleshooting, assess your seed source or environment. Gardening is a learning journey; don’t lose heart. Consider a fresh start with different seeds, a new variety, or an adjusted setup. Each try builds experience.
With these troubleshooting tips in hand, you’re now better equipped to navigate the rewarding journey of growing lavender from seed to beautiful bloom.
Successfully growing lavender from seed, a task often perceived as tricky, truly hinges on knowing when to plant lavender seeds and mastering the ‘how’—especially the nuances of cold stratification. This guide aimed to demystify the entire process for you. We covered the best timing for your zone, clarified stratification techniques, detailed planting and seedling care, and shared community-tested solutions for common problems. By breaking down each step and addressing conflicting advice, we hope to have shown that achieving a thriving lavender patch from seed is entirely possible. You’re now equipped with the knowledge and confidence to begin. We’d love to hear about your lavender growing journey in the comments!
