Table of Contents
Planning that month-long dream vacation or extended trip but dreading leaving your beloved plants behind? You’re certainly not alone. Finding a truly reliable way to water plants while away for weeks on end, especially without relying on a friend, can feel daunting. Worries about overwatering, drying out completely, or coming home to a soggy mess after a month or more are common.
You need practical, proven solutions that work for extended absences and fit your budget. This guide cuts through the conflicting advice, helping you choose the best self-watering method for your specific plants, trip length (particularly a month or longer), and budget. Drawing on insights from real gardeners, we’ll compare popular options like Blumat stakes against DIY alternatives, highlighting their tested pros and cons for long trips. We’ll also provide essential troubleshooting tips to help you avoid common failures like leaks or inconsistent watering.
Ready to ensure your green friends thrive while you’re enjoying your time away? Let’s explore the reliable options available to keep them perfectly hydrated.
Chapter 1: Planning a Long Trip? Why Your Plants Need a Vacation Watering Strategy
Heading off for a month or more? Leaving your beloved plants behind for an extended trip can be stressful. You worry about their survival, especially if standard watering methods have failed you in the past. The core problem is maintaining consistent hydration without reliable help. Finding dependable long term plant watering solutions (1 month+) is crucial for peace of mind.

Knowing how to water plants while away for extended periods, like a month-long vacation, presents a unique challenge. Typical watering routines, like a quick pre-trip soak, simply won’t cut it for absences over a week or two. Your plants risk complete drying out, and relying on neighbors or friends for such long trips isn’t always feasible or reliable.
Finding Your Best Fit Solution
Planning for self watering plants vacation means choosing the right system for your needs. Commercial systems like Blumat offer automation, while DIY methods using spikes, greenhouse bags, and capillary mats provide budget-friendly alternatives. Key factors for choosing between these approaches include your trip duration, the types of plants you have, your budget, and the level of reliability you require.
Quick Look at Key Methods
Here’s a brief overview of some popular methods for long-term plant watering:
- Blumat stakes: Automated watering based on soil moisture.
- Ceramic watering spikes: Simple, gravity-fed DIY option.
- Greenhouse bags or humidity domes: Traps moisture around the plant.
- Capillary mats plant watering: Wicks water to multiple plants.
We’ll compare these methods in detail later to help you find the perfect fit.
With the need for a vacation watering strategy established, let’s compare the most popular methods—Blumat, DIY spikes, greenhouse bags, and capillary mats—in the next chapter.
Chapter 2: Comparing Your Options: Blumat vs. DIY Spikes vs. Greenhouse Bags vs. Capillary Mats
Let’s compare the most popular vacation watering methods side-by-side. This overview covers pros, cons, costs, and ideal uses to help you narrow down your choices for keeping plants watered during your trip.
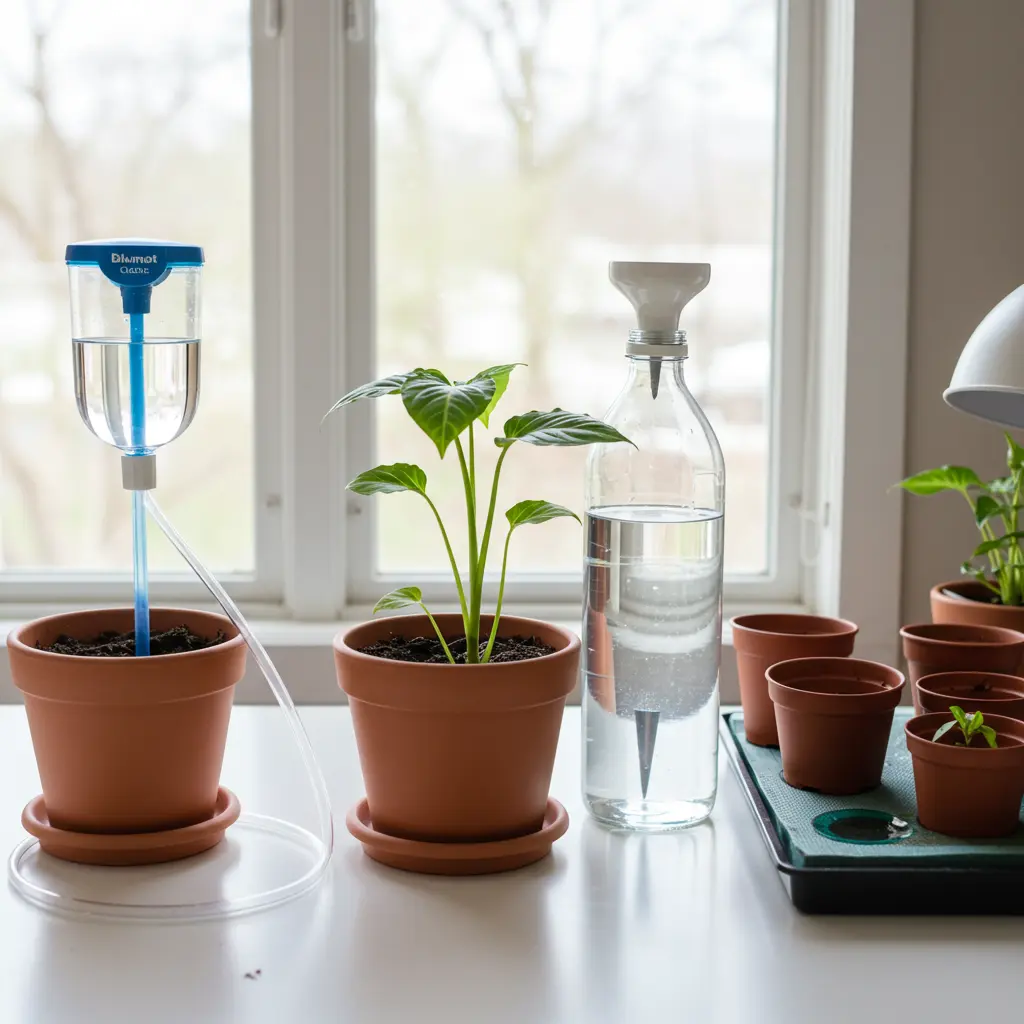
Commercial Solution: Blumat Watering Stakes
Blumat stakes offer a reliable automatic watering solution.  The porous clay cone senses soil dryness. When dry, it draws water from a reservoir through a tube, keeping the soil consistently moist. Blumat stakes typically cost $5-10 each. They are ideal for longer trips, ensuring consistent watering for multiple plants from a single reservoir. For a detailed look at using Blumat stakes, see the next chapter.
Popular DIY: Ceramic & Plastic Bottle Spikes
DIY spikes involve placing a ceramic watering spike or an upturned bottle filled with water into the soil. This DIY self-watering options method is extremely low-cost but can be prone to leaks or clogging, requiring careful testing. Ceramic watering spikes generally offer better flow control than basic plastic bottles. They’re suitable for budget-conscious users, individual pots, and potentially shorter trips, provided you test the system thoroughly beforehand for a DIY plant waterer while away.
Low-Tech DIY: The Greenhouse Bag Method
The DIY greenhouse bag method involves placing your watered plant inside a large, clear plastic bag. Condensation forms inside, recycling water back to the plant. This is a very low-cost solution for a DIY plant waterer while away, ideal for humidity-loving plants and potentially shorter trips when other methods aren’t feasible. However, be mindful of potential mold growth or overheating, especially in direct sun.
For Smaller Pots: Understanding Capillary Mats
Capillary mats work by wicking water from a reservoir up to pots placed on top of the mat. This moderately priced method is excellent for groups of small pots with similar watering needs, seedlings, or plants like African violets that prefer bottom watering. Capillary mats plant watering offers a simple solution for keeping smaller plants consistently hydrated.
At-a-Glance Comparison
Which method suits your trip? Choosing the right self watering plants vacation solution depends on your trip length, budget, and plants. Long term plant watering solutions require careful consideration. Here’s a quick comparison to help you decide:
| Method | Estimated Duration Supported | Relative Cost | Setup Effort | Reliability Factor (Based on User Feedback) |
|---|---|---|---|---|
| Blumat Stakes | Long | High | Medium | High |
| DIY Spikes (Ceramic/Bottle) | Short/Medium | Low | Low | Medium |
| Greenhouse Bag | Short | Low | Low | Low |
| Capillary Mats | Medium | Medium | Low | High |
Now that we’ve compared the options, let’s dive deeper into using Blumat stakes for reliable long-term watering.
Chapter 3: Deep Dive: Blumat Stakes for Reliable Long-Term Watering
Blumat stakes are often recommended for longer trips, but proper setup is absolutely key to their success. Let’s explore how they work, step-by-step installation, and troubleshooting common issues based on real gardener experiences.
Understanding the Blumat Mechanism (Classic Stakes)
Blumat classic stakes offer a simple yet effective watering solution. These Blumat stakes utilize a porous ceramic cone that senses dryness in the soil. As the soil dries, the cone creates a vacuum, drawing water through a thin tube from your reservoir.  This automatic watering system keeps your plants consistently hydrated while you’re away, adapting to their needs.
Essential Supplies for Blumat Setup
Here’s what you’ll typically need for your Blumat setup:
- Blumat Classic stakes (or Jr. stakes for smaller pots)
- Flexible tubing (usually 3mm or 8mm depending on system)
- Water reservoir (bucket, container, large bottle)
- Drill/tool (if your pot lacks drainage holes or needs modification)
- Connectors/stakes (optional, for larger or more complex setups)
Step-by-Step Installation Guide
Proper setup starts with soaking the ceramic cones (carrots) thoroughly – this is step one for how to use blumat stakes correctly for vacation. Next, prepare your reservoir and position it correctly (more on this critical detail below). Connect the tubing securely to the reservoir outlet and then to the stakes. Carefully fill the cone and tube completely with water, ensuring absolutely no air bubbles remain (a common user mistake), then cap tightly. Insert the stake firmly into pre-moistened soil near the plant’s roots. Finally, if using Blumat Classic Jr. stakes, adjust the cap slightly to fine-tune the initial watering rate.
CRITICAL Setup Detail: Reservoir Height
Getting the reservoir height right is critical for your Blumat stakes and a frequent source of problems discussed in user troubleshooting forums. To prevent failure, the water level in your reservoir must be lower than the green cap/head of the Blumat stake. Placing the reservoir higher can cause continuous siphoning and severe overwatering. Mastering this essential detail is crucial for a successful, reliable setup.
Real Gardener Experiences
Are Blumat stakes reliable for a month-long vacation? Reviews and shared experiences show they are considered reliable long term plant watering solutions (1 month+), with many gardeners reporting success, especially for vacations, when set up correctly. Remember, success hinges on careful initial setup, correct reservoir placement, and pre-trip testing. Reliability, when properly configured, is a key advantage of Blumat stakes.
Avoiding Common Blumat Mistakes (Setup Errors, Clogging)
Users frequently report these common issues, which are usually preventable:
- Incorrect reservoir height (too high causing overwatering, too low causing no flow)
- Air bubbles trapped in the lines or cones during setup
- Loose cap on the stake allowing air entry
- Clogged cone (always use clean water; filter if necessary)
- Kinked or blocked tubing
Troubleshooting Guide
Experiencing issues? Here’s a quick guide:
- No Water Flow? Check for air bubbles (re-soak and refill cone/tube), clogs in the cone or tube, kinks in the tubing, and ensure the cones were thoroughly soaked initially. Also, verify the reservoir isn’t positioned too low.
- Too Much Water? The reservoir water level must be lower than the stakes’ caps. Double-check this first. Also, ensure the cap on the stake is tight. If you’re wondering how to use blumat stakes correctly for vacation, double-checking these points is essential.
Now that you understand Blumat stakes, let’s explore DIY solutions—spikes, bottles, and bags—in the next chapter.
Chapter 4: Deep Dive: DIY Solutions – Mastering Spikes, Bottles & Bags
Exploring budget-friendly DIY options? Let’s cover the setup and troubleshooting for popular methods like watering spikes and greenhouse bags, highlighting common pitfalls like leaks and inconsistent flow based on user feedback.
Setting Up DIY Spikes
Creating a DIY plant waterer while away using ceramic or plastic bottle watering spikes is straightforward. 1. Choose your spike (ceramic often preferred for better control) and a suitable bottle (wine bottles are popular).  2. Fill the bottle completely with water. 3. Attach the spike securely to the bottle opening to prevent leaks. 4. Carefully invert the bottle and insert the spike firmly into pre-moistened soil near the plant roots.
Choosing the Right Bottle and Spike Combination
Ensure a snug, leak-proof fit between the bottle and spike. Consider the bottle size relative to the plant’s water needs and the desired watering duration – larger bottles last longer but are heavier. Ceramic watering spikes may offer slightly different flow regulation compared to basic plastic ones; testing is key.
CRITICAL Risk Mitigation: Preventing Leaks & Overwatering
How do you prevent ceramic watering spikes from overwatering or leaking? Thorough testing, as advised by many gardeners, is crucial before you leave. Here are some key tips:
- Ensure a very snug fit between the bottle and spike.
- Consider your soil type; water flows faster in looser mixes. Adjust insertion depth if needed.
- Test the setup for several days to observe the flow rate.
Some users suggest angling the spike slightly or adding a tiny air hole to the top of the inverted bottle to regulate flow, but proceed with caution, as results can vary significantly. Acknowledge that inherent variability and a higher risk of failure exist with these DIY methods compared to automated systems.
Troubleshooting Spikes
Troubleshooting common spike problems, frequently discussed by DIY plant waterer while away enthusiasts, often involves checking a few key areas:
- Emptying too fast? -> Check the bottle/spike fit for leaks. Ensure the spike is firmly in the soil. Consider if the soil is too porous or the plant is using water rapidly. An air hole might worsen this.
- No/slow flow? -> Check for clogs in the spike (soil or debris). Ensure good contact between the spike and moist soil. See if a vacuum lock has formed (a tiny air hole might help, but test carefully).
Remember, consistent performance relies heavily on testing in your specific conditions.
Setting Up the Greenhouse Bag
Creating a DIY Greenhouse Watering Bag is easy for your plants while you are away. 1. Water your plant thoroughly. 2. Place the entire pot inside a large, clear plastic bag. 3. Gently pull the bag up and around the plant, leaving some air space at the top. 4. Loosely seal the bag opening (e.g., with a twist tie), allowing some air exchange but trapping humidity. 5. Place the bagged plant in bright, indirect light – direct sun can cook the plant.
When is the Greenhouse Bag Method Most Effective?
This method works best for humidity-loving plants and for shorter durations (generally up to 2-4 weeks, depending on the plant, pot size, and ambient conditions) in indirect light. It’s less suitable for succulents, cacti, or plants prone to fungal problems due to the high humidity.
Potential Downsides of the Greenhouse Bag Method
While convenient and cheap, the greenhouse bag method has potential risks:
- Overheating if placed in direct sunlight.
- Mold or fungal growth on the soil or plant, especially with longer durations or susceptible plants.
- Unsuitability for very large plants that won’t fit in a bag.
Now that you’ve explored DIY options, let’s move on to Chapter 5: Final Checks: Testing, Long-Term Prep & Answering Key Questions to ensure your plants thrive in your absence.
Chapter 5: Final Checks: Testing, Long-Term Prep & Answering Key Questions
Before you lock the door and leave, some crucial steps remain. This involves the non-negotiable testing phase, tips for extra-long trips, and answers to common questions about vacation plant watering.
The Golden Rule: Test Your System!
Why you absolutely must test your watering system before leaving cannot be overstated. The Golden Rule, echoed by expert advice and community consensus, is to thoroughly test your chosen setup before your trip. This is the most critical step for success with self watering plants vacation plans. Why? Testing identifies potential failures (leaks, clogs, incorrect flow rates), allows you to make adjustments, builds your confidence, and significantly reduces travel anxiety. As PlantMD horticultural expert advises, “Don’t skip the test run! Running your chosen watering system for several days, ideally a week, before you leave is the single most important step to catch potential failures and ensure your plants are actually getting the water they need.” This pre-departure check is essential.
How to Test Effectively
Properly testing your chosen method involves a few key steps:
- Set up your system exactly as you plan to use it during your trip.
- Run the system for at least 3-4 days, but ideally a full week, based on user experience. This helps gauge real-world water usage and system stability.
- Monitor reservoir levels daily, check soil moisture consistency
 , and vigilantly watch for leaks, clogs, or any system failures.
 - Adjust your setup as needed during this test phase (e.g., reservoir height, spike insertion depth, cap tightness on Blumat Jr.) to fine-tune water delivery.
Following these steps ensures you understand how your system performs and how to water plants while away effectively.
 , and vigilantly watch for leaks, clogs, or any system failures.
Estimating Water Needs: How Much for a Month?
How much water do plants need for a month without care? This is highly variable and depends heavily on factors like plant type (thirsty ferns vs. drought-tolerant succulents), pot size, ambient temperature, light exposure, and how often plants typically need water. While you might find rough guidelines online, testing is the only reliable way to gauge water consumption for your specific plants in your specific environment with your chosen watering system, especially for long term plant watering solutions (1 month+). Real-world testing manages expectations far better than guesswork.
Reservoir Considerations
Choosing and sizing your water reservoir for extended absences is crucial. Here are a few practical tips:
- Size Matters: Use a large enough container to hold sufficient water for your entire trip, plus a buffer. Calculate based on your test run observations.
- Cleanliness: Ensure the reservoir is thoroughly clean before filling it to prevent clogs or contamination.
- Cover (Optional): Consider using a lid (but not airtight, especially for Blumat systems which need atmospheric pressure) to minimize evaporation and prevent debris or insects from falling in.
- Positioning: Remember, correct reservoir positioning (usually lower than the plant for Blumat) is vital, as highlighted by user experience and manufacturer warnings.
Extra-Long Trips (4+ Weeks)
For absences significantly longer than four weeks, careful planning is paramount. Consider using larger reservoirs, potentially linking multiple reservoirs together (possible with some systems like Blumat), or even combining watering methods (e.g., Blumat for large plants, capillary mat for small ones). Thorough testing becomes even more critical for these long term plant watering solutions (1 month+). Reliability is paramount for such durations. Tested systems like Blumat, when set up correctly, often prove more dependable than riskier DIY setups over very long periods, based on community feedback and documented success stories.
FAQ
Q: What is the best DIY way to water plants while away for 4 weeks or more?
A: Reliability is the primary concern for extended absences. While some DIY plant waterer while away solutions like well-tested ceramic spikes might work for long term plant watering solutions (1 month+), they inherently carry a higher risk of failure (clogging, inconsistent flow, running dry) compared to tested commercial systems like Blumat over such long durations, based on community insights and reported experiences. If choosing DIY for a long trip, extremely thorough testing and potentially having a backup plan (or a quick check-in if possible) is highly recommended.
FAQ
Q: Revisiting: How Much Water Do Different Plants Need Over a Month?
A: Plant water needs vary drastically. A tropical foliage plant in a sunny window will need far more water than a snake plant in low light. There is no single answer that fits all situations. Factors like plant type, pot size, soil mix, light, temperature, and humidity all play a role. Pre-trip testing, where you monitor how much water your specific setup uses over several days or a week, is the only reliable way to determine the approximate water needs for your plants in your conditions.
With your watering system chosen, tested, and finalized, you’re almost ready. Proper preparation ensures peace of mind while you’re away.
Planning that extended trip no longer needs to mean constant anxiety over your plants’ survival. You’ve explored how different watering methods—from the reliable automation of Blumat stakes to various DIY options like spikes and greenhouse bags—perform during absences of a month or more. By understanding their real-world pros, cons, setup nuances (like critical reservoir height), and common pitfalls derived from gardener experiences, you can confidently select the best fit for your specific plants, budget, and travel duration. Remember, the single most critical step identified by seasoned gardeners and experts alike is thoroughly testing your chosen system before you leave. Armed with this practical knowledge and careful preparation, you’re equipped to travel with peace of mind, knowing your green companions are well cared for.
