Table of Contents
Loving your rubber tree plant (Ficus elastica) and wishing you had more? Propagating is a fantastic way to multiply your collection for free, but it’s easy to feel a bit intimidated when you’re starting out. You might wonder exactly where to make the cut, whether water or soil is the right choice for rooting, or if that thicker, woodier stem you have will even work. It’s understandable to want clear, reliable steps to avoid mistakes and feel confident in the process.
Learning how to propagate a rubber tree plant is simpler than you might think with the right guidance. This article walks you through easy, step-by-step methods using both water and soil. We’ll demystify the crucial process of identifying nodes (where roots form!), help you decide between water and soil based on what works for other growers, and provide practical tips for successfully rooting cuttings, including those that are a bit more mature or woody.
Ready to expand your rubber plant family? Let’s start by gathering the necessary supplies and selecting the best cutting.
Getting Started: What You Need to Propagate Your Rubber Plant
Prepare for successful propagation by gathering the necessary tools and materials. Having everything ready before you take your cutting ensures a smooth process.
Gathering Your Propagation Toolkit
Having the right rubber plant propagation supplies makes the process easier and more successful! Gather these essentials before you start:
- Sharp, clean scissors or pruners
- Clean jars or small pots
- Your chosen propagation medium (water or soil mix)
- Optional: Rooting hormone
- Gloves (the sap can irritate skin)


Choosing a Healthy Mother Plant and Cutting
Your success starts with selecting a healthy rubber plant cutting from a thriving mother plant. A vigorous parent plant has more stored energy, significantly boosting the chances of successful rooting. Look for a stem section that is 4-6 inches long and includes 2-3 healthy leaves and, crucially, visible nodes (we’ll cover nodes next!). Avoid any stems that look stressed, yellowing, or diseased. Choosing a prime cutting sets you up for a great start.
Best Time for Propagation
Wondering when to propagate rubber plant cuttings for the best results? While possible year-round indoors, the optimal time is during the spring and summer. This is the plant’s active growing season, meaning its natural growth hormones are surging, which encourages faster root development. Propagation attempted during fall or winter might still work, but expect the rooting process to take considerably longer due to slower plant activity.
With your tools gathered and your ideal cutting selected, you’re prepared for the next crucial step: finding the node.
The Secret to Success: Finding the Node on Your Rubber Plant Cutting
Identifying the node is the most critical step for successful rooting. Understanding node identification addresses a common beginner challenge and sets you up for propagation success.
What is a Node and Why It Matters
A node is simply a specific point on the plant’s stem where leaves emerge or buds form.  Crucially, these nodes contain specialized cells capable of developing into new roots. Understanding this is vital because, without a node included on your cutting, it simply won’t root. Many beginners stumble here, so remember this key principle: no node means no new rubber plant.
How to Spot Nodes
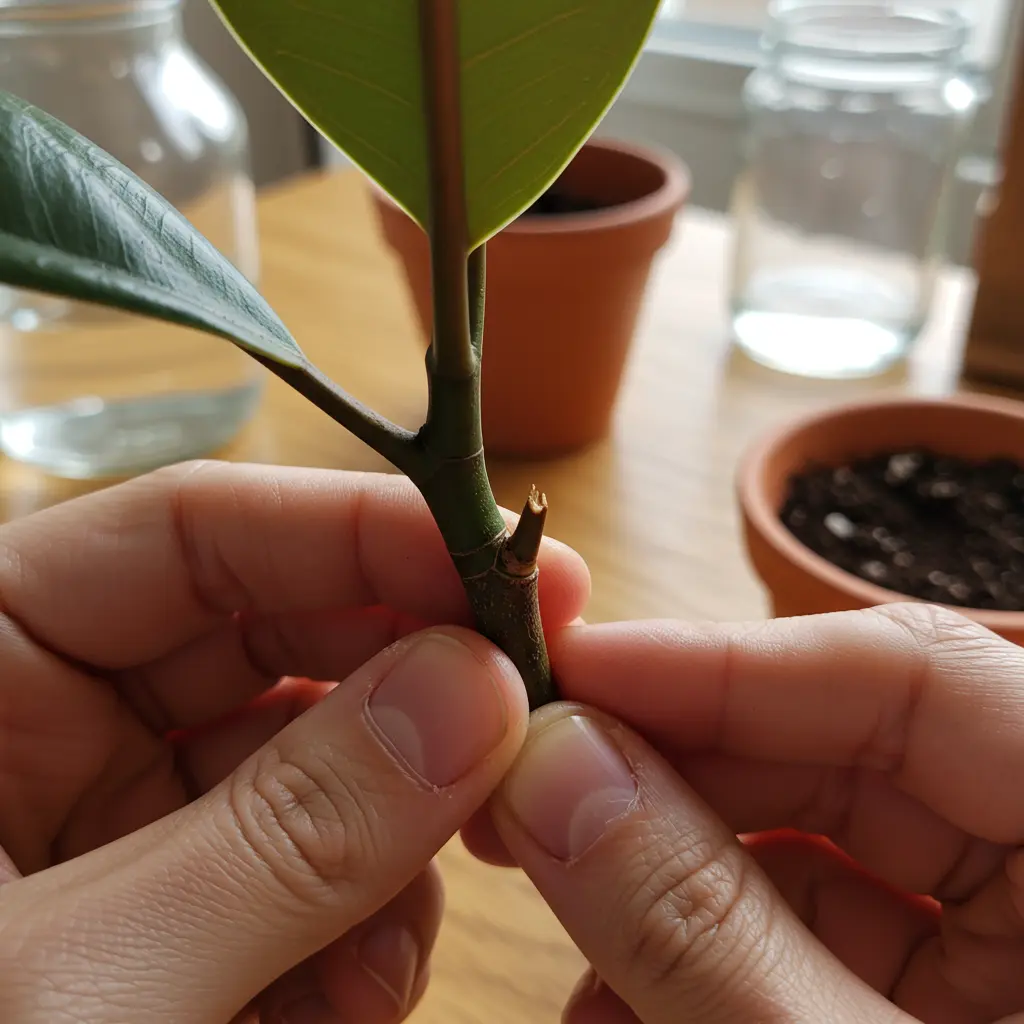
So, how do you identify a node on a rubber plant cutting? Look closely at the stem for slight bumps, ridges, or rings. These often mark where a leaf is currently attached or was previously attached (leaving a small leaf scar). You might also spot a tiny dormant bud nestled just above the leaf or scar.
On younger, green stems, nodes are usually quite visible as slight swellings. On older, slightly woodier stems, they might appear as more subtle rings. Careful rubber plant node identification is the first step toward a healthy new plant.
Making the Cut
Once you’ve located a node, it’s time for taking plant cuttings. First, ensure your scissors or pruners are sharp and sterilized (wipe with rubbing alcohol) to prevent spreading disease. Make a clean cut about 1/4 to 1/2 inch below the chosen node. Cutting below the node ensures this vital rooting point is included on your cutting and can be submerged in water or buried in soil. Finally, carefully snip off the lowest leaf or two if they are very close to the cut end.
Tips for Different Stems
Don’t worry if the nodes seem less obvious on older, woodier rubber plant stems. Look carefully for those subtle rings or slightly raised bumps where leaves once grew – these are your targets for rubber plant node identification on mature growth. Propagating woody rubber plant stems this way is definitely possible, though be prepared for them to potentially take a bit longer to root compared to greener cuttings. Addressing this common concern, a PlantMD horticultural expert advises: “Don’t be discouraged if older, woodier rubber plant stems take a bit longer to root. Patience and consistent care, perhaps with a rooting hormone assist, often yield success even with these tougher cuttings.”
Now that you know exactly how to find the node and take your cutting, let’s explore the best way to root it.
Choose Your Method: Propagating in Water vs. Soil
With your cutting prepared, choose your preferred propagation method. Both water and soil propagation can be successful.
Method 1: Water Propagation
Water propagation offers a clear view of root development, making it a popular choice. If you’re wondering how to propagate rubber plant in water, follow these steps. This method allows direct observation, which many beginners find reassuring.
- Choose a clean jar and fill it with filtered or rainwater. Tap water left out overnight to dechlorinate can also be used.
- Place your rubber plant cutting into the water. Ensure at least one node is submerged, keeping all leaves above the waterline to prevent them from rotting.
- Position the jar in a location that receives bright, indirect sunlight.
- Change the water every 2-3 days, or if it becomes cloudy. This frequent change is vital as it prevents bacterial and algal growth, which can cause stem rot and harm your cutting.
- Patience is key; roots may take several weeks to a few months to develop enough for potting. Look for a healthy root network. This careful approach to water propagation rubber plant cuttings boosts success.
Method 2: Soil Propagation
Soil propagation allows your rubber plant cutting to develop roots directly in its future growing medium. For those learning how to propagate rubber plant in soil, this method can lead to robust growth.
- Prepare a small pot with a well-draining potting mix. A quality mix is vital as it prevents waterlogging, a primary cause of root rot.
- (Optional) Dip the cut end of your stem into rooting hormone; this often encourages faster, stronger root development.
- Make a hole in the soil, then insert the cutting, ensuring at least one node is buried.
- Gently firm the soil around the cutting and water lightly.
- Position the pot in a warm location with bright, indirect light.
- Keep the soil consistently moist but not soggy. Overwatering can easily lead to rot, so aim for soil that feels like a damp sponge. This careful watering is key for successful soil propagation rubber plant attempts.
Using Rooting Hormone
Rooting hormone, available as a powder or gel, can significantly boost your propagation success.  It contains plant hormones that stimulate faster, more robust root development on cuttings; learn more about how rooting hormones aid plant propagation. While optional, using rooting hormone for rubber plant cuttings is highly recommended by experienced growers, particularly for soil propagation or woodier stems. To use it, simply dip the cut end of your stem into the hormone before planting. This small step often enhances rooting.
Which Method to Choose?
So, is it better to root rubber plant cuttings in water or soil? Both methods have pros and cons. Water propagation allows easy root monitoring and is initially cleaner. However, water-grown roots need careful acclimation to soil, and rot is a risk if water isn’t changed. Soil propagation means roots are adapted to their final medium, potentially rooting faster with hormone. The downsides are hidden root development and the need for precise watering. As PlantMD horticultural expert advises, "Choosing between water and soil for rubber plant propagation often comes down to personal preference. Water lets you watch roots grow, while soil avoids transplant shock – both can be successful with the right care." Ultimately, the choice for water vs soil propagation rubber plant cuttings depends on your preference; both can succeed.
Tips for Woody Stems
Can you propagate a thick or old rubber plant branch? Yes, propagating woody rubber plant stems is possible, though it often requires more patience and may have a lower success rate than greener cuttings. For these tougher stems, community experience strongly suggests soil propagation combined with rooting hormone for the best chance of success. Some growers also find that lightly wounding the bark near a node by gently scraping a small area can encourage rooting, though this is an optional step. Be prepared for a potentially longer rooting period. While very old, thick stems can be challenging, success with persistence is achievable. Patience is truly key.
With your chosen propagation method underway, the next step is learning how to care for your new cutting as it develops roots.
Caring for Your New Cutting: Patience and Potting
Once your cutting is set up, proper care is needed while roots develop. Patience is key during this stage!
Water Propagation Care: Changing Water and Monitoring Roots
Taking care of your cutting in water requires just a few simple steps. Be patient, as roots take time to appear! Proper water propagation care prevents issues like rot and encourages healthy growth.
- Keep the water level consistently above the node(s).
- Change the water every 3-7 days to keep it fresh and prevent bacterial growth, which can cause rot.

- Place the container in bright, indirect light.
- Watch for small, white roots emerging from the node area.

Soil Propagation Care: Maintaining Moisture and Light
Soil propagation care focuses on creating the right environment for root development. Consistency is important here.
- Keep the soil consistently moist, but avoid making it waterlogged, as this is a common cause of rot.
- Provide bright, indirect light.
- Optionally, cover the cutting with a plastic bag or cloche to increase humidity.
- After several weeks, you can check for roots by giving the cutting a very gentle tug – resistance means roots are forming.
How Long Does It Take?
Wondering how long rubber plant propagation takes? It truly varies, requiring patience. Rooting can take anywhere from 4 weeks to several months, depending on conditions. Don’t worry if it seems slow! Look for healthy, white roots that are at least 1-2 inches long if propagating in water. For soil propagation, feeling resistance when you gently tug the cutting indicates successful rooting.
Ready for a Pot!
Once roots are established, it’s time for potting your rubber plant cutting! This is an exciting step towards a mature plant.
- Wait until the roots are about 1-2 inches long.
- Choose a small pot with drainage holes.
- Fill it with a well-draining potting mix.
- Gently plant the rooted cutting.
- Water thoroughly. Remember, water-propagated roots need time to acclimate to soil, so keep the soil consistently moist initially.
With your cutting successfully potted and cared for, you’re well on your way. Let’s address some common issues that might arise.
Troubleshooting Common Issues & FAQ
Sometimes things don’t go exactly as planned. Here’s how to address common propagation problems and answers to frequently asked questions.
Problem: No Roots
Q: What should I do if my rubber plant cutting isn’t rooting?
A: It’s definitely discouraging when your rubber plant cutting isn’t rooting, but don’t give up yet! Several factors could be at play. First, double-check that your cutting has at least one node and that it’s correctly positioned (submerged in water or buried in soil). Insufficient light or warmth can slow things down, as can plant dormancy. Older, woodier stems naturally take longer. Ensure the stem isn’t rotting. Try moving it to a warmer, brighter spot, consider applying rooting hormone, and practice patience, especially with thicker cuttings.
Problem: Rotting Stem
Q: What should I do about a mushy or rotting stem?
A: A mushy, brown or black stem base, sometimes with a foul smell, indicates your rubber plant cutting is rotting. This often happens if the water wasn’t changed frequently enough, the soil stayed too wet, or bacteria were introduced. If only the very bottom is affected, you might salvage it. Use a sterile knife or shears to cut off the rotted part well above the mushy area. Let the fresh cut callous over for a few hours before trying again in fresh medium.
Problem: Leaf Issues
Q: Why are my cutting’s leaves turning yellow or falling off?
A: Don’t panic if the lowest leaf on your cutting turns yellow and drops! This is common as the cutting directs its energy towards developing roots instead of maintaining all its leaves. However, if multiple rubber plant cutting leaves yellow rapidly or fall off, it could signal stress. Check if it’s getting too much or too little light or water, or inspect the stem base for signs of rot. Adjusting care conditions accordingly can help.
FAQ: Propagation Without Leaves?
Q: Can you propagate a rubber plant without leaves?
A: It’s generally difficult to propagate rubber plant without leaves. Leaves are crucial for photosynthesis, which generates the energy needed for root development. While a leafless stem section with nodes might occasionally root, the chances of success are significantly lower. For the best results, always try to use cuttings that possess at least one or two healthy leaves to fuel the rooting process.
FAQ: Revisiting Woody Stems
Q: Can you propagate a thick or old rubber plant branch? Any quick tips?
A: Yes, you can propagate thicker, woodier stems, though it requires more patience! Here are the key propagating woody rubber plant stems tips recapped:
- Soil propagation often yields better results than water for woody cuttings.
- Applying rooting hormone can significantly help encourage root development.
- Be prepared for a longer waiting period compared to greener cuttings.
- Always make clean cuts with sterile tools.
- Ensure the node is properly buried in the soil mix.
By addressing these common issues and understanding these FAQs, you’re better equipped to navigate the propagation process successfully.
Multiplying your rubber tree plant is an achievable goal. Understanding how to precisely identify a node is the crucial first step, paving the way for successful rooting whether you choose the simplicity of water or the stability of soil propagation. We’ve tackled common beginner sticking points, demystifying node location and comparing propagation methods, even for those trickier woody stems. Remember the importance of patience during the rooting phase and the aftercare required once roots appear. With this knowledge, you are now equipped to confidently take cuttings and expand your Ficus elastica family. Enjoy the satisfaction of watching your new rubber plants take root!
