Table of Contents
Venus flytraps capture the imagination like few other plants. Their unique traps and carnivorous nature make them incredible additions to any collection. Perhaps you’ve admired them from afar and wondered if you could grow one yourself, maybe even starting from a tiny seed. If the idea seems a bit intimidating, especially for a beginner, you’re not alone. Many people think growing these fascinating plants from seed is incredibly difficult or requires expert knowledge.
The truth is, while Venus flytrap seeds do have specific requirements, the process is entirely manageable and deeply rewarding, even if you have zero experience with carnivorous plants. This guide is built specifically for you, the absolute beginner gardener ready for a unique challenge. We’ll break down every essential step, from gathering the right materials and preparing the perfect soil mix to understanding the critical conditions for germination and knowing exactly what to expect along the way.
Forget the confusion and potential pitfalls. We’ll provide clear, actionable instructions designed to give you the best chance of success. Get ready to embark on the exciting journey of growing your very own Venus flytrap from seed!
Preparing for Success: Materials and Mindset
Before you sow a single seed, gathering the right supplies and understanding the process is key to successfully growing Venus flytraps. While it might seem daunting at first glance, growing these fascinating carnivorous plants from seed is an achievable project, even for absolute beginners. It requires patience and attention to specific needs, but the reward of seeing a tiny seedling grow into a mature trap is immense.
Getting Started: Why Grow From Seed & What You Need
Is it difficult to grow Venus flytraps from seed? It’s a common question for newcomers. While it demands more patience than buying a mature plant (it can take several years to reach full size), the actual process of germination and early growth is straightforward if you follow the correct steps. Growing from seed offers the satisfaction of nurturing a plant from its very beginning and is often more cost-effective than purchasing established specimens.
To embark on this journey, you’ll need a few essential items. Appropriate containers are a must – think small pots or trays, ideally with drainage holes. A humidity dome or even simple plastic wrap is crucial for maintaining consistent moisture. Don’t forget labels to keep track of your seeds and a spray bottle for gentle watering.

This image shows the basic setup: small pots, a tray, labels, and likely a bag of the correct soil mix. These are the fundamental components you’ll need before you even open your seed packet.
Perhaps the most critical component is the soil. What is the best soil for Venus flytrap seeds? Forget standard potting mix or anything with added fertilizers. Venus flytraps require a nutrient-poor, acidic medium. The recommended soil mix for Venus flytrap seeds is typically a blend of sphagnum peat moss and either horticultural-grade silica sand or perlite, often in a 1:1 ratio. This specific carnivorous plant soil mimics their natural bog habitat. Standard soils contain minerals and nutrients that will quickly kill these sensitive plants, which have evolved to get nutrients from insects, not the soil. Always use pure water (distilled, reverse osmosis, or rainwater) when working with the soil and watering.
Finally, sourcing reputable Venus flytrap seeds is vital. Seed viability decreases over time, so fresh seeds from a trusted supplier will give you the best chance of success when buying Venus flytrap seeds.
With your materials gathered and an understanding of the necessary conditions, you’re ready for the next exciting step: planting your seeds.
Planting Your Venus Flytrap Seeds: Step-by-Step
With your materials ready, follow these precise steps to correctly sow your Venus flytrap seeds for optimal germination. This process is straightforward, even for absolute beginners, and sets the stage for successful growth.
Step-by-Step Planting Instructions
Sowing Venus flytrap seeds requires a gentle touch and specific conditions to encourage germination. Here is a step-by-step guide to help you through the process:
Step 1: Prepare the Soil Mix. Start by thoroughly moistening your chosen soil mix – typically a blend of peat moss and perlite or sand. It is crucial to use only pure water like distilled, reverse osmosis, or rainwater. Tap water contains minerals that can harm carnivorous plants. Squeeze the mix gently; it should be damp but not waterlogged.
Step 2: Fill the Containers. Loosely fill your chosen pots or trays with the prepared, moist soil mix. Do not compact the soil. The roots of germinating seeds need air pockets to grow into.
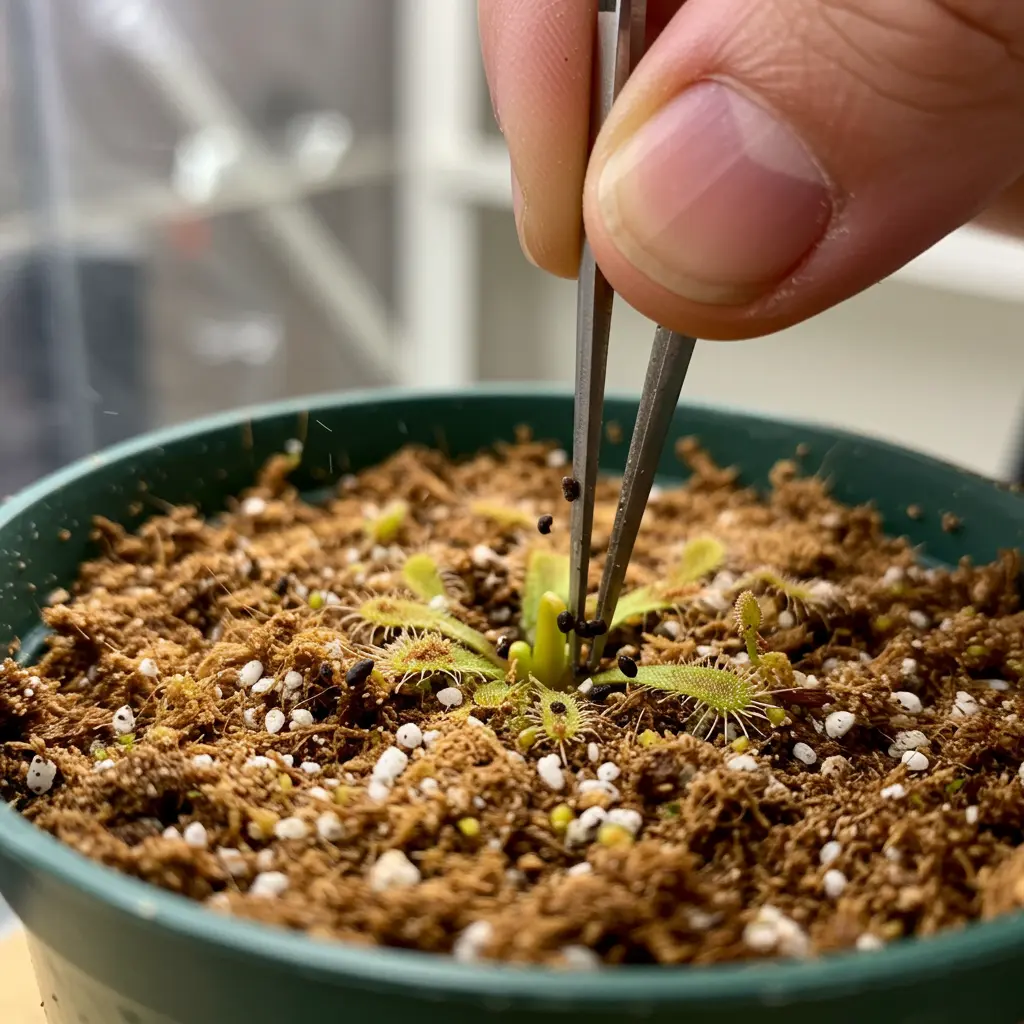
Step 3: Sow the Seeds. Now, it’s time to sow the seeds. A common question is, “How deep do you plant Venus flytrap seeds?” The answer is simple: you don’t bury them! Venus flytrap seeds need light to germinate. Sprinkle the tiny black seeds directly onto the surface of the moist soil. Space them out if possible, but don’t worry if they are close together.  The seeds will look like tiny black specks scattered across the dark, damp surface.
Step 4: Water Gently. After sowing, water the pots gently. You can do this by misting the surface lightly with pure water, being careful not to dislodge the seeds. Alternatively, place the pots in a tray filled with about an inch of pure water and let the soil soak up moisture from the bottom.
Step 5: Ensure Humidity. Venus flytrap seeds require high humidity to germinate. Cover the pot with a clear plastic dome, a ziplock bag, or plastic wrap secured with a rubber band. This creates a mini-greenhouse effect, trapping moisture and maintaining a consistently humid environment around the seeds.
For a visual walkthrough of these steps, be sure to watch our supplementary guide:
. This video demonstrates preparing the soil, sowing the seeds on the surface, and setting up the humidity cover, making the process even clearer. Following each of these steps carefully is essential for successful germination, especially for beginners.
Now that your seeds are sown, the next critical step is to create the perfect environment for them to sprout.
Creating the Ideal Germination Environment
Successfully sprouting Venus flytrap seeds depends heavily on providing the right conditions from the start. Unlike many common garden plants, these unique carnivorous seeds have specific requirements for temperature, light, and moisture that must be met to encourage them to break dormancy and begin to grow.
Creating the Perfect Germination Conditions
Once your seeds are sown in the proper soil mix, establishing the ideal environment is the next critical step. Venus flytrap seeds germinate best when kept consistently warm. Aim for a temperature range between 70-85°F (21-29°C). Consistent warmth is vital; fluctuations can stress the seeds and reduce germination rates.
Lighting is also important, even before sprouts appear. Provide bright, indirect light. A sunny windowsill that doesn’t get harsh direct sun all day works well, or you can use artificial grow lights placed a safe distance above the container.
Proper watering is paramount. The soil must be kept consistently moist, but never waterlogged. This is crucial for preventing fungal issues and ensuring the seeds have access to the moisture they need to sprout. Remember, Venus flytraps are sensitive to minerals, so always use pure water like distilled water, reverse osmosis (RO) water, or rainwater. This specific requirement for pure water, combined with the need for a nutrient-poor [[Venus flytrap soil mix]], differs significantly from general plant watering principles for many other plants.
Maintaining high humidity around the seeds is also essential. Keeping the container covered with a clear plastic dome or plastic wrap helps trap moisture and create the humid microclimate that aids germination.
A common question is whether Venus flytrap seeds need cold stratification. Stratification is a process where seeds are exposed to cold temperatures to mimic winter conditions, breaking dormancy. Generally, fresh Venus flytrap seeds do not require cold stratification to germinate. However, older seeds might benefit from a brief period of chilling if they are slow to sprout. Research into cold stratification requirements indicates that while some carnivorous plant seeds have a biological need for cold periods to germinate, this is not typically the case for fresh Dionaea muscipula (Venus flytrap) seeds.
By providing consistent warmth, bright indirect light, constant (but not excessive) moisture with pure water, and high humidity, you create the optimal conditions for your Venus flytrap seeds to begin their journey. Now that the environment is set, it’s time to understand what happens next and how long germination might take.
Patience is Key: Germination Timeline and What to Expect
Growing Venus flytraps from seed requires patience, and understanding the germination timeline is crucial for managing your expectations. Don’t worry if you don’t see results immediately; this process takes time and varies depending on several factors.
The Waiting Game: Germination Timeline & Expectations
One of the most common questions beginners ask is, “How long does it take to grow a Venus flytrap from seed?” or “How long for venus flytrap seeds to sprout?” The truth is, there’s no single exact answer. While some seeds might sprout relatively quickly, venus flytrap germination typically takes between 2 to 5 weeks. However, it’s not uncommon for it to take even longer, sometimes up to several months, depending on factors like seed viability, temperature, and humidity.
Managing your expectations is important during this “waiting game.” Don’t get discouraged if you don’t see immediate results. Keep the conditions consistent, and trust the process. The first signs of life will be tiny, thread-like green sprouts emerging from the soil surface. These initial leaves are called cotyledons and look very different from the mature traps.  You’ll notice these small, simple leaves first, indicating successful germination. The iconic traps that Venus flytraps are known for will develop later as the seedling grows and matures over time.
Now that you know what to expect during germination, let’s look at some common issues you might encounter and how to avoid them.
Avoiding Pitfalls: Common Problems and Beginner Tips
Address potential issues early to increase your chances of success with Venus flytrap seeds. While growing from seed requires patience, understanding common challenges can help you navigate the process smoothly and avoid disappointment. Don’t worry, most problems have straightforward solutions if caught early.
Troubleshooting Common Problems & Beginner Tips
It’s completely normal to encounter a few bumps in the road when growing Venus flytrap seeds, especially as a beginner. Let’s address some common venus flytrap seed problems and offer practical beginner venus flytrap tips to help you succeed.
One frequent concern is no germination after the expected timeframe. If your seeds aren’t sprouting, consider a few possibilities. Were the seeds fresh, or potentially old and non-viable? Is the temperature consistently within the ideal range (around 75-85°F or 24-29°C)? Are they receiving enough light – bright, indirect light is crucial, even before sprouting? Finally, double-check your water and soil – using anything other than distilled, reverse osmosis, or rainwater and a peat/sand mix can prevent germination.
Another issue you might see is mold or algae growth on the soil surface. This often indicates poor air circulation or overly wet conditions. To manage it, increase ventilation slightly if possible. You can carefully remove small patches of mold with a sterile toothpick, but the best prevention is ensuring proper watering – the soil should be consistently moist, not waterlogged.
Seedlings suddenly wilting and dying, known as “damping off,” is a sad but possible problem. This is usually caused by a fungal disease thriving in overly wet, stagnant conditions. To prevent this, ensure good airflow around your seedlings once they sprout. If you’re particularly concerned, you can sterilize your soil mix and pots before planting, though this isn’t always necessary for success.
Here are some essential beginner venus flytrap tips specifically for the seeding stage: Always use pure water (distilled, RO, or rainwater). Stick to the recommended soil mix (peat moss and sand/perlite). Provide consistent, bright light and stable, warm temperatures. Most importantly, be patient! Germination can take several weeks. Check on your setup regularly, but avoid disturbing the seeds or soil unnecessarily. Addressing these potential troubleshooting germination points early will significantly improve your chances.
Now that you’re prepared for potential challenges, let’s look beyond germination and focus on caring for your new seedlings.
Frequently Asked Questions About VFT Seeds
Here are answers to some common questions specifically about growing Venus flytraps from seed. This section addresses key points beginners often wonder about when starting this unique growing project.
Frequently Asked Questions (Seed Specific)
Many new growers wonder about the best conditions and practices for starting Venus flytraps from seed.
Can you grow Venus flytraps indoors from seed? Yes, absolutely! In fact, growing Venus flytraps indoors from seed is often preferred, especially for beginners. It allows you to control the environment more easily, ensuring consistent light (often using grow lights) and stable temperatures, which are crucial for successful germination and seedling growth.
How many seeds should I plant? It’s a good idea to plant multiple seeds per pot or tray. Venus flytrap seed germination rates can vary, so planting several increases your chances of success. You can always thin them out later if too many sprout in one spot.
When is the best time to plant seeds? If you are growing indoors under controlled conditions with grow lights and stable temperatures, you can plant Venus flytrap seeds anytime throughout the year. If planting outdoors, the best time is typically in the spring after the last frost, allowing them to benefit from natural warmth and light as they germinate.
Once your seeds have successfully germinated, the next step is understanding how to care for the delicate seedlings as they begin to grow.
Beyond Germination: Caring for Your Seedlings
Once your seeds have sprouted, the journey continues with proper care for the young Venus flytrap seedlings. Seeing those tiny green specks emerge is exciting, but they are still delicate and require specific conditions to thrive beyond this initial stage.
Next Steps: Caring for Young Venus Flytrap Seedlings
After successful germination, your tiny Venus flytrap seedlings are ready for the next phase of their development. The first step is often to gradually accustom them to slightly less humid conditions than the sealed environment you used for germination. Over several days or even a week or two, slowly increase ventilation by propping open the dome or removing the plastic wrap for longer periods each day. This helps prevent fungal issues and strengthens the young plants.
Proper venus flytrap seedling care shares many similarities with caring for mature plants, but on a smaller scale. Continue to use only pure water, such as distilled, reverse osmosis, or rainwater, keeping the soil consistently moist but not waterlogged. Adequate bright light is absolutely crucial for their continued growth and health; they need many hours of direct sun or strong grow lights daily.
Don’t worry about feeding them yet. Venus flytrap seedlings are too small to digest insects, and they will get all the nutrients they need from light and photosynthesis at this stage. Feeding only becomes relevant much later, after their traps have fully developed and are large enough to close around prey. If grown outdoors, they will naturally catch tiny insects when ready.
Manage your expectations regarding size. Growth is still quite slow in the first year or two. Your seedlings will remain tiny for a long time, gradually developing their characteristic traps.
They can comfortably remain in their germination pot for many months, or even longer, as they grow slowly and don’t mind being close together initially. Transplanting should only be considered when the seedlings are large enough to handle without damage (often when they have several true leaves and small traps) or if they become significantly overcrowded.
This initial stage of seedling care lays the foundation for the plant’s future health. As they grow larger, their needs transition into the standard long-term requirements for mature Venus flytraps. Understanding these needs is key to their continued success. For a complete guide covering everything from dormancy cycles and feeding mature plants to repotting and pest control, refer to our .
With consistent pure water, plenty of light, and patience, your tiny seedlings will slowly but surely grow into fascinating Venus flytrap plants.
Embarking on the journey of growing Venus flytraps from seed is an exciting step, and it’s absolutely achievable for beginners! This guide walked you through gathering the specific materials needed, the simple step-by-step planting process, creating the perfect humid and warm environment, understanding the germination timeline, and tackling common issues. By following these clear, actionable steps, you’ve equipped yourself with the knowledge to successfully nurture those tiny seeds into fascinating carnivorous plants. It requires patience and attention to detail, but the reward of seeing your own flytrap emerge is immense. You’re now ready to start growing!
Enjoyed learning how to grow unique plants like the Venus flytrap? Subscribe for more beginner-friendly guides and plant care tips!
