Table of Contents
Dreaming of digging up your own homegrown potatoes but short on garden space? Growing them in bags is a brilliant solution, perfect for patios, balconies, or even small yards. If you’re asking, “How do I plant potatoes in a bag?” you might feel a little uncertain about where to start. Questions about the right soil mix, exactly how much to water in a container, or even which potato varieties work best are completely common. It’s easy to feel overwhelmed by conflicting advice.
Don’t let that stop you! This comprehensive guide will walk beginner gardeners like you through the entire process, step-by-step, from preparing your seed potatoes to harvesting a satisfying yield. We’ll demystify common points of confusion, such as initial soil depth and consistent watering, by sharing practical insights and community-tested tips. You’ll gain the confidence to select the best varieties for bags and troubleshoot any challenges that arise, ensuring a successful and rewarding project.
Ready to transform a simple bag into your very own potato patch? Let’s begin by gathering the essential supplies.
Why Grow Potatoes in Bags & What You’ll Need
Growing potatoes in bags offers fantastic advantages, especially if you’re a beginner or have limited space. Let’s explore why this method is so popular and gather the essential supplies to get you started.
The Perks of Potato Grow Bags: Why Beginners Love Them
Potato grow bags offer several fantastic advantages, making them a popular choice:
- Space-saving:
 Ideal for balconies or small patios, a key benefit for urban gardeners.
 - Easier Management: Pest and disease control can be simpler compared to in-ground planting.
- Simple Harvest: Many gardeners love the easy harvest – just tip the bag to reveal your potatoes!
- Beginner-Friendly: This method is wonderfully suited for those new to gardening, offering a straightforward path to success.
 Ideal for balconies or small patios, a key benefit for urban gardeners.
Gathering Your Gear: Essential Supplies for Bag Success
Once you see the perks, gathering your potato grow bag supplies is the next practical step. Here’s what you’ll need:
- Grow Bags: Choose various sizes; these are your containers for healthy potato growth.
- Certified Seed Potatoes: Essential for beginners as they are disease-free and selected for vigorous growth, unlike some grocery store spuds.
- Quality Potting Mix/Compost: Provides vital nutrients and ensures good drainage critical for bag cultivation.
- Watering Can/Hose: Necessary for consistent watering.
- Trowel: Useful for planting and managing soil.
Choosing Your Grow Bags: Size, Material, and Critical Drainage
Selecting the right grow bag is key. Common sizes are 5 to 10 gallons. Breathable fabric pots are often recommended for superior aeration, temperature regulation, and drainage, though plastic options exist. Whatever your choice, ensure excellent drainage holes. This is critical to prevent waterlogging and root rot, a common beginner pitfall. As PlantMD horticultural expert advises, “Don’t underestimate the importance of drainage in grow bags. Without adequate holes, you’re essentially creating a swamp for your potato roots, leading to rot and disappointment. Good drainage is non-negotiable for healthy tubers.”
Seed Potatoes 101: Why Certified Seeds Are Key (and What to Avoid)
For a successful harvest, always use certified seed potatoes. These are specifically grown for planting, ensuring they are disease-free and selected for vigorous growth, which is vital for beginners. You can learn more about certified seed potatoes to understand their benefits fully. Unlike these, grocery store potatoes might carry diseases or be treated to prevent sprouting. Crucially, avoid any potatoes explicitly treated with sprout inhibitors, as these chemicals will significantly hinder or even prevent any growth. Opting for quality seed potatoes is a key first step.
With a clear understanding of why grow bags are an excellent choice and your essential supplies gathered, you’re now ready to prepare your potatoes and bags for planting.
Getting Started: Preparing Your Potatoes and Bags
Proper preparation of your seed potatoes and grow bags is a crucial first step for successful planting. We’ll cover techniques like ‘chitting,’ how to prepare your seed potatoes, and setting up your bags with the right initial soil layer, clarifying common questions along the way.
What is ‘Chitting’ and Is It Necessary for Grow Bags?
Chitting, or pre-sprouting, gives your seed potatoes a head start. You simply place them in a cool, light spot, like a windowsill, for a few weeks until small, sturdy sprouts appear.  Chitting potatoes for grow bags can lead to an earlier harvest. While highly recommended, it’s not strictly essential if you’re short on time; your potatoes will still grow. Consider it a helpful boost rather than an absolute must for success in grow bags.
Preparing Your Seed Potatoes: Cutting and Curing for Best Results
Properly preparing seed potatoes for planting can significantly boost your harvest. If you have larger seed potatoes, you can cut them into smaller pieces. Ensure each piece has at least one or two ‘eyes’ – these are the small dimples where sprouts will form. After cutting, allow the pieces to ‘cure’ by leaving them in a dry, airy place for a few days. This helps the cut surfaces heal, preventing rot once planted.
Setting Up Your Grow Bags: Placement and Smart Prep Tips
When preparing potato grow bags, a few smart tips make a big difference:
- Choose your bag’s final sunny location before filling it – they become very heavy!
- Roll down the top edges of the bag. This helps with initial planting and makes ‘hilling up’ soil later much easier.
- Ensure your grow bags have adequate drainage holes to prevent waterlogged soil.
These simple steps ensure a smoother planting process and a better environment for your potatoes.
The First Layer of Soil: Best Mix and Ideal Starting Depth
For the first layer in your grow bags, the best soil mix for potatoes is a good quality potting mix or compost, offering vital nutrients and drainage. When it comes to initial soil depth, advice can vary. As PlantMD horticultural expert states, “For initial soil depth in grow bags, aim for 4-6 inches. While some suggest less, this provides a solid base and crucial room for hilling later, which is key for a great potato yield. Always opt for a quality potting mix.” This recommended depth allows space for future hilling, crucial for developing tubers.
With your potatoes and bags fully prepared, you’re perfectly set for the exciting next stage: planting your potatoes.
Planting Your Potatoes: The Step-by-Step Guide
Now for the exciting part: planting your prepared seed potatoes! Follow these clear, actionable steps for correct density, depth, and initial care to give your potato crop a successful start.
How Many Seed Potatoes per Grow Bag? (Guidance for Common Bag Sizes)
Figuring out the right number of seed potatoes for your grow bag is key for a good harvest. For a standard 10-gallon grow bag, you should aim to plant 2 to 4 seed potato pieces. This approach balances giving each plant enough space to develop tubers effectively while maximizing your potential yield. If you’re using smaller bags, adjust accordingly: a 5-gallon bag typically accommodates 1 to 2 seed pieces, and a 7-gallon bag can comfortably house 2 to 3 pieces.  Spacing them properly ensures each plant gets sufficient nutrients and room to grow without competition.
The Planting Process: A Step-by-Step Walkthrough
Let’s get your potatoes planted! Here’s how to plant potatoes in a bag, step by step, making it easy for you to succeed.
- Add Initial Soil: Start by adding about 4-6 inches of your chosen potting mix to the bottom of the grow bag. This creates a base for your seed potatoes.
- Position Seed Potatoes: Gently place your chitted seed potato pieces on top of the soil layer. Make sure the sprouts (or “eyes”) are pointing upwards, as these will grow into the potato plant. Space them evenly, following the guidance for your bag size. If your potatoes have delicate chits, handle them with care to avoid breaking them off.
- Cover with Soil: Lightly cover the seed potatoes with another 3-4 inches of soil. Don’t fill the bag completely at this stage; you’ll add more soil later as the plants grow in a process called hilling.
This straightforward process sets your potatoes up for healthy growth.
Ensuring Correct Planting Depth and Spacing in Bags
Understanding how deep to plant potatoes in bags is crucial for their development. Your seed potatoes should be nestled under about 3-4 inches of soil, with the total initial soil level in the bag around 4-6 inches deep. Proper spacing, as discussed earlier, is equally important to prevent overcrowding, which can lead to smaller potatoes. This initial setup ensures the developing tubers have adequate space to grow without competing for vital resources. Critically, leaving this space at the top of the bag allows room for ‘hilling’ – adding more soil as the plants grow, which encourages more potatoes to form and protects them from sunlight.
Initial Watering After Planting: Giving Your Potatoes a Good Start
After planting, give your potatoes a good initial watering. This vital step helps settle the soil around the seed pieces and provides essential moisture to kickstart their growth. Water thoroughly until you observe some drainage from the bottom of the bag, but be careful to avoid creating waterlogged conditions, which potatoes dislike. For more on watering, refer to our general watering guidelines, adjusting for these newly planted spuds.
With your potatoes now successfully planted, you’re ready to focus on nurturing your crop to ensure an abundant harvest.
Nurturing Your Crop: Ongoing Care for Abundant Potatoes
Once planted, your potatoes need consistent care to thrive. Let’s cover essential ongoing tasks such as proper watering, the crucial process of ‘hilling,’ ensuring adequate sunlight, and appropriate fertilization for a bountiful harvest.
Watering Potato Grow Bags: How Often and How Much (Preventing Drying Out)
Keeping potato grow bags from drying out requires vigilance, as they lose moisture more quickly than garden beds due to increased surface area and breathable fabric. Your key task is to check the soil daily; stick your finger about an inch deep.  If it’s dry, water thoroughly until it drains, ensuring the soil stays consistently moist but not soggy. A PlantMD horticultural expert emphasizes, “Consistent moisture is king for potatoes in grow bags. They dry out much faster than in-ground plants, so check the soil daily by feeling an inch deep. Aim for evenly moist, not soggy, and water thoroughly when the top inch is dry.” To combat dryness, apply mulch or consider DIY self-watering options.
Mastering ‘Hilling’ in Grow Bags: Why It’s Crucial and How-To
‘Hilling’ is the vital process of adding more soil or compost around your potato plants as they grow. This is crucial for two main reasons: it protects developing tubers from sunlight, preventing them from turning green and inedible, and it encourages more potatoes to form along the buried stems. To successfully hill potatoes in grow bags: 1. Wait until your plants are about 8-10 inches tall. 2. Gently add a few inches of your hilling mix around the stems, leaving the top few inches of leaves exposed. 3. Repeat this process every 2-3 weeks as the plants continue to grow, until the bag is nearly full.
Soil for Hilling: What to Use for Best Results
When hilling, the type of soil you add matters. The best soil for hilling potatoes in bags is a light, loose mixture, such as compost, good quality potting soil, or a blend of both. This allows tubers to expand easily. Avoid using heavy garden soil, as it can compact, leading to poor drainage, restricted tuber growth, and potentially introducing soil-borne diseases to your otherwise clean grow bag environment.
Sunlight Savvy: Ensuring Your Potatoes Get Enough Light
Potatoes are sun-lovers and require plenty of direct sunlight for robust plant growth and good tuber development. Aim to provide your potato plants with at least 6 to 8 hours of full sun each day. Position your grow bags in the sunniest available spot in your garden or patio to ensure they receive adequate light for a healthy and productive crop. This is key for maximizing your yield.
Fertilizing Potatoes in Bags: When and What to Use
Potatoes are heavy feeders, especially in grow bags where nutrients can leach more quickly. Begin fertilizing a few weeks after planting. Opt for a balanced liquid fertilizer or a slow-release granular type formulated for vegetables, carefully following package directions. Consistent feeding supports vigorous growth. For detailed guidance, consult these resources on guidelines on fertilizing potatoes.
With these ongoing care practices for watering, hilling, sunlight, and feeding well in hand, you’re now well-equipped to address any common growing challenges and prepare for harvesting your delicious potatoes.
Troubleshooting Common Issues & Harvesting Your Bounty
Even with the best care, you might encounter a few challenges. We’ll help you troubleshoot common issues and avoid beginner mistakes, then guide you through recognizing harvest readiness, the joy of harvesting, and properly storing your homegrown potatoes.
Troubleshooting: Common Problems and Beginner Mistakes in Bag Potato Growing
It’s perfectly normal to face a few challenges when growing potatoes in bags, especially when you’re starting out. Here are some common issues and beginner mistakes, along with solutions:
- Yellowing Leaves: Often signals watering issues or nutrient needs. Check soil moisture. Learn about diagnosing yellowing leaves.

- Pests (Aphids, Potato Beetles): Handpick or use insecticidal soap. You can safely remove aphids.
- Blight: Prevent with good airflow and dry foliage. Remove affected leaves quickly.
- Watering Issues: A frequent mistake. Aim for consistently moist, not soggy, soil.
- Insufficient Hilling: Exposes tubers. Hill regularly as plants grow.
- Poor Drainage/Wrong Bag Size: Ensure drainage holes and adequate bag size.

As PlantMD horticultural expert notes, “Many beginners face challenges like inconsistent watering or knowing when to hill – you’re not alone! The key is observation and consistency. Small adjustments based on your plants’ needs can make a huge difference in grow bag success.” These are common learning experiences; small adjustments can significantly boost your success.
When Are My Potatoes Ready? Signs to Look For
Knowing when to harvest depends on if you want tender new potatoes or larger storage spuds. For new potatoes, carefully dig a few small ones 2-3 weeks after plants flower, while foliage is green. For your main crop, which is ideal for storage, wait until the plant’s foliage yellows and dies back completely. This is usually 70-120 days post-planting, depending on the variety. Patience yields larger, mature tubers.
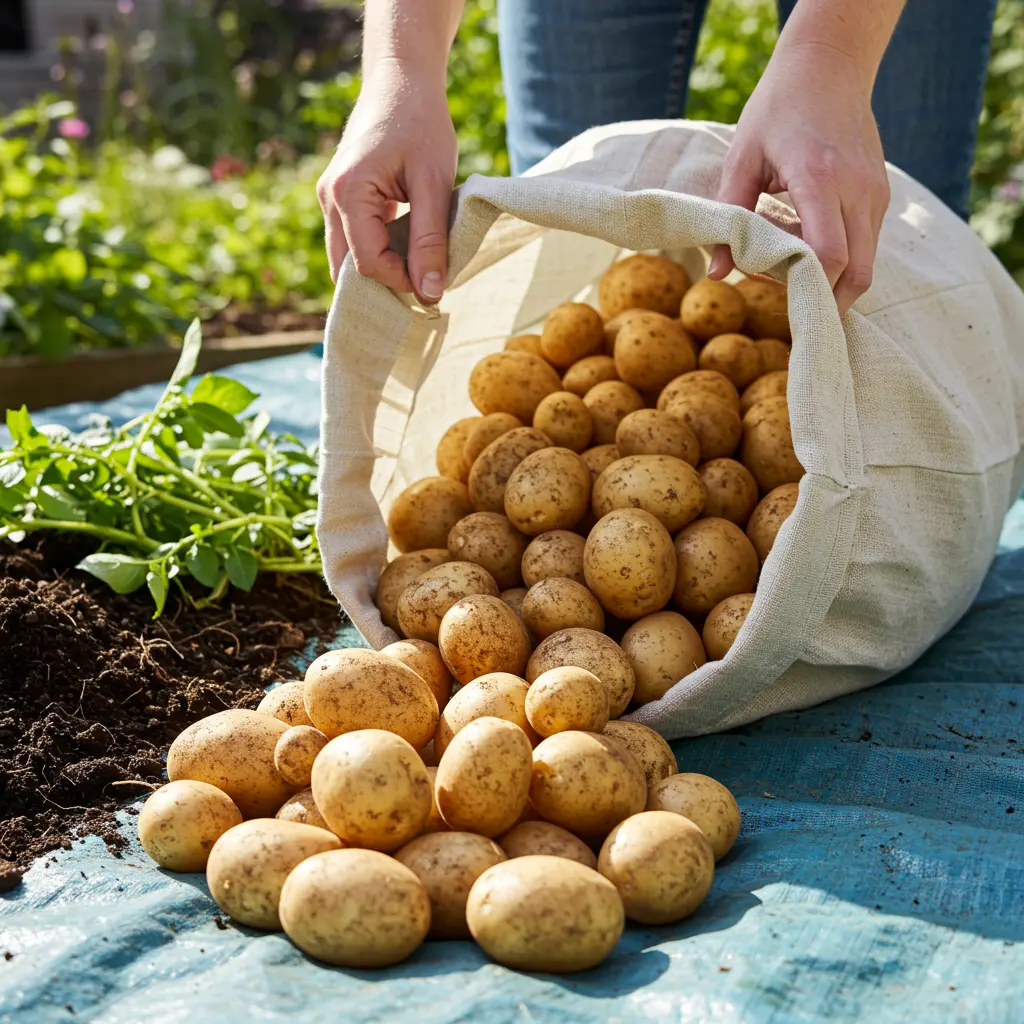
Harvest Day! The Easy Method of Emptying Your Grow Bag
Harvesting your bag-grown potatoes is incredibly rewarding and surprisingly easy! The simplest method, a community-proven tip, is to tip the entire grow bag over onto a tarp or large sheet of newspaper. Gently sift through the loosened soil with your hands to find all your hidden treasures. It’s like a treasure hunt—kids especially love this part! This technique ensures you gather every last potato with minimal effort.
Curing and Storing Your Homegrown Potatoes for Best Longevity
Proper curing and storage ensure your homegrown potatoes last. First, cure them: brush off soil, then air dry for a few hours out of direct sun. Next, place them in a cool (45-60°F), dark, humid area for 1-2 weeks to toughen skins. For long-term storage, a cool, dark, well-ventilated spot is ideal; avoid refrigerators, as they can affect the taste. This careful handling leads to the immense satisfaction of enjoying your harvest for months. For more details, consult this detailed guide on curing and storing potatoes.
With these troubleshooting skills and harvesting know-how, you’re now fully prepared to enjoy the rewarding journey of growing potatoes in bags, from planting to your plate.
Embarking on your potato bag gardening journey should now feel much clearer. This guide has navigated you through each essential step, from choosing the right supplies and preparing your seed potatoes, all the way to nurturing your plants and anticipating a successful harvest. We’ve specifically addressed common beginner uncertainties, such as ideal soil depth and effective watering techniques, by sharing community-tested advice. With this comprehensive understanding, you’re well-equipped to overcome challenges and confidently transform a few seed potatoes into a delicious, homegrown bounty, proving that productive gardening is indeed achievable even in limited spaces.
