Table of Contents
Dreaming of growing your own delicious, native pawpaw trees? Starting these unique fruits from seed can feel like a mystery, especially when you hear about tricky requirements like stratification. Many gardeners try planting pawpaw seeds only to be met with frustration and empty pots, often due to missing crucial steps or misunderstanding their specific needs.
However, don’t let that discourage you! While pawpaw seeds have their quirks, successfully germinating them and nurturing young seedlings is absolutely achievable with the right approach. This guide cuts through the confusion, providing a clear, step-by-step process honed through practical experience.
We’ll walk you through everything you need to know, from properly preparing your seeds and mastering the critical stratification phase to the exact planting depth, soil mix, and temperature conditions needed for successful germination. You’ll also learn how to care for those precious first sprouts and troubleshoot common issues. Get ready to unlock the secrets to growing pawpaws from seed and embark on this rewarding journey!
Getting Started with Pawpaw Seeds
Before diving into the planting process, let’s explore why growing pawpaws from seed is a rewarding endeavor and address a common question about what to expect from seed-grown trees. Starting pawpaws from seed is a journey that requires patience but offers unique benefits.
Why Grow Pawpaws From Seed?
There are several compelling reasons to consider growing pawpaw from seed. One major motivation is cost savings; seeds are significantly less expensive than purchasing established, grafted trees. It’s also deeply satisfying to nurture a plant from the very beginning, watching it progress from a tiny seed to a mature tree.
A frequent question among potential growers is: “Do pawpaws grow true to seed?” The direct answer is generally no. Pawpaws exhibit significant genetic variability when grown from seed. This means the fruit produced by a seed-grown tree may differ, sometimes considerably, from the characteristics (like size, flavor, or quality) of the parent tree it came from.
While this variability means you aren’t guaranteed fruit identical to the parent, it also presents an exciting opportunity, as growing pawpaw from seed allows for the potential discovery of unique or locally adapted varieties. It’s a bit like a genetic lottery, where you might find a hidden gem among your seedlings.
It’s important to set realistic expectations regarding the timeline. Undertaking Pawpaw planting from seed to fruit production is a long-term project, often taking 5 to 8 years or even longer before you see the first fruits. Patience is truly a virtue when undertaking this method of propagation, but the potential rewards and the satisfaction of the process make it worthwhile.
Now that we understand the potential and the patience required, let’s move on to the practical steps for planting pawpaw seeds.
Step-by-Step Guide: Planting Pawpaw Seeds
This section provides the core, step-by-step instructions for successfully germinating pawpaw seeds, covering everything from initial preparation to the crucial stratification process and planting techniques. By following these steps carefully, you’ll significantly increase your chances of growing these unique native trees from seed.
Step 1: Sourcing and Preparing Pawpaw Seeds
The first step in your pawpaw growing journey is obtaining viable seeds. You can find pawpaw seeds for sale from reputable suppliers who specialize in native plants or tree seeds, ensuring you get seeds from known sources. Alternatively, if you have access to fresh, ripe pawpaw fruits, you can collect the seeds directly yourself. It’s crucial to use fresh seeds whenever possible, as their viability decreases over time.
Once you have your seeds, immediate cleaning is essential. Thoroughly remove all fruit pulp surrounding the seed. Any remaining pulp can inhibit germination by promoting mold growth. After cleaning, the most critical step is to keep the seeds consistently moist. Pawpaw seeds are recalcitrant, meaning they are highly susceptible to drying out. If the seed embryo dries, it can be damaged or killed, preventing germination entirely. Never let cleaned pawpaw seeds dry out. If you aren’t starting the stratification process right away, place the cleaned, moist seeds in a sealed container, like a zip-top plastic bag, with a bit of damp paper towel or peat moss, and store them in the refrigerator.
Step 2: The Critical Step – Pawpaw Seed Stratification
Pawpaw seeds have a natural dormancy that must be broken before they will germinate. This requires a process called cold, moist stratification. Do pawpaw seeds need cold stratification? Yes, absolutely. This step is non-negotiable for successful pawpaw germination. Stratification mimics the natural conditions the seeds would experience over winter, signaling to the seed that it’s time to sprout in the spring.
To stratify your pawpaw seeds, mix the cleaned, moist seeds with a sterile medium that can hold moisture, such as damp peat moss, sphagnum moss, sand, or even moist paper towels. Place this mixture into a container. A labeled zip-top plastic bag or a small container with ventilation holes works well. The ideal temperature range for effective stratification is typically 32-40°F (0-4°C), making a standard refrigerator the perfect location.
How long do pawpaw seeds need to stratify? The generally recommended duration is between 70 to 100 days. Research, including university extension recommendations, suggests that this period is optimal for breaking dormancy in pawpaw seeds. While the seeds are stratifying, check on them periodically, perhaps monthly, to ensure the medium remains damp but not waterlogged. Also, watch for any signs of mold and remove affected seeds if necessary. This image shows a typical setup for stratification, with seeds nestled in a moist medium inside a labeled bag, ready for their cold period in the refrigerator.
Step 3: Planting Your Stratified Pawpaw Seeds
After the required stratification period is complete (usually sometime in late winter or early spring), your seeds are ready for planting. When planting pawpaw seeds, it’s highly recommended to use deep pots, such as those 6-8 inches deep or specialized tree pots. This is because pawpaws develop a long, sensitive taproot very quickly, and deep containers prevent it from becoming root-bound prematurely. Can you grow pawpaw from seeds inside? Yes, starting seeds indoors in pots is a common and effective practice, especially for providing the necessary warmth for germination.
What is the best soil mix for pawpaw seeds? An ideal soil mixture is one that is well-draining yet retains adequate moisture, typically rich in organic matter. A standard potting mix amended with compost or peat moss works well. This image illustrates the look and texture of a suitable potting mix – it should feel light, crumbly, and hold moisture without becoming dense or soggy.
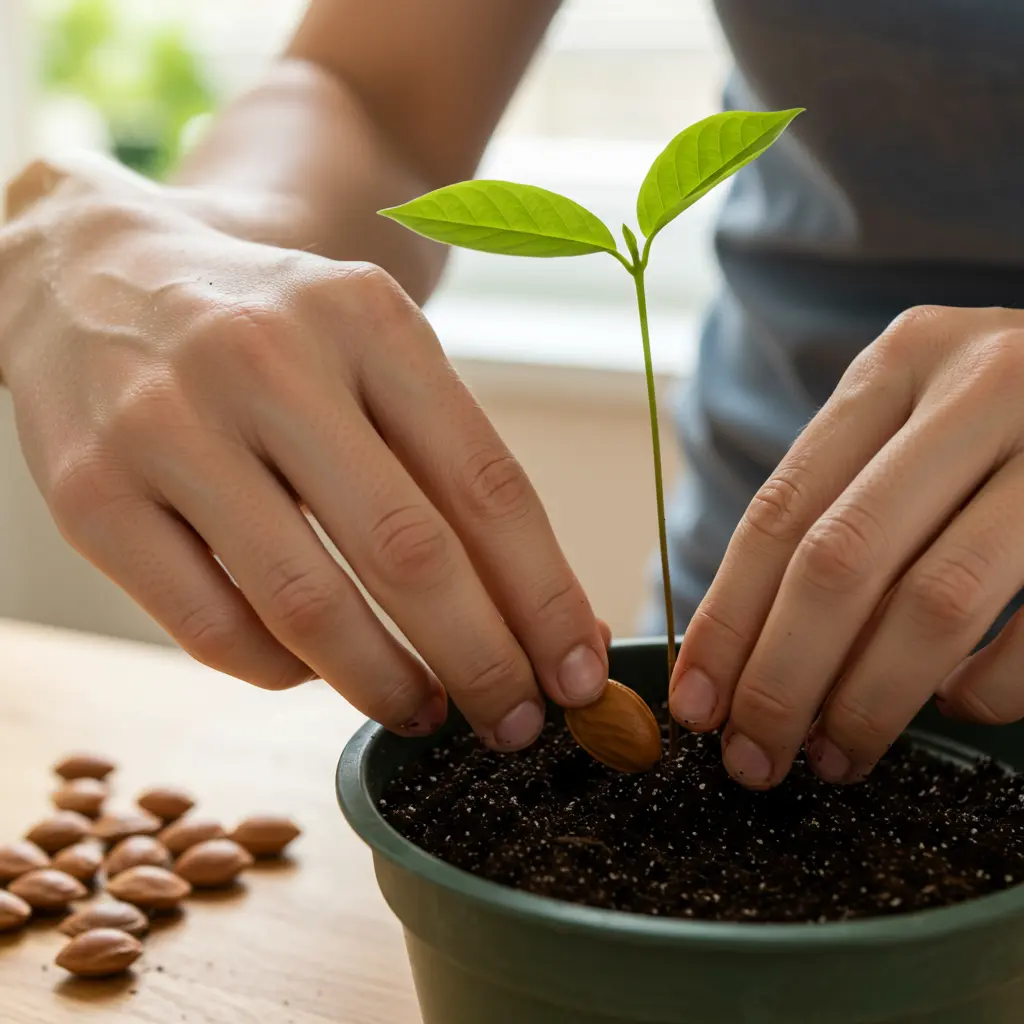
How deep should I plant pawpaw seeds? Plant the stratified seeds approximately 1 inch (2.5 cm) deep. Planting them horizontally is often recommended. This image demonstrates the correct planting depth and method, showing a seed placed in the pot and lightly covered with about an inch of soil. After planting, water the pots thoroughly. Maintain consistent moisture in the soil throughout the germination period, keeping it damp but never waterlogged. What temperature do pawpaw seeds need to germinate? Pawpaw seeds germinate best in warm soil conditions, ideally between 75-85°F (24-29°C). You can achieve this warmth by placing the pots on a heat mat or in a consistently warm indoor location. For a visual guide, watch this
. The video walks you through filling the pots with soil, placing the seeds at the correct depth, covering them, and the initial watering process.
Step 4: Caring for Germinating Seeds and Seedlings
Patience is key when waiting for pawpaw seeds to sprout. How long does it take for pawpaw seeds to sprout? Germination can be slow and sometimes erratic, potentially taking anywhere from several weeks to a few months, even under optimal conditions. Don’t be discouraged if you don’t see immediate activity.
The first sign of successful germination is the emergence of the initial shoot (the cotyledon) from the soil surface. This image shows a young, healthy pawpaw seedling, characterized by its initial leaves and upright stem. Once seedlings emerge, they require specific care. Young pawpaws prefer partial shade initially; intense direct sunlight can easily scorch their tender leaves. Maintain consistent soil moisture and continue to provide warmth. If you plan to move them outdoors later, gradually acclimate them to brighter conditions over several days to weeks.
When your seedlings have grown large enough, typically having developed several sets of true leaves, they will be ready for transplanting. Handle them with extreme care during this process to avoid damaging the delicate, long taproot. Providing clear guidance on nurturing these vulnerable young plants is crucial for their survival. Following these steps carefully sets the stage for successful germination and healthy seedlings.
Now that you’ve successfully navigated the planting process, learn how to troubleshoot common issues and find answers to frequently asked questions about pawpaw seeds.
Troubleshooting and Pawpaw Seed FAQs
Even with careful preparation, challenges can arise when germinating pawpaw seeds. Don’t be discouraged if every seed doesn’t sprout on the first try. This section addresses common problems you might encounter and answers frequently asked questions to help you troubleshoot your pawpaw planting journey and increase your success rate.
Common Germination Questions Answered
Successfully germinating pawpaw seeds requires specific conditions, and when those aren’t met, problems can occur. Here are some common issues and their potential solutions, presented in a question-and-answer format to help you quickly find the information you need. This section provides a dedicated resource for tackling common pawpaw germination failures.
Q: Why didn’t my pawpaw seeds sprout?
A: This is a common frustration, and several factors can contribute to pawpaw seeds not sprouting. The most frequent causes include:
- Inadequate Stratification: The seeds either weren’t stratified long enough (they need 70-100 days) or the cold temperature wasn’t consistently within the required range (ideally 32-40°F / 0-4°C). Without proper cold stratification, the embryo’s dormancy won’t be broken.
- Seeds Dried Out: Pawpaw seeds are highly sensitive to drying out at any stage – before stratification, during stratification, or after planting. If the seed coat dries completely, the embryo may die.
- Incorrect Planting Depth: Planting seeds too deep can prevent the seedling from reaching the surface. Pawpaw seeds should typically be planted about 1 inch deep.
- Soil Temperatures Too Low: While they need cold stratification, pawpaw seeds require warm soil to germinate after stratification, ideally between 75-85°F (24-29°C). If the soil is too cool, germination will be delayed or won’t happen.
- Fungal Issues or Rot: Excessive moisture combined with cool temperatures can lead to fungal growth or rot, killing the seed before it germinates.
- Non-Viable Seeds: Seeds may have been old, improperly stored before you received them, or simply not viable from the start.
Q: How long do pawpaw seeds need to stratify?
A: Pawpaw seeds require a period of cold stratification lasting approximately 70 to 100 days. This simulates the natural winter conditions they experience to break dormancy.
Q: Do pawpaw seeds need cold stratification?
A: Yes, absolutely. Cold stratification is a critical step and is essential for breaking the natural dormancy of pawpaw seeds, allowing them to germinate.
Q: What temperature do pawpaw seeds need to germinate after stratification?
A: After cold stratification, pawpaw seeds need warm soil temperatures to sprout. The ideal range for germination is typically between 75°F and 85°F (24-29°C).
Q: How deep should I plant pawpaw seeds?
A: Plant pawpaw seeds approximately 1 inch (2.5 cm) deep in your planting medium. This depth provides enough cover while allowing the seedling to emerge relatively easily.
Q: How long does it take for pawpaw seeds to sprout after planting?
A: Patience is key with pawpaw seeds! Even after proper stratification and planting in ideal warm soil, germination can be variable. It might take anywhere from several weeks to several months for a seedling to emerge.
Q: Do pawpaws grow true to seed?
A: No, pawpaws generally do not grow true to seed. Like many fruit trees, growing pawpaws from seed will result in genetic variation. The resulting tree may produce fruit different in size, flavor, or quality from the parent tree. If you want a specific cultivar, you’ll need to propagate it vegetatively (e.g., by grafting).
Troubleshooting Tips:
- If stratification was too short or inconsistent: You can try re-stratifying the seeds if they haven’t dried out completely since the first attempt.
- If seeds dried out: Unfortunately, if seeds dried completely at any point, they are likely not viable. Ensure consistent moisture (damp, not wet) during all stages.
- If soil was too cold: Move your planting containers to a warmer location. Consider using a heat mat specifically designed for seed starting to maintain the ideal 75-85°F soil temperature.
- If you suspect rot: Ensure your planting medium is well-draining and avoid overwatering. Fungicides can sometimes help, but prevention through proper moisture management is best.
- If seeds seem old or questionable: Source fresh seeds from a reputable supplier for the best chance of success.
Understanding these common issues and their solutions can significantly improve your success rate when starting pawpaws from seed.
You’ve now walked through the essential steps for successfully germinating pawpaw seeds, from understanding the critical need for cold stratification to providing the right conditions for sprouting and early growth. We’ve covered common challenges and how to address them, empowering you to navigate the process with confidence. Growing pawpaws from seed requires patience and attention to detail, but the reward of nurturing this unique native fruit tree from its very beginning is immense. With this practical, step-by-step guide, you have the knowledge to give your pawpaw seeds the best possible start.
Ready to tackle more unique growing projects? Subscribe for expert tips delivered straight to your inbox! #
