Table of Contents
If you’ve ever planted tiny carrot seeds, waited weeks, and seen little to no sign of life, you’re definitely not alone. Getting carrots to germinate successfully can be one of gardening’s most common frustrations. Keeping those minuscule seeds consistently moist without washing them away feels like a constant battle.
But achieving those straight, sweet roots doesn’t have to be a gamble. This guide goes beyond basic instructions, sharing practical, tested strategies to overcome germination failures. We’ll share community-proven hacks for moisture retention – including the popular ‘board trick’ – clear up confusing advice like whether you can really transplant carrots, and offer tips for success even in challenging climates.
Ready to troubleshoot your way to a thriving carrot patch? Let’s prepare the ground for success.
Why Carrot Seeds Fail & What They Really Need
Understand why carrot seeds often struggle to sprout and the essential conditions they need, addressing common frustrations and setting the stage for solutions.
It’s common to feel frustrated when carrot seeds fail to germinate, so know you’re not alone.  These tiny seeds are inherently sensitive, partly due to their small size which means limited energy reserves. They are also notoriously slow to sprout, often taking 14-21 days. This extended period leaves them vulnerable to various environmental challenges, making successful germination feel like a real hurdle for many beginner and even intermediate gardeners. Understanding this sensitivity is the first step to overcoming it.
Top Reasons for Germination Failure
So, why aren’t your carrot seeds sprouting? It usually comes down to a few common culprits, often related to their delicate nature. We hear the frustration; inconsistent moisture is often the primary issue – the seeds simply cannot dry out. Other key reasons include:
- Soil surface crusting over, preventing emergence.
- Soil temperatures being too hot or too cold.
- Planting the tiny seeds too deep.
- Using old, non-viable seeds.
- Trying to grow them in compacted, heavy, or rocky soil.
Carrots need loose, deep, and well-drained soil to thrive. This type of soil structure allows their long taproots to grow straight down without obstruction. The soil must be free from rocks, clumps, and debris, as these force roots to fork or become stunted. Aim for a soil depth of at least 12 inches of this loose material. Good drainage also prevents waterlogging, which the sensitive seeds and developing roots cannot tolerate.
Beyond soil structure, temperature and moisture are critical. Carrot seeds prefer cool soil temperatures for germination, ideally within a ‘Goldilocks zone’ of 50-65°F (10-18°C). Temperatures outside this range can significantly slow or halt sprouting. However, the number one factor, echoed constantly by experienced gardeners, is consistent moisture. The seedbed must remain evenly damp – never soggy, but critically, never allowed to dry out completely – from sowing until the seedlings are well-established. Mastering consistent watering practices is key.
Understanding these core needs sets the foundation for success, paving the way for preparing the perfect carrot patch.
Preparing the Perfect Carrot Patch: Soil is Key
Learn the essential steps for preparing your soil, a critical factor for preventing common carrot problems like poor germination and stunted roots. Getting the soil right from the start significantly increases your chances of a successful harvest.
Choosing the Right Spot: Sunlight Needs
Select a location that receives at least six hours of direct sunlight daily for optimal carrot development; full sun is preferable.  When choosing your spot, also pay close attention to drainage. Carrots perform poorly in soggy conditions, so ensure the area drains well to prevent root problems.
Achieving Ideal Soil Texture
Carrots require deep, loose, and stone-free soil to grow long, straight roots. Aim for a loose soil depth of at least 12 inches. Diligently remove any rocks, old roots, compacted clods, or other debris. Encountering obstructions is a common reason why carrots end up forked, split, or stunted. You can achieve the ideal loose texture using several methods:
- Tilling: Using a rototiller breaks up the topsoil effectively but can sometimes harm soil structure if overdone.
- Double Digging: A more labor-intensive manual method that loosens soil to a greater depth (often 18-24 inches).
- Using a Broadfork: This tool helps aerate and loosen soil deeply with less disturbance to the soil layers than tilling.
Properly loosened soil gives carrot roots the clear path they need to grow downwards.
Improving Fertility: Amending Your Soil
Enhance your soil’s fertility and structure by working in plenty of organic matter before planting. Well-rotted compost or aged manure are ideal choices. These amendments supply balanced nutrients and significantly improve soil structure, aeration, and water retention. For more specific adjustments, consider getting a soil test. Be mindful of nitrogen levels. Avoid high-nitrogen fertilizers, as too much nitrogen promotes leafy top growth at the expense of root development, sometimes causing hairy roots.
Raised Beds vs. In-Ground: Which is Better for Carrots?
Choosing between raised beds and in-ground planting depends on your existing soil conditions. Raised beds provide complete control over the soil medium, making them an excellent option if your garden has heavy clay, rocky soil, or poor drainage. You can fill them with the perfect loose mix. Planting directly in the ground works well if your native soil is naturally loose and deep, or if you’ve amended it thoroughly.
With your carrot patch prepared for perfect root growth, you’re now ready to tackle the delicate process of sowing those tiny seeds.
Sowing Carrot Seeds: Techniques for Tiny Seeds
Master the correct methods for sowing tiny carrot seeds, covering timing, depth, spacing, and helpful tools like pelleted seeds or seed tapes. Getting these steps right is crucial for overcoming common germination frustrations.
Optimal Planting Time and Depth
Plant carrots during cool seasons—spring or fall—when soil temperatures are consistently between 45°F and 85°F (7°C and 29°C). Because the seeds are tiny, they lack the energy reserves to push through deep soil. Sow them very shallowly, no more than 1/4 inch deep.  Cover the seeds lightly with fine soil or vermiculite to protect them without burying them too deeply. Proper timing and shallow depth give tiny seeds their best start.
Spacing Strategies for Healthy Roots
You can sow seeds in traditional rows or broadcast them more widely over the prepared bed. Either way, carrots need adequate space for their roots to fully develop without competition from neighbors. Aim for roughly 2 inches between plants after thinning. You’ll likely sow more thickly initially, so remember that thinning crowded seedlings later is essential for a good harvest and preventing stunted, misshapen roots.
Tips for Sowing Tiny Seeds
Handling tiny carrot seeds evenly can be tricky. Here are a few community-tested tips to make it easier:
- Mix seeds with fine sand or used coffee grounds to bulk them up for easier, more visible sprinkling.
- Consider using a handheld seed sower designed for small seeds for better control over distribution.
- After sowing, water very gently with a fine spray or mist setting to avoid washing the tiny seeds away or burying them too deeply.
Pelleted Seeds and Seed Tapes: Easier Sowing Options
For gardeners finding tiny seeds too fiddly, consider pelleted seeds or seed tapes. Pelleted seeds have a clay coating, making them larger and easier to handle and space accurately. Seed tapes contain seeds pre-spaced within strips of biodegradable tape that you simply lay down and cover. Both options simplify sowing but usually cost more. Pelleted seeds might also germinate slightly slower due to the coating needing to dissolve. These are helpful tools, not necessities, often suggested for easier planting.
With these sowing techniques mastered, you’re ready to focus on the crucial next stage: keeping those seeds consistently moist until they sprout.
The Germination Game: Community Hacks for Keeping Seeds Moist
Discover community-tested techniques, including the popular ‘board trick’, to overcome the biggest hurdle in carrot growing: maintaining consistent moisture for germination. It’s a common frustration, but these tips can make a huge difference.
Why Consistent Moisture is Non-Negotiable (and Difficult)
Carrot seeds need constant surface moisture from the moment you sow them until they sprout. We understand this can be frustratingly hard to achieve. Because the seeds are tiny and sown shallowly, the top layer of soil dries out very quickly from sun and wind.  This rapid evaporation makes maintaining soil moisture a challenge, highlighting why covering techniques are so helpful.
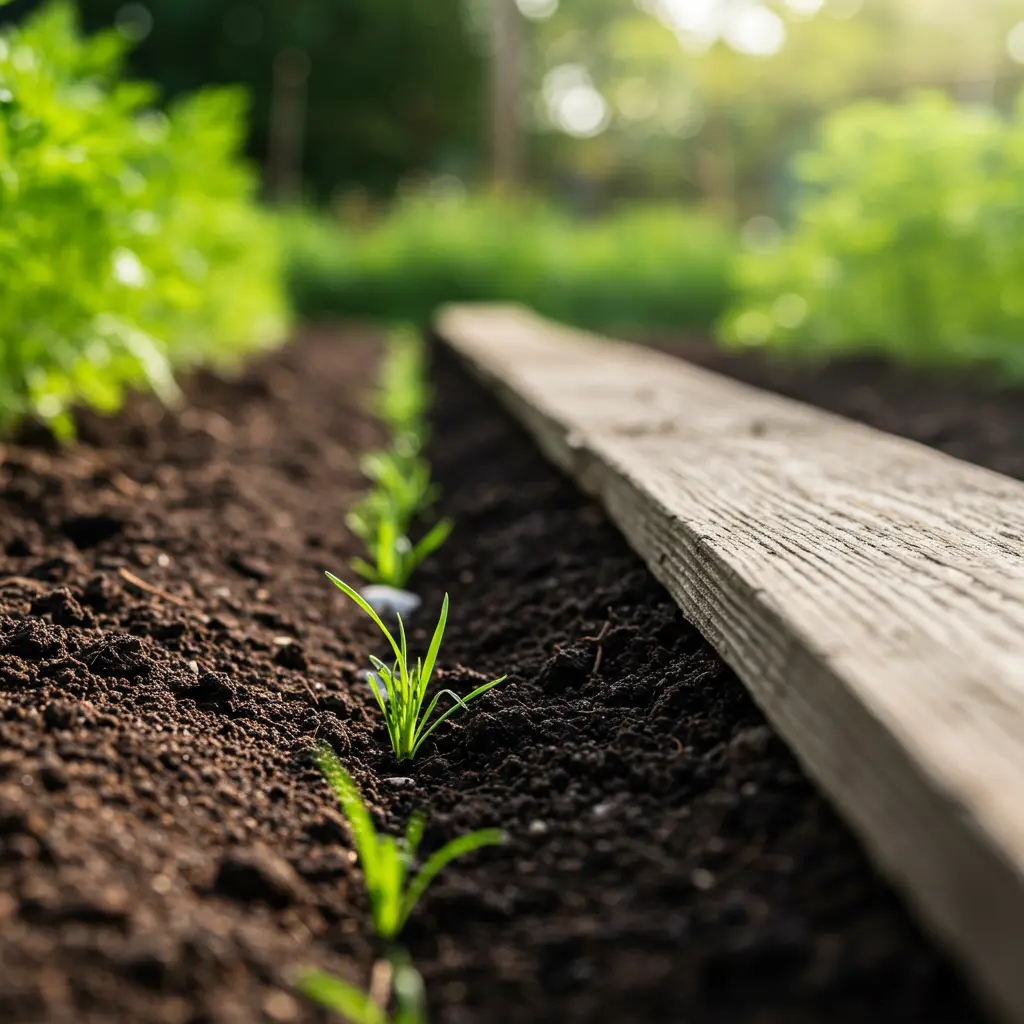
What is the ‘Board Trick’?
A favorite community hack is the “board trick.” This simply involves laying flat boards, pieces of plywood, or even sturdy cardboard directly over your sown carrot rows after watering. It works by significantly reducing surface evaporation, keeping the soil consistently damp where the seeds need it most. The cover also blocks light (which carrot seeds don’t need to germinate) and helps prevent the soil surface from forming a hard crust. As one PlantMD horticultural expert notes, “The board trick is a classic for a reason – it tackles the biggest carrot germination hurdle: keeping those tiny seeds consistently damp until they sprout.”
Using Covers Effectively
Using covers like boards or alternatives is straightforward. Follow these steps:
- Sow and Water: Plant your carrot seeds according to your chosen method and water the area thoroughly but gently.
- Place Covers: Immediately lay your boards, cardboard, burlap, or floating row cover flat over the seeded rows. If using plastic sheeting, ensure there’s some way for air to circulate to prevent overheating.
- Check Daily: Starting about a week after sowing, lift the covers daily to check for the first signs of germination.
- Remove Promptly: As soon as you see the first tiny seedlings emerge, remove the covers completely.
Should You Cover Carrot Seeds? (PAA Answer)
Q: Should I cover carrot seeds after planting?
A: Yes. While you first cover the seeds lightly with soil or compost, adding a temporary top cover—like a board, burlap, or row cover—after sowing and watering is highly recommended by experienced gardeners. This simple step is crucial because it maintains the consistent surface moisture that tiny carrot seeds need to germinate successfully, preventing the soil from drying out too quickly.
Best Watering Practices During Germination
Even with covers, paying attention to watering is key. Here are the best practices:
- Water the seedbed thoroughly before you place any covers down.
- Use gentle proper watering techniques, like a watering can with a fine rose or a hose on a mist setting, to avoid washing away the tiny seeds.
- Periodically (every day or two), lift a corner of the cover to check the soil moisture. If it feels dry, water gently again.
- Aim to keep the soil surface consistently damp, like a wrung-out sponge, but avoid making it waterlogged.
Temperature’s Role
Q: What temperature is too hot for carrot seed germination?
A: Carrots germinate best in cool soil, ideally between 50-65°F (10-18°C). While they can sprout in warmer conditions, soil temperatures consistently above 80-85°F (27-29°C) significantly reduce germination success and seedling vigor. Hot temperatures also dramatically increase surface evaporation, making the crucial task of keeping seeds moist even harder. Conversely, very cold soil drastically slows germination. Covering can help moderate soil temperature slightly.
Checking for Sprouts and Removing Covers
Start checking under your covers daily about 7 days after sowing. Remember that germination times vary with temperature and moisture, often taking anywhere from 1 to 3 weeks. Look for the first tiny green loops or the two small initial leaves (cotyledons) pushing through the soil. As soon as you spot these first emerging seedlings, remove the covers immediately. This allows the delicate sprouts crucial access to sunlight needed for growth.
With these community hacks for maintaining moisture mastered, you’re well on your way to successful germination and ready to tackle the next steps of thinning and caring for your young carrot plants.
Beyond Germination: Thinning, Transplanting & Next Steps
Once your carrots sprout, it’s a relief, but the work isn’t over! Learn essential next steps like thinning to give roots space, navigate the common debate around transplanting fragile seedlings, and troubleshoot any early growth issues that might pop up. Mastering these post-germination tasks sets the stage for a healthy harvest.
Thinning Carrots: Why It’s Crucial and How to Do It
Even with careful sowing, you’ll likely have carrot seedlings growing too close together. Thinning is essential because carrots need space for their roots to swell properly; overcrowding leads to small, tangled, or misshapen roots. Wait until seedlings are about 2 inches tall with their first true leaves. Instead of pulling, which can disturb the delicate roots of neighboring keepers, use small scissors to snip the unwanted seedlings off at the soil line.  Aim for a final spacing of roughly 2 inches between each remaining plant. This crucial step gives your chosen carrots the best chance to develop fully.
The Great Debate: Transplanting Carrots
Q: Can I start carrot seeds inside and transplant them?
A: This is a hot topic among gardeners! The standard advice is no, don’t transplant carrots. Their long, sensitive taproots are easily damaged during the process, often resulting in forked, stunted, or completely failed roots. However, many gardeners report success, especially when taking extreme care. If seeds are started individually in deep containers like root trainers or even toilet paper tubes, the entire soil plug can sometimes be moved with minimal disturbance. While direct sowing is strongly recommended for reliability, careful transplanting is occasionally possible, though always risky.
Tips for Successfully Transplanting Carrots (If You Dare!)
If you decide to try transplanting despite the risks, here are tips gleaned from gardeners who’ve had some success. Remember, even with perfect technique, failure rates are higher than direct sowing.
- Use Deep, Individual Cells: Start seeds in containers that allow the taproot to grow downwards without hitting bottom, like root trainers or tall paper pots.
- Transplant Small: Move seedlings to their final spot when they are still very young, usually with only their first set of true leaves.
- Handle with Extreme Care: Disturb the root ball as little as possible. Don’t touch or break the taproot. Slide the entire soil plug gently into the prepared hole.
- Water In Well: Settle the soil around the transplant immediately with gentle watering.
Troubleshooting Common Seedling Problems
Even after germination, young carrots can face challenges. Here are a few common issues:
- Damping Off: A fungal disease causing seedlings to rot at the soil line. Prevent it with good air circulation, avoiding overwatering, and using a sterile seed-starting mix.
- Legginess: Seedlings grow tall and spindly, often flopping over. This is usually caused by insufficient light; provide stronger light or move seedlings closer to the source.
- Early Pests: Tiny carrot rust fly larvae can tunnel into roots. Prevent infestations by using floating row covers as soon as seedlings emerge, especially during fly activity periods. Learn more about identifying and managing carrot rust fly.
Ongoing Care: Watering and Weeding Young Plants
Once your seedlings are thinned (or carefully transplanted), continue providing consistent care. Maintain consistent moisture in the soil. As the plants grow and roots deepen, you can water less frequently but more deeply to encourage downward root growth. Crucially, keep the area weed-free. Weeds aggressively compete with young, slow-growing carrots for essential water and nutrients, so diligent weeding is vital for a good harvest.
With your seedlings thinned and cared for, you’ve navigated the critical post-germination phase and are well on your way to growing healthy carrots.
Turning tiny carrot seeds into a successful harvest often hinges on overcoming that initial germination hurdle. This guide shared the step-by-step process, emphasizing crucial soil preparation and careful sowing techniques. We explored community-tested wisdom, particularly the game-changing hacks for maintaining consistent moisture—the key to unlocking germination. By exploring methods like the ‘board trick’ and clarifying debates around transplanting based on real gardener experiences, you’re no longer just following basic instructions. You now possess the practical knowledge and troubleshooting confidence to nurture those tricky seeds into the crunchy, sweet carrots you’ve been aiming for.
