Table of Contents
Ever eagerly planted cantaloupe seeds, dreaming of slicing into your own sweet summer fruit, only to be met with… nothing? It’s a frustratingly common experience for many gardeners, especially beginners facing less-than-ideal conditions like limited space or tricky light.
Successfully growing cantaloupe from seed is absolutely within reach, even if you’ve struggled before. This guide cuts through the confusion, showing you exactly how to plant cantaloupe seeds for success. We’ll reveal the critical, often-missed secret to germination—that specific, high soil temperature!—provide actionable troubleshooting for seeds that won’t sprout based on real-world community insights, and give you tailored tips for growing delicious cantaloupes even in containers or on a balcony.
Ready to leave germination woes behind and start your cantaloupe journey? Let’s first look at the absolute essentials your seeds need to thrive.
Understanding Cantaloupe’s Core Needs: Sun, Soil, and That Crucial Temperature
Before planting, understand the non-negotiables for cantaloupe success. Getting these foundational requirements right, especially soil temperature, is key to avoiding common beginner frustrations.
Why ‘Full Sun’ is Non-Negotiable for Cantaloupe
For thriving cantaloupe, ‘full sun’ means your plants need at least six hours of direct, unblocked sunlight each day.  This isn’t just a suggestion; it’s crucial. Sunlight fuels the plant’s energy through photosynthesis, essential for vigorous growth and, importantly, for developing sweet, flavorful fruits. More sun directly translates to more sugars in your cantaloupes.
Preparing the Perfect Soil Bed or Potting Mix
Cantaloupes thrive in soil that is:
- Well-draining: Prevents waterlogged roots and potential rot.
- Rich in organic matter: Compost provides essential nutrients for healthy growth.
- Slightly acidic: Aim for a pH between 6.0 and 6.8. Soil pH influences how easily plants access nutrients. ideal soil pH for cantaloupes
You can amend garden soil with compost or choose a quality potting mix for containers.
The Golden Rule: Achieving 80°F Soil Temperature
The golden rule for cantaloupe seed germination is an 80°F (27°C) soil temperature. This warmth is non-negotiable, activating enzymes essential for sprouting. So, what temperature do cantaloupe seeds need to germinate? A firm 80°F. As PlantMD horticultural expert emphasizes, “Many gardeners overlook soil temperature, but for cantaloupes, hitting that 80°F mark is the secret handshake for reliable germination. It ensures the seeds’ internal engines fire up correctly for a strong start.” Confirm this with a soil thermometer ;
using black plastic to warm the soil or simply having patience for warm weather can also help.
When is the Right Time to Plant Cantaloupe Seeds?
So, when is the ideal time to plant cantaloupe seeds? Timing directly depends on achieving that crucial 80°F soil temperature. This is typically after your ‘last frost date’—the average final day frost is expected in your area. check your local last frost date Ensure the soil is consistently warm before planting. Understanding these foundational conditions is key before moving to the actual planting steps.
With a solid understanding of cantaloupe’s essential needs for sun, soil, and crucial soil temperatures, you’re now equipped to confidently tackle the step-by-step process of planting your seeds.
Step-by-Step: Planting Your Cantaloupe Seeds
Now that you know the ideal conditions, let’s get planting! Follow these simple steps for starting seeds indoors or sowing directly outdoors.
Choosing the Right Cantaloupe Seeds (Especially for Containers)
Begin by selecting your seeds. Always check the seed packet’s “packed for” date  to ensure good viability, as older seeds may not sprout well. If you’re growing in containers, seek out compact or bush cantaloupe varieties specifically suited for pots. These require less space and are generally easier to manage than vigorous vining types.
Method 1: Starting Seeds Indoors (Recommended)
Starting cantaloupe seeds indoors, typically 2-4 weeks before your last expected frost date, gives you a head start. This method provides a controlled environment, makes maintaining the crucial 80°F (27°C) soil temperature easier, and can lead to an earlier harvest. starting seeds indoors Here’s how to do it:
- Fill biodegradable peat pots with seed-starting mix. Using peat pots helps minimize root disturbance (transplant shock) when you move them outdoors later.
- Sow 2-3 seeds per pot, planting them about 1/2 inch deep.
- Keep the soil consistently moist but not waterlogged. Place the pots in a warm spot; using a cantaloupe heat mat is highly effective for achieving the necessary 80°F (27°C) soil temperature critical for germination.
- Once seedlings emerge, provide strong light (grow lights or a very sunny window).
Method 2: Direct Sowing Outdoors
You can direct sow cantaloupe seeds, but only attempt this once all danger of frost has passed and your soil temperature consistently reaches at least 70-80°F (21-27°C). This method can be riskier, especially in cooler climates or if spring weather is unpredictable. Follow these steps:
- Prepare your planting area by creating small mounds or hills spaced 3-5 feet apart. Mounds warm up faster in the sun and provide good drainage.
- Sow 3-5 seeds per hill, pushing them about 1 inch deep into the soil.
- Water gently and keep the soil consistently moist until germination occurs.
Remember, achieving and maintaining that warm 80°F (27°C) soil temperature is absolutely key for success when direct sowing.
Planting Depth and Spacing
Correct planting depth and spacing are vital for healthy cantaloupe growth, whether you’re starting seeds indoors or direct sowing.
- Depth: Plant seeds about 1/2 inch deep if starting indoors in pots, or about 1 inch deep if direct sowing outdoors in mounds.
- Spacing: Space mounds or hills 3-5 feet apart. Once seedlings are established (or when transplanting), thin them to the strongest 1 or 2 plants per spot, ensuring individual plants are about 18-24 inches apart.
Proper spacing might seem excessive initially, but it’s crucial. It ensures good air circulation around the developing vines (reducing disease risk), minimizes competition for sunlight, water, and nutrients, and ultimately leads to healthier plants and better fruit production.
Now that your seeds are planted, the next step is nurturing those tiny sprouts into healthy plants.
Caring for Your Cantaloupe Seedlings
Your seeds have sprouted! Now comes the crucial stage of nurturing young seedlings into strong plants. Consistent care is key to their success, helping them thrive and prepare for eventual transplanting or continued growth.
Watering Your Cantaloupe Seedlings Correctly
Watering young cantaloupe seedlings correctly is vital. Keep the soil consistently moist—like a wrung-out sponge—but avoid waterlogging, which can cause root rot. Water gently at the plant base  to avoid disturbing roots and keep leaves dry to prevent diseases. Aim for 1-2 inches of water weekly, including rain. Following good general watering practices helps.
Ensuring Enough Light for Strong Seedling Growth
How much sun do cantaloupe seedlings really need? Immediately after germination, they crave lots of light to prevent becoming weak and ‘leggy’. Provide at least 6 hours of direct sunlight outdoors, or use strong indoor grow lights for 12-16 hours daily. A ‘strong’ grow light is typically full-spectrum and provides adequate intensity for young plants. Meeting these cantaloupe seedlings light requirements is crucial for robust growth.
Why and How to Thin Your Seedlings
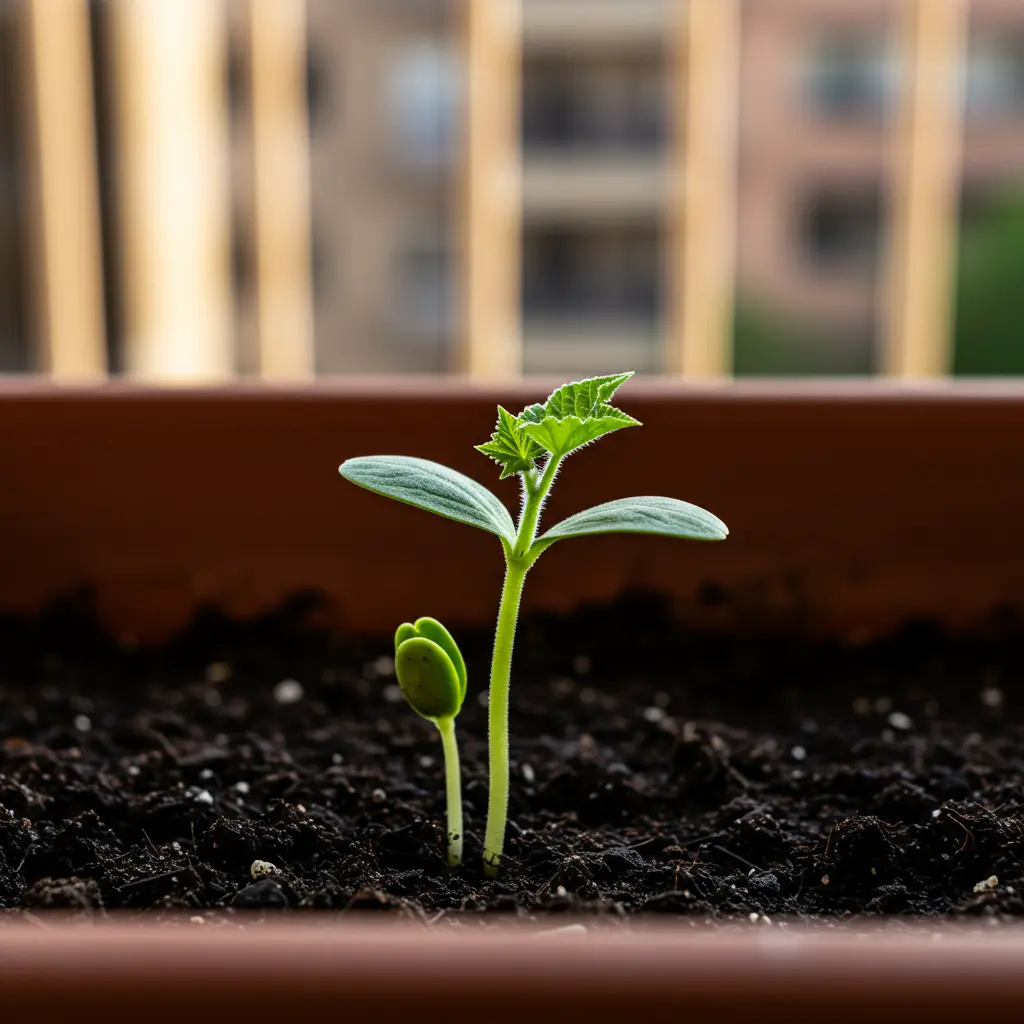
Thinning cantaloupe seedlings prevents overcrowding and competition for resources. Once seedlings develop their ‘true leaves’—the second set that resemble miniature cantaloupe leaves—select the strongest one or two per pot or hill. Carefully snip the weaker ones at soil level rather than pulling, as pulling can disturb the roots of the remaining plants.
Hardening Off Indoor-Started Seedlings Before Transplanting
If you started your seeds indoors, hardening off the cantaloupe seedlings is essential to prevent transplant shock. Gradually acclimate them to outdoor conditions—sun, wind, and temperature fluctuations—over 7-10 days before transplanting them into their final growing spot. This crucial step toughens plants by slowly exposing them to the elements. Careful seedling care is key, but sometimes issues arise.
Mastering these seedling care steps paves the way for healthy cantaloupe growth. Now, let’s address what to do if you encounter common problems like seeds not sprouting or other seedling issues.
Troubleshooting: Why Aren’t My Cantaloupe Seeds Sprouting (and Other Issues)?
Frustrated by seeds that won’t sprout or weak seedlings? You’re not alone. Let’s diagnose common problems and find solutions, drawing on real gardener experiences.
Problem 1: Seeds Not Sprouting? Check Soil Temperature First!
It’s incredibly frustrating when your cantaloupe seeds are not sprouting! The number one reason is usually soil temperature; the ideal cantaloupe seed germination temperature needs to hit at least 80°F (27°C). As PlantMD horticultural expert advises, “If your cantaloupe seeds are playing hide-and-seek, nine times out of ten, the soil is too cold. Before you blame the seeds, grab a soil thermometer – that 80°F sweet spot is non-negotiable for these heat-lovers.” Use a soil thermometer  to confirm. Solutions include waiting, using black plastic, or starting indoors on a heat mat.
If temperature isn’t the issue for cantaloupe seeds not germinating, consider these other factors:
- Inconsistent Moisture: Too dry, seeds won’t hydrate; too wet, they can rot.
- Old Seeds: Viability decreases over time. Always check the seed packet date.
- Planting Depth: Sowing seeds too deep can prevent emergence.
Consistent moisture is key for seeds to swell and sprout, but soggy conditions invite disease.
Problem 2: Help! My Seedlings Look Weak and Leggy
Are your cantaloupe seedlings looking weak and leggy? This “stretching,” called etiolation, happens when they don’t get enough strong cantaloupe seedlings light. Leggy cantaloupe seedlings are weaker and may not thrive. To answer “How much sun do cantaloupe seedlings really need?”: they need a lot! Move them to a sunnier spot or provide stronger grow lights, positioned closer. This encourages sturdier growth.
Problem 3: Fixing Common Watering Mistakes
Watering issues are common cantaloupe seedling problems. Here’s how to diagnose and fix them:
- Underwatering: Wilting, dry soil.
- Overwatering: Yellowing leaves, mushy stems, potential root rot.
Always check soil moisture an inch deep with the “finger test” before watering. Ensure your pots have good drainage to prevent waterlogging. Learn more about proper watering techniques.
Fellow gardeners offer these cantaloupe growing tips, especially helpful in challenging conditions:
- Use heat mats for consistent germination warmth.
- Carefully start seeds near a heater (monitor closely to prevent overheating).
- Try pre-sprouting seeds in a damp paper towel before planting.
These community experiences and proven techniques can significantly boost your success, particularly if you’re facing less-than-ideal growing situations.
With these common cantaloupe growing problems diagnosed and solutions offered, you’re now better prepared to tackle them, which is especially useful as we next explore growing cantaloupe in containers or on balconies.
Growing Cantaloupe in Containers or on Balconies
Limited space doesn’t mean you can’t grow cantaloupe! With the right approach, container gardening on patios or balconies is achievable. Success hinges on choosing suitable varieties, providing adequate container size, and managing sun exposure and support.
Best Cantaloupe Varieties for Pots and Small Spaces
Don’t let a small space deter you! For successful container growing, selecting compact or bush cantaloupe varieties is key. These types are more manageable and won’t sprawl excessively.  Always check seed packet descriptions for terms like ‘container friendly’ or ‘bush habit’. Good small cantaloupe varieties include:
- ‘Honey Bun’
- ‘Sleeping Beauty’ recommended compact cantaloupe varieties
Choosing the Right Container Size (Bigger is Better!)
Yes, you can grow cantaloupe in pots on a balcony with the right cantaloupe container size! Bigger pots aid root growth and moisture retention. Use at least 5 gallons per plant; 10-15 gallons is even better for planting in large pots. PlantMD horticultural expert advises, “Don’t skimp on pot size for cantaloupes! A spacious container, at least 5 gallons but ideally 10-15, gives their roots room to roam and helps prevent rapid drying, which is key for happy container-grown melons.” Excellent drainage is critical, while container material matters less than overall size.
Potting Mix and Watering Tips for Container Cantaloupe
Use a high-quality potting mix, not garden soil, for your container cantaloupes; it offers better drainage, aeration, and is lighter. Containers dry out faster than garden beds, so check moisture daily. When watering cantaloupe in containers, water thoroughly once the top inch of soil feels dry. In hot weather, daily watering might be necessary. consider self-watering pots
Strategies for Getting Enough Sun on a Balcony or Patio
Securing enough sun for cantaloupes on a balcony or patio can be tricky, but it’s crucial for success when growing in pots. Aim for at least six hours of direct sun daily. To maximize light:
- Place pots in your sunniest available spot.
- Consider carefully using reflective surfaces nearby.
- Move pots to follow the sun, if feasible.
Trellising Cantaloupe in Containers
Trellising cantaloupe in pots is essential for vining types to save space, improve air circulation, and keep fruit off the soil. Use stakes, cages, or small trellises. Support developing melons with slings made from old pantyhose or mesh bags, tied to the trellis.
With these tips for growing cantaloupe in containers, you’re well-equipped for success; now, let’s learn how to tell when your cantaloupe is ready to harvest.
Quick Guide: Knowing When Your Cantaloupe is Ready to Harvest
The moment you’ve been waiting for! Here’s how to tell when your cantaloupe is perfectly ripe and ready to pick.
Harvesting your homegrown cantaloupe is a rewarding moment! Your senses are key to determining ripeness. Look for these signs:
- Skin changes from green to yellow, tan, or beige.

- Netting becomes more pronounced and stands out.
- The blossom end (opposite the stem) softens slightly to gentle pressure.
- A sweet, musky aroma develops, especially near the stem.

The ‘Slip Test’: How to Easily Harvest at Peak Flavor
The “cantaloupe slip test” is your golden ticket to harvesting at peak flavor! Gently push the stem where it joins the melon. A ripe cantaloupe will detach, or “slip,” easily. If it resists or needs a tug, it’s not quite ready.
Successful cantaloupe pollination is crucial for fruit! Flowers need bees or other pollinators to transfer pollen, allowing melons to form. If you’re a balcony grower with few natural visitors, you might see flowers but no fruit; consider hand-pollination. learn how to hand-pollinate
With these tips, you’re all set to confidently pick your homegrown cantaloupes at their absolute best and enjoy the sweet taste of success!
Embarking on your cantaloupe growing journey armed with the right knowledge truly makes all the difference. This guide has illuminated the path from seed to sweet fruit, emphasizing critical factors like achieving that 80°F soil temperature and ensuring ample light—common stumbling blocks for many. By understanding these core needs, mastering the planting steps, and learning how to troubleshoot sprouting issues or adapt for container gardening, you’re no longer just hoping for success; you’re equipped for it. You now have the practical steps and insights to confidently cultivate your own delicious cantaloupes. We’d love to hear about your experiences – what are your go-to tricks for growing cantaloupe, especially in less-than-ideal spaces?
