Table of Contents
Dreaming of growing your own delicious, native pawpaws? You’re not alone! These unique North American fruits are gaining popularity, and starting them from seed is a rewarding way to add them to your garden or landscape. However, getting those precious pawpaw seeds to sprout can feel like a mystery, especially when you hear terms like “stratification.” It’s true that pawpaw seeds have specific requirements to break dormancy and germinate successfully.
But don’t let that intimidate you! It’s a straightforward process once you understand the simple steps involved. This beginner-friendly guide is designed to demystify pawpaw seed planting, walking you through everything you need to know from preparing your seeds correctly (yes, including that crucial cold stratification step!) to getting them in the ground and caring for them as they sprout.
We’ll provide clear, easy-to-follow instructions, practical tips, and even cover what to do if your seeds seem slow to germinate. If you’re ready to embark on the journey of growing pawpaws from seed, you’ve come to the right place. Let’s get started!
Getting Started with Pawpaw Seeds
Before diving into the planting process, let’s cover why growing pawpaws from seed is worthwhile and how to find the best seeds for success. This initial step sets the stage for nurturing your own unique native fruit trees.
Why Grow Pawpaws from Seed?
Growing pawpaws (Asimina triloba) from seed offers a uniquely rewarding experience, especially for those new to gardening or looking to expand their skills. Pawpaws are the largest native fruit in North America, boasting a delicious, tropical-like flavor that’s hard to find elsewhere. Starting these fascinating trees from scratch provides immense satisfaction. While the process involves specific steps like stratification, think of it as an achievable experiment that connects you deeply with nature’s cycles. Growing pawpaw trees from seed also contributes to genetic diversity, as each seed can produce a tree with slightly different characteristics than its parent.
Sourcing Viable Pawpaw Seeds
Success in growing pawpaws begins with selecting high-quality, viable seeds. It’s crucial to start with fresh seeds, as they lose viability over time, especially if allowed to dry out. You can source good quality pawpaw seed from reputable native plant nurseries, which often sell seeds collected from known, healthy trees. Seed exchanges or native plant societies can also be valuable resources. Foraging ripe pawpaw fruit in the wild (ensure you have permission!) is another way to obtain seeds, though the resulting trees will have more variable traits.
When assessing seed viability, look for seeds that appear plump and firm, without obvious signs of damage, mold, or being shriveled.  Pawpaw seeds are typically brown, kidney-shaped, and relatively large, often around an inch long. If you collect or receive seeds but aren’t ready to stratify them immediately (the next crucial step), proper pawpaw seed storage is vital. Keep them moist and cool – storing them in a sealed plastic bag with a little damp peat moss or paper towel in the refrigerator is a common and effective method.
Now that you know why growing from seed is exciting and where to get your seeds, let’s understand the critical process of stratification.
Understanding Pawpaw Seed Stratification
One of the most crucial steps for pawpaw seed success is understanding and performing stratification. Let’s break down why it’s necessary. This process might sound technical, but grasping the ‘why’ makes the ‘how’ much simpler and less intimidating for beginners.
Why Stratification is Necessary
So, do pawpaw seeds need cold stratification? Yes, absolutely. This isn’t just a suggestion; it’s a requirement for successful germination. Pawpaw seeds have a natural mechanism called dormancy that prevents them from sprouting prematurely, like in the fall right after they drop from the tree. In nature, they spend the winter on the ground, experiencing a period of cold, moist conditions. This cold, moist period signals to the seed that winter has passed and it’s safe to sprout in the spring.
Cold, moist stratification simply mimics this natural winter process indoors or in a controlled environment. It involves keeping the seeds consistently cool and damp for a specific duration. This essential step helps break the seed’s dormancy, preparing it to germinate when conditions are right. Understanding this natural cycle helps demystify the process of pawpaw seed stratification; you’re just giving the seed the “winter” it expects. seed dormancy requirements
Now that you understand why stratification is so vital for pawpaw seeds, let’s move on to the practical steps of how to actually do it.
How to Stratify and Plant Pawpaw Seeds: Step-by-Step
Now for the practical part! Follow these steps carefully to stratify and plant your pawpaw seeds for the best chance of germination. This section will walk you through the essential techniques, from preparing the seeds for their cold nap to getting them into soil and ready to sprout.
Step-by-Step: Stratifying Your Pawpaw Seeds
Stratification is a crucial step for pawpaw seeds, mimicking the natural winter conditions they need to break dormancy. Here’s how beginners can approach this step-by-step:
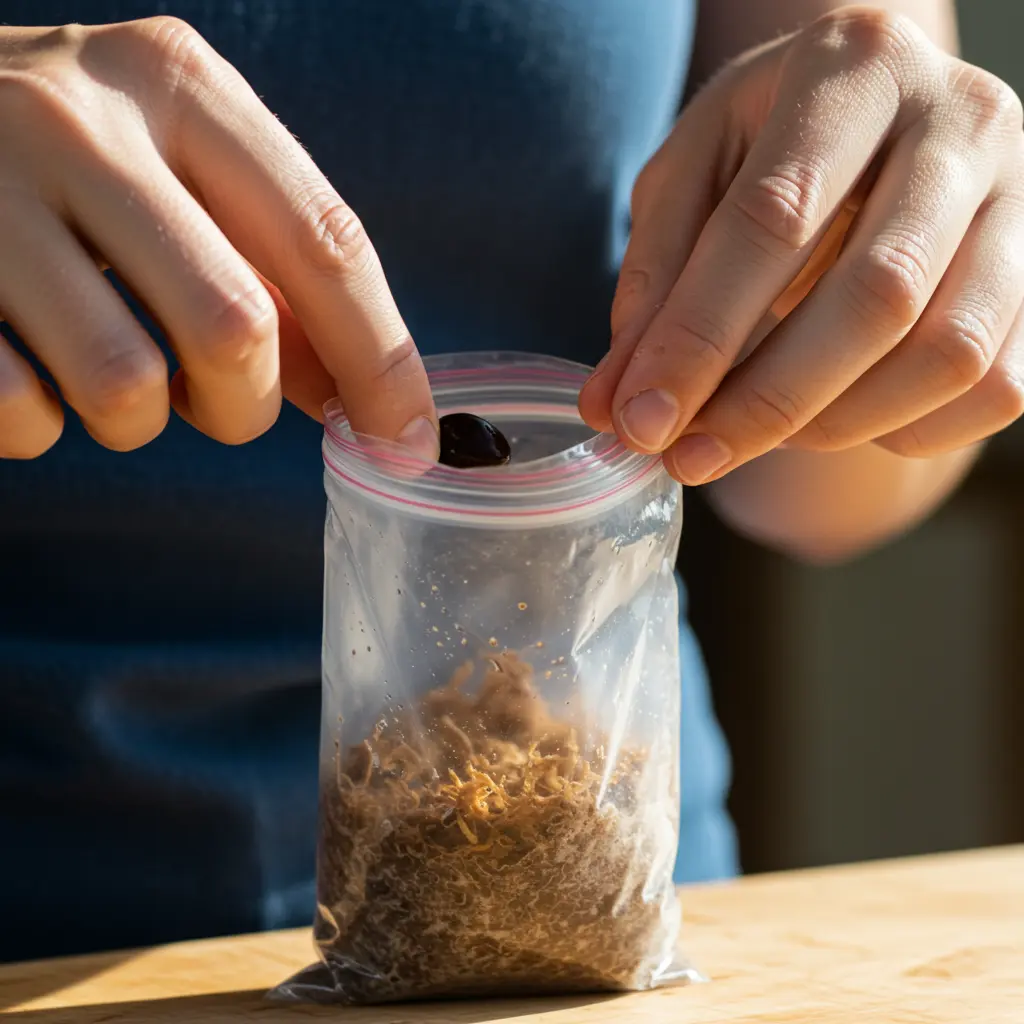
- Clean the Seeds: Gently clean any remaining pulp or fruit residue from the pawpaw seeds. You can do this by lightly scrubbing them under running water. Ensure they are clean to prevent mold during storage.
- Prepare the Medium: Choose a suitable stratification medium. Options include moist paper towels, sphagnum moss, or a mix of sand and peat. The key is to make the medium damp, not soaking wet. It should feel like a wrung-out sponge. Excess moisture can lead to rot.
- Bag the Seeds: Place the cleaned seeds within the prepared damp medium inside a container. A zip-top plastic bag or a small plastic tub with a lid works well. Ensure there’s enough medium surrounding the seeds to keep them consistently moist.

- Provide Cold Temperatures: Store the container in a cold environment. The ideal temperature range is typically between 32°F and 40°F (0°C to 4°C). The crisper drawer of your refrigerator is often the perfect spot.
- Wait Patiently: Pawpaw seeds require a lengthy cold stratification period. The typical duration is around 70 to 100 days. This answers the question, how long to stratify pawpaw seeds. Consistent cold and moisture for this timeframe are key.
- Monitor Periodically: Check on your seeds every few weeks during stratification. Look for any signs of mold and ensure the medium hasn’t dried out. If it seems dry, add a tiny bit of water (again, aiming for damp, not wet).

For a visual walkthrough of this process, check out this helpful demonstration:
. The video shows the cleaning of seeds, preparing the moist medium, placing seeds in a bag, and storing them in the refrigerator.
Planting Your Stratified Pawpaw Seeds
Once your pawpaw seeds have completed their stratification period, they are ready to be planted.
- Select Containers: Choose appropriate planting containers. Due to the pawpaw’s tendency to quickly develop a deep taproot, deep pots or tree tubes are highly recommended over standard shallow pots. This minimizes root disturbance later.
- Choose Soil Mix: Use a well-draining potting mix that also retains some moisture. A good quality general potting mix or a mix specifically for trees/shrubs often works well and can be considered the best soil for pawpaw seeds for container growing.
- Determine Planting Depth: How deep do you plant pawpaw seeds? Plant the stratified seeds about 1 inch (2.5 cm) deep in the soil mix.
- Planting Timing: The ideal time to plant pawpaw seeds after stratification is typically in the spring, once the danger of hard frost has passed. This answers “What month should you plant pawpaw seeds?” – generally late spring, aligning with outdoor temperatures warming up.
- Initial Watering: After planting, water the soil gently but thoroughly until moisture drains from the bottom of the pot.
- Ensure Warmth for Germination: Pawpaw germination temperature is crucial. Seeds germinate best in warm soil, ideally between 70°F and 85°F (21°C to 29°C). A warm indoor spot or a heated propagate mat can help achieve this.
Can you plant pawpaw seeds directly in the ground? While possible, it’s generally not recommended for beginners. Direct sowing exposes the seeds to inconsistent moisture, temperature fluctuations, and potential pests. Starting them in pots gives you more control over the critical germination phase.
Here’s a concise summary of how to plant pawpaw seeds:
- Use deep pots.
- Fill with well-draining, moisture-retentive soil.
- Plant seeds about 1 inch deep.
- Water well.
- Keep soil warm (70-85°F) for germination.
Once your seeds have successfully germinated, the next step is caring for your young pawpaw seedlings and navigating potential challenges.
After Planting: Care and Troubleshooting
Once your seeds are planted, the journey continues with proper care during germination and knowing how to troubleshoot potential issues. Successfully getting your pawpaw seeds to sprout requires patience and attention to detail in the weeks and months following planting.
Post-Planting Care and Germination
After you’ve carefully planted your stratified pawpaw seeds, consistent care is crucial for successful germination. Maintain steady moisture levels in the potting mix – it should feel like a wrung-out sponge, never waterlogged or completely dry. Consistent warmth is also key. While stratification requires cold, germination needs warmth, ideally in the range of 70-85°F (21-29°C). Placing pots on a heat mat can help achieve the optimal pawpaw germination temperature.
So, how long does it take for pawpaw seeds to germinate? Be prepared for a test of patience! Pawpaw seeds are notoriously slow germinators. While some might sprout in a couple of months, it’s not uncommon for them to take 6 to 12 months, or even longer, to emerge. Don’t give up too soon! Maintaining these consistent conditions for moisture, warmth, and providing indirect light will support the process of growing pawpaw trees from seed. Proper watering techniques are vital during this long germination period; learn more about consistent moisture in our guide on proper watering techniques.
Troubleshooting Common Germination Problems
It can be disheartening to wait months and see no sign of life. If you’re asking, “Why are my pawpaw seeds not germinating?”, there are several common culprits to investigate. The most frequent reason is insufficient stratification – if the cold period wasn’t long enough or cold enough, the seed’s dormancy might not have been broken. Seed viability issues can also occur if seeds weren’t fresh or stored correctly before stratification; ensuring good pawpaw seed viability from the start is important.
Incorrect moisture levels are another major factor. Too much water can lead to rot, while too little can prevent the seed from swelling and sprouting. Planting depth matters too; if they are buried too deep, they won’t have the energy to push through the soil. Temperature fluctuations after planting can also hinder germination; consistent warmth is needed. If you notice issues like mold on the surface or simply a lack of sprouting after many months, it could indicate one of these problems.  This image shows examples of common issues, such as mold on the potting mix surface or seeds that haven’t sprouted after the expected time. For beginners, while these issues are common, they are often solvable by re-evaluating your stratification process, checking your watering, ensuring adequate warmth, and confirming the seeds were viable initially.
Knowing how to care for your pawpaw seeds after planting and how to troubleshoot issues will increase your chances of success, leading us to answer some frequently asked questions.
Frequently Asked Questions (FAQ)
Here are answers to some of the most common questions beginners have about planting pawpaw seeds. Getting these details right is crucial for successful germination.
Common Pawpaw Seed Questions
Many new pawpaw growers have similar questions when starting with seeds. Understanding the basics of pawpaw seed stratification and pawpaw germination can help avoid common pitfalls.
Do pawpaw seeds need cold stratification?
Yes, absolutely. Pawpaw seeds have a natural dormancy that requires a period of cold, moist conditions to break. This process, called cold stratification, mimics the seeds overwintering in the ground.
How long does it take for pawpaw seeds to germinate?
Germination time can vary significantly, even after proper stratification. It typically takes anywhere from 1 to 3 months after planting the stratified seed, sometimes longer. Patience is key!
What is the best way to stratify pawpaw seeds?
The most reliable method is to place the seeds in a moist medium like peat moss, sand, or vermiculite, seal them in a plastic bag, and store them in a refrigerator at temperatures between 32°F and 40°F (0°C to 4°C).
Why are my pawpaw seeds not germinating?
Several factors can prevent germination. The most common reasons include: the seeds were not properly stratified (or not stratified long enough), the seeds dried out at some point, the planting medium is too hot or too cold, or the seeds were old and non-viable.
How long to stratify pawpaw seeds?
Pawpaw seeds generally require a minimum of 70 to 100 days (about 2.5 to 3.5 months) of cold stratification. Some sources recommend up to 120 days for best results, but 70-100 is a common target.
Can you plant pawpaw seeds directly in the ground?
While theoretically possible if planted in the fall, planting directly in the ground is less reliable than controlled stratification. Seeds planted outside are subject to fluctuating temperatures, inconsistent moisture, and potential predation, making successful germination less predictable.
With these questions answered, you should feel more confident in your pawpaw seed planting journey.
Bringing a pawpaw seed to life is a rewarding process, especially when you understand the simple science behind stratification. This guide walked you through each necessary step, from preparing the seed to providing the right conditions for germination, tackling common hurdles along the way. By following these practical steps, you’ve laid the groundwork for potentially growing your own piece of native fruit history. Don’t be discouraged by the need for cold stratification – it’s a natural step, and with patience, you can achieve success. Enjoy the journey of nurturing your future pawpaw tree!
Enjoyed learning how to start unique plants like pawpaws? Subscribe for more beginner-friendly guides and tips!
