Table of Contents
Dreaming of those large, fragrant white blooms that unfurl like magic as the sun sets? Moonflower vines are truly enchanting, adding a touch of nocturnal beauty and captivating scent to your garden. If you’re new to gardening, starting plants from seed can feel a bit intimidating – you might wonder if you’re taking the right steps or if those seeds will actually sprout.
Successfully growing these stunning night-bloomers begins with knowing exactly how to plant their notoriously tough seeds. It’s the crucial first step to seeing that vigorous vine climb and produce its spectacular flowers.
But don’t worry, it’s completely achievable, even for beginners! This comprehensive guide is designed to take the guesswork out of the process. We’ll walk you through every essential step, from preparing those hard-shelled seeds correctly (including crucial techniques like soaking and scarification) and explaining why these steps make all the difference, to planting them at the right depth and offering simple tips to troubleshoot common germination hiccups. With clear instructions, you’ll feel confident planting your moonflower seeds and watching them grow.
Ready to unlock the secret to successful moonflower germination and bring that incredible evening fragrance to your space? Let’s start with the first critical step: preparing your seeds.
Why Grow Enchanting Moonflower Vines?
Before diving into the planting steps, let’s explore why moonflower vines are such a captivating addition to any garden. These remarkable plants boast large, trumpet-shaped blooms that unfurl in the evening, releasing a sweet, intoxicating fragrance that fills the night air.
Their most fascinating characteristic is their nocturnal blooming habit – the pristine white flowers dramatically open as dusk settles, offering a unique spectacle that daytime flowers simply can’t provide. Moonflower vines are also vigorous climbers, quickly covering trellises, arbors, fences, or walls with lush foliage and abundant blooms throughout the summer and fall.
For anyone, especially beginner gardeners, the desire to experience these enchanting flowers firsthand starts with successfully planting the seeds. Understanding the correct process is key to nurturing these beautiful plants from a tiny seed into a flourishing vine, a truly rewarding gardening journey.
Ready to begin your moonflower adventure? Let’s move on to preparing your seeds for planting.
Getting Started: Preparing Moonflower Seeds for Success
Moonflower seeds have a notoriously tough outer shell, so proper preparation is the crucial first step for successful germination. This section covers the essential techniques you’ll need to give your moonflower seeds the best possible start. Without these simple steps, you might find your seeds just sit in the soil without sprouting.
Understanding Seed Preparation: Soaking & Scarification Explained
You might wonder why moonflower seeds need special treatment. The answer lies in their hard, impermeable seed coat. This tough outer shell protects the seed but also makes it difficult for water to penetrate, which is necessary to trigger germination. To overcome this natural barrier, we use two simple techniques: scarification and soaking.
Scarification sounds complicated, but it simply means slightly breaking or weakening the hard seed coat. This allows moisture to reach the embryo inside. You can achieve this by gently nicking the seed coat with a sharp knife or razor blade, or by rubbing it with a nail file or sandpaper. The key is to just break through the outer layer without damaging the inner seed. Don’t nick the ‘eye’ or hilum (the small scar where the seed was attached to the plant). It might feel a little scary to intentionally alter the seed, but this step is vital for germination!

This image shows a moonflower seed with a small nick made on its side, demonstrating the scarification technique.
Once scarified, the next step is soaking. Soaking the seeds in water helps to further soften the seed coat and allows the seed to absorb the moisture it needs to wake up from dormancy and begin the germination process.
So, do moonflower seeds need to be soaked before planting? Absolutely! It’s a critical step after scarification. Place your scarified seeds in a container of warm water and let them soak for 12 to 24 hours. You might notice some seeds swell up during this time, which is a good sign they’re absorbing water. If the water gets cloudy, you can change it for fresh warm water.
Here, moonflower seeds are shown soaking in a small dish of water, preparing them for planting.
How do you prepare moonflower seeds for planting? By combining these two essential steps: first, scarify the hard outer coat, and then soak the seeds in warm water. This preparation dramatically increases your chances of successful germination.
Now that your moonflower seeds are prepped and ready, let’s figure out the best time and place to plant them.
Choosing the Right Time and Place
Timing your planting correctly and selecting an appropriate location are key factors for ensuring your moonflower vines thrive. Let’s determine the best conditions to give your seeds the best chance at success.
When and Where to Plant Moonflowers
Knowing when and where to plant is crucial for growing healthy moonflower vines. The best time to plant moonflower seeds outdoors is after the danger of the last spring frost has completely passed. Moonflowers are sensitive to cold, and frost can easily kill young seedlings. If you live in a region with a shorter growing season, you can get a head start by planting seeds indoors about 4 to 6 weeks before your average last frost date.
Moonflower vines absolutely love sunshine. They perform best when planted in a location that receives full sun, meaning at least 6 to 8 hours of direct sunlight daily. Ample sun exposure is vital for strong growth and abundant flowering.
When it comes to soil, moonflowers aren’t overly fussy but do require good drainage. They prefer well-draining soil that is moderately rich, such as a loamy type. Incorporating organic matter, like compost, into the planting area can significantly improve soil structure and fertility, providing a great environment for roots to develop. Research from university extensions highlights the importance of both ideal soil conditions and sun exposure for successful moonflower growth.
Given their vigorous vining habit, it’s essential to provide a support structure from the beginning. Install a trellis, fence, netting, or stakes near the planting site so the vines have something to climb as they grow.
Now that you know the ideal timing and location, you’re ready to move on to the planting process itself.
Planting Your Moonflower Seeds: A Step-by-Step Guide
With your seeds prepared and the perfect spot chosen, it’s time for the main event – planting! Getting your moonflower seeds into the soil correctly is crucial for successful germination. Don’t worry; this doesn’t have to be intimidating. This simple, step-by-step guide is designed for beginners, breaking down the process so you can plant with confidence and look forward to those beautiful evening blooms.
Step-by-Step Planting Instructions
Ready to get your hands dirty? Follow these steps to plant your prepared moonflower seeds, whether you’re starting them indoors or sowing directly into the garden. This easy-to-follow process will set your moonflower vines up for success.
- Choose Your Planting Method: You have two main options for how to plant moonflower seeds. You can start them indoors in small pots or trays about 4-6 weeks before the last expected frost. Alternatively, you can plant moonflower seeds directly in the ground after all danger of frost has passed in your area. Yes, you absolutely can plant moonflower seeds directly in the ground once the weather is warm enough!
- Prepare the Soil or Container: If sowing directly, loosen the garden soil to a depth of about 6-8 inches using a trowel or fork. Mix in a little compost if your soil is heavy clay or very sandy. For container planting, choose a pot with drainage holes and fill it with a good quality, well-draining potting mix.
- Determine Planting Depth: How deep should I plant moonflower seeds? This is a common question, and getting it right is important for germination. Plant moonflower seeds about 1/2 inch to 1 inch deep. This shallow depth allows the seedling to push through the soil easily after sprouting. You can use your knuckle or a small stick to gauge the depth.

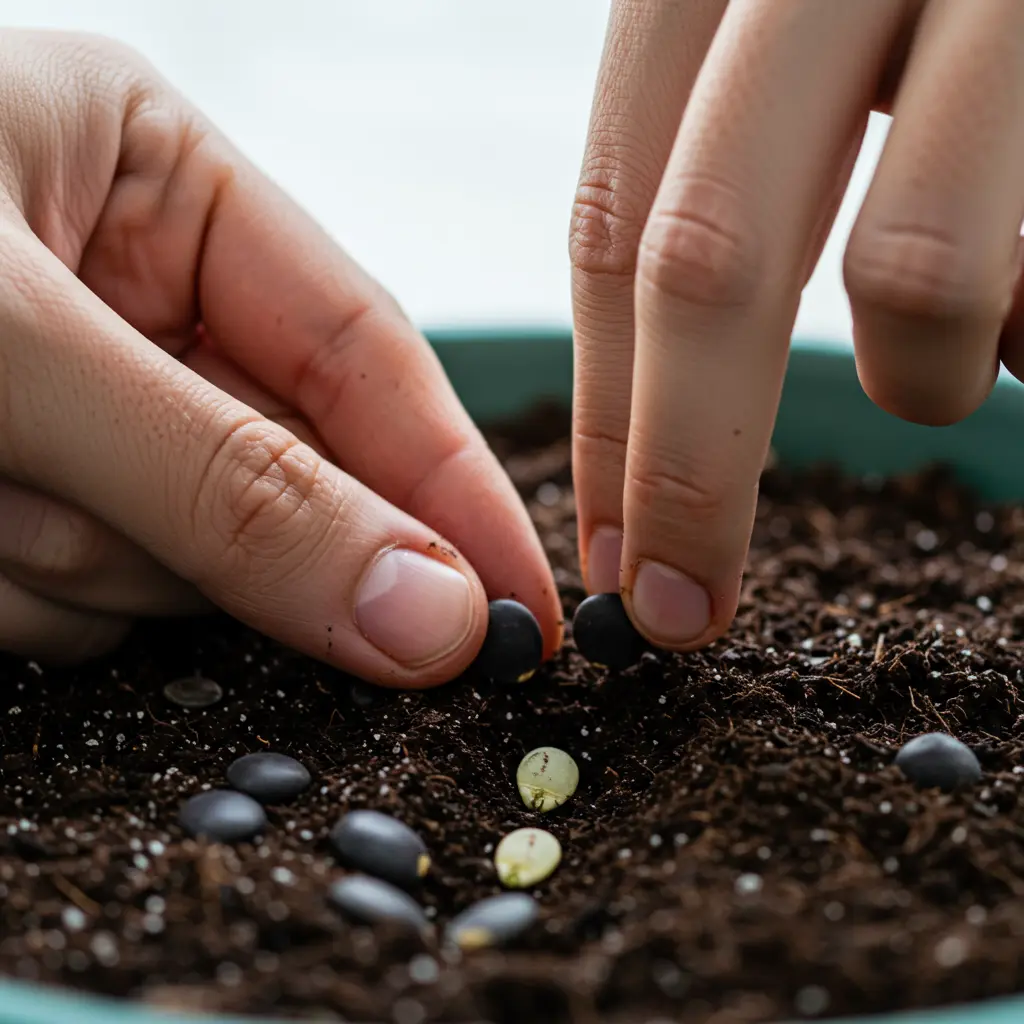
- Place the Seeds: Gently place your prepared (scarified and soaked) moonflower seeds into the prepared soil or potting mix. If planting directly in the garden, space them about 6-12 inches apart. If planting in pots, place 1-2 seeds in the center of each small pot or cell.
- Cover and Firm: Lightly cover the seeds with soil or potting mix, ensuring they are completely buried at the correct depth. Gently firm the soil surface with your fingers or the back of your trowel. This ensures good contact between the seed and the soil, which is essential for germination.
- Water Thoroughly: After planting, water the soil thoroughly but gently. Use a watering can with a fine rose or a gentle stream from a hose to avoid dislodging the seeds. The goal is to moisten the soil evenly without making it waterlogged.

Container vs. In-Ground Planting:
Both methods have benefits. Growing moonflowers in pots offers portability, allowing you to move the plant to optimize sunlight or protect it from harsh weather. Containers also give you complete control over the soil composition. However, in-ground planting provides more space for the vigorous vine to spread its roots and grow larger. If using containers, consider using self-watering containers to help maintain consistent moisture, which moonflowers appreciate.
For a visual walkthrough of these steps, be sure to watch our embedded guide:
. This step-by-step guide for planting moonflower seeds for beginners makes the process straightforward and helps boost your confidence!
Now that your seeds are nestled in their new homes, it’s time to focus on the next crucial phase: waiting for them to sprout and providing the right care.
After Planting: Watering, Germination, and Seedling Care
Your moonflower seeds are now nestled in their new home, but the planting process is just the beginning. Consistent moisture and careful attention during the crucial germination phase are essential steps for encouraging those tiny seeds to sprout and develop into healthy, vigorous seedlings ready to grow into beautiful vines.
Post-Planting: Water, Germination, and Seedling Care
After planting, providing consistent moisture is vital for successful moonflower germination. The soil needs to be kept evenly moist, much like a wrung-out sponge. A common concern for beginner gardeners is overwatering, which can lead to seeds rotting before they even have a chance to sprout. Avoid letting the soil become waterlogged or sit in standing water. While there is general guidance on watering frequency for plants, the best approach after planting seeds is to check the top inch of the soil regularly. If it feels dry, it’s time to water gently.
One of the most frequently asked questions is, “How long does it take for moonflower seeds to germinate?” Typically, you can expect to see signs of life within 7 to 21 days after planting, especially if you prepared the seeds beforehand. However, this timeframe can vary depending on several factors, including consistent soil temperature, the effectiveness of your seed preparation (like soaking or scarifying), and maintaining that crucial, even moisture level.
As the germination period progresses, keep a close eye on the soil surface. You’ll eventually spot tiny green shoots pushing through! A young moonflower seedling typically emerges with a pair of initial leaves, called cotyledons, followed by the first true leaves shortly after. 
Once seedlings appear, their care continues. If you planted multiple seeds in one spot and more than one germinated, you’ll need to “thin” them. Select the strongest-looking seedling and gently snip the others at the soil line with small scissors to avoid disturbing the roots of the one you keep. Ensure the seedlings continue to receive ample sunlight – at least 6-8 hours daily. If you started your seeds indoors, you’ll need to “harden them off” before transplanting them outside. This means gradually exposing them to outdoor conditions (sun, wind, temperature fluctuations) over a week or two to prevent shock.
With successful germination and initial seedling care, your moonflowers will soon be ready for the next stage of growth, though you may encounter a few bumps along the way.
Troubleshooting Common Issues
Sometimes, despite following all the steps, your moonflower seeds might not sprout. This can be frustrating, but it’s a common part of gardening. Understanding the potential reasons behind germination failure can help you diagnose the problem and improve your success rate for future plantings.
Troubleshooting: Why Didn’t My Moonflower Seeds Sprout?
If your moonflower seeds aren’t sprouting, there are a few likely culprits. First, revisit the crucial seed preparation steps. Did you remember to properly scarify and soak the seeds before planting? Skipping these steps is a very common reason for germination failure with moonflowers, as their hard seed coat needs to be broken and softened for water to penetrate and trigger sprouting.
Another factor could be planting depth. Planting the seeds too deep makes it hard for the sprout to reach the surface, while planting them too shallow can cause them to dry out quickly. Check that they were planted at the recommended depth of about half an inch. Soil temperature is also critical; moonflower seeds need warmth to germinate. If the soil is too cold, they simply won’t sprout. Ensure the soil temperature is consistently warm, ideally between 70-85°F (21-29°C).
Inconsistent moisture levels are another frequent issue. Soil that dries out completely or is constantly waterlogged will prevent germination. The soil should be kept consistently moist, like a wrung-out sponge. Finally, consider the seeds themselves. If they are very old or haven’t been stored properly, their viability might be low. If you’ve checked all other factors, trying a batch of fresh seeds might be the solution. Don’t get discouraged if your moonflower seeds aren’t sprouting right away; troubleshooting is a valuable skill you’ll develop as you garden!
Now that you understand potential issues, let’s look at common questions people ask about growing moonflowers.
Your Moonflower Questions Answered
To wrap up, here are quick answers to some of the most frequently asked questions about planting and growing moonflower vines from seed. Getting these basics right can make all the difference for beginner gardeners.
Frequently Asked Questions About Planting Moonflowers
Do moonflower seeds need to be soaked before planting? Yes, it’s highly recommended. Moonflower seeds have a very hard outer coat that can prevent water from reaching the embryo inside, making germination difficult.
How do you prepare moonflower seeds for planting? The best way is to gently nick or file a small spot on the hard seed coat (this is called scarification) and then soak the seeds in warm water for several hours, or even overnight, before planting.
What is the best time of year to plant moonflower seeds? You can plant them directly outdoors after all danger of frost has passed in your area. For an earlier start, you can begin seeds indoors about 4-6 weeks before your last expected frost date.
How deep should I plant moonflower seeds? Plant the prepared seeds about 1/2 to 1 inch deep in soil or seed starting mix.
How long does it take for moonflower seeds to germinate? With proper preparation (scarifying and soaking), moonflower seeds typically germinate within 1 to 3 weeks.
Are moonflowers easy to grow from seed? Yes, they are generally quite easy to grow from seed, especially if you remember to prepare the seeds first!
Can you plant moonflower seeds directly in the ground? Absolutely! Just wait until the weather is warm and there’s no more risk of frost.
With these common questions answered, you’re well on your way to successfully growing beautiful moonflower vines.
With these step-by-step instructions, planting moonflower vine seeds is well within reach, even for beginner gardeners. We’ve covered the crucial preparation steps like scarifying and soaking that significantly boost germination rates, discussed ideal timing and location, and walked through the planting process for both containers and in-ground. Remember the importance of consistent moisture and patience as you await those first signs of life. By following this guide, you’ve given your moonflower seeds the best possible start towards becoming beautiful, fragrant night-blooming vines that will enchant your garden.
Now that your seeds are planted, learn how often to water your plants to ensure they thrive!
