Table of Contents
Imagine the joy of seeing your garden fill with cheerful, sun-kissed marigolds, grown entirely from tiny seeds. While these vibrant flowers are known for being easy to grow, knowing exactly how to plant marigold seeds for successful germination can feel a little uncertain, especially for beginners. You want to ensure those little seeds sprout and grow into healthy, beautiful plants.
This guide takes the guesswork out of the process. We provide clear, visual, step-by-step instructions covering everything from choosing the right time to plant based on your climate, to deciding whether to start seeds indoors or sow them directly in the garden bed. You’ll learn the correct soil conditions, planting depth, and watering techniques. Plus, we’ll show you what common germination problems look like and how to troubleshoot them, so you can feel confident every step of the way.
Ready to get your marigolds off to a great start? Let’s begin by figuring out the best time to plant your seeds.
Getting Started: Timing, Seeds, and Soil Prep
Before you plant, let’s cover the essentials: knowing when to plant based on frost dates, choosing the right seeds, preparing the perfect soil, and gathering your supplies. Getting these basics right sets your marigolds up for success from the very beginning.
So, when should you plant marigold seeds outside? The most crucial factor is waiting until after the last spring frost has passed in your area. Marigolds are tender plants susceptible to cold damage, so planting them too early when frost is still a risk can unfortunately kill your young seedlings. Waiting ensures their survival and gives them the warm start they need. Ideally, the soil temperature should be consistently around 70-75°F for the best germination. To figure out the right timing, you need to know your local last frost date. Consult an official USDA plant hardiness zone map or a reliable local planting calendar to find your local last frost date. Knowing this date is key to determining exactly when to plant marigold seeds for the best results.
Choosing the right marigold seeds is your next step. Take a moment to read the seed packet carefully.  Look for the specific marigold variety (like French, African, or Signet types) and, importantly, check the “packed for” or expiration date. Seed viability decreases over time, so using fresh seeds gives you a better chance of successful germination. Consider what you want from your marigolds – French marigolds are typically smaller and bushier, great for borders or containers, while African marigolds are taller with larger blooms, making a statement in garden beds. Think about the final size, color, and where you plan to plant them (containers vs. garden beds) to select the perfect seeds for your space.
Marigolds aren’t overly fussy, but they thrive in well-draining soil. This is vital because soil that stays too wet can lead to root rot, a common problem that hinders growth and can kill the plant. Providing good drainage ensures the roots get the oxygen they need and prevents waterlogging. Creating the best soil mix for marigolds often involves using a quality potting mix or garden soil amended with compost. As one expert notes, “For happy marigolds, start with well-draining soil. A good mix of quality potting soil amended with compost provides the aeration and nutrients they need to thrive.” – PlantMD horticultural expert. Before planting, loosen the soil in your garden bed or container to a depth of about 6-8 inches. If your soil is heavy clay or very sandy, mixing in compost will improve its texture and fertility.
Essential Supplies Checklist
Gathering your supplies beforehand makes the planting process smooth and enjoyable. Here’s what you’ll need:
- Marigold seeds (your chosen variety)
- Seed starting mix or good quality potting soil
- Containers or pots (if starting indoors) or prepared garden bed space
- Labels or markers (to remember what you planted!)
- Watering can with a gentle rose attachment or a spray bottle
With your timing planned, seeds selected, and soil prepared, you’re almost ready to decide on your planting approach.
Planting Method: Starting Indoors vs. Direct Sowing Outdoors
Marigolds offer flexibility. You can start seeds indoors for an earlier start or sow them directly outside once the weather warms up. Let’s compare the pros and cons to help you decide which approach is best for your situation. Understanding the differences between starting marigold seeds indoors vs outdoors is key to a successful planting experience.
Starting Indoors: The Benefits
If you’re eager for those cheerful blooms, starting your marigold seeds indoors can be a fantastic option. It gives you a jump on the growing season, often resulting in flowers appearing earlier than if you waited to sow directly outside. Here’s why many gardeners choose this method:
- Get a Head Start: Starting seeds indoors 6-8 weeks before your last expected frost date allows seedlings to mature in a protected environment. This means you’ll have small plants ready to go into the garden (and bloom sooner!) once the weather is reliably warm.
- Protection for Young Seedlings: Tiny seedlings are vulnerable. Indoors, they are safe from unpredictable spring weather like heavy rain, strong winds, or late frosts. They’re also protected from common garden pests like slugs, snails, or birds that might otherwise feast on your emerging sprouts.
- Controlled Environment: You have much greater control over crucial growing conditions indoors. You can ensure consistent warmth ideal for germination, manage moisture levels precisely, and provide adequate light, giving your seeds the best possible start.
Starting Indoors: Potential Challenges
While starting indoors has its perks, it also comes with a few considerations. Weighing these against the benefits helps clarify the choice between starting seeds inside versus outside. Keep these potential drawbacks in mind:
- Requires Indoor Space: You’ll need a dedicated area, like a sunny windowsill or a table with grow lights, to house your seed trays for several weeks.
- Potential Need for Equipment: Beyond seeds and soil, you’ll need containers (seed trays, small pots, or recycled containers with drainage). If you lack a very bright, south-facing window, you might also need supplemental grow lights to prevent weak, spindly growth.
- Risk of ‘Leggy’ Seedlings: Insufficient light is a common issue when starting seeds indoors. Seedlings stretch desperately towards the light source, becoming long, pale, and weak (known as becoming ‘leggy’). These seedlings often struggle when transplanted outdoors.
- Hardening Off is Necessary: Seedlings grown in the controlled indoor environment aren’t accustomed to outdoor conditions. Before planting them in the garden, you must gradually acclimate them over 7-10 days to sunlight, wind, and temperature fluctuations. This process, called ‘hardening off’, requires extra time and attention.
Direct Sowing: The Benefits
For many gardeners, especially beginners, directly sowing marigold seeds into the garden bed or outdoor containers is the preferred route. Considering the pros and cons of starting seeds indoors versus outdoors, this method shines in its simplicity. Here are the advantages:
- Simplicity and Less Equipment: This is straightforward gardening. You don’t need special indoor setups, grow lights, or numerous pots. You simply prepare your garden soil and plant the seeds directly where they will grow.
- Easier Process: There’s no need to juggle seed trays indoors or worry about finding space. You wait until the danger of frost has passed, plant the seeds, water them, and wait for nature to take its course. Many find this less demanding.
- No Transplant Shock or Hardening Off: Because the seeds germinate and grow in their final location, the plants don’t experience the stress of being transplanted. You also skip the hardening-off process entirely, saving time and effort. This often results in robust plants from the start.
Direct Sowing: Potential Challenges
Of course, direct sowing isn’t without its own set of potential hurdles. Understanding these challenges is crucial when deciding between starting seeds inside or outside. Consider these factors:
- Delayed Start and Blooms: You must wait until after your area’s last frost date and the soil has warmed sufficiently. This means your marigolds will start growing later in the season, and consequently, they will bloom later compared to those started indoors.
- Exposure to Elements and Pests: Seeds and young seedlings sown directly outdoors are immediately exposed to whatever Mother Nature throws their way – unexpected cold snaps, heavy rain, or drying winds. They are also more vulnerable to garden pests, from insects to hungry critters, right from the beginning.
- Less Predictable Germination: Soil temperature fluctuations, inconsistent moisture due to weather, and varying soil conditions can lead to less uniform or potentially lower germination rates compared to the controlled environment indoors.
Which Method is Right for You?
So, how do you choose between starting marigold seeds indoors vs outdoors? The best method truly depends on your individual circumstances and gardening goals.
Consider these key factors:
- Climate & Growing Season: If you have a short growing season, starting indoors gives you a valuable head start for earlier blooms. In warmer climates with long seasons, direct sowing is often perfectly adequate.
- Available Space & Equipment: Do you have a bright windowsill or space for a grow light setup? If indoor space is limited, direct sowing is likely more practical.
- Desired Bloom Time: If getting the earliest possible flowers is important, starting indoors is the way to go. If you’re happy with blooms starting a bit later in the summer, direct sowing works well.
- Personal Preference: How much time and effort do you want to invest? Starting indoors requires more initial setup and care (including hardening off). Direct sowing is generally simpler and requires less hands-on time initially.
Many beginners ask, “What is the easiest way to grow marigolds from seed?” Often, direct sowing is considered simpler due to requiring less equipment and eliminating the need for transplanting and hardening off. However, ‘easiest’ can be subjective. If you enjoy nurturing seedlings indoors and want earlier flowers, that method might feel more rewarding and ultimately ‘easier’ for achieving your specific goals.
Here’s a quick comparison:
| Feature | Starting Indoors | Direct Sowing Outdoors |
|---|---|---|
| Timing | 6-8 weeks before last frost | After last frost, soil warmed |
| Blooms | Earlier | Later |
| Effort | More initial effort, hardening off | Simpler process, less initial effort |
| Equipment | Needs containers, possibly lights | Minimal equipment needed |
| Seedling Care | Controlled environment, less risk early | Exposed to weather/pests |
| Transplanting | Required, potential shock | Not required, no shock |
Ultimately, both methods can lead to beautiful marigolds. Choose the approach that best fits your climate, resources, and gardening style!
Now that you’ve weighed the options for starting your seeds, you’re ready to learn the specific steps involved in planting them.
How to Plant Marigold Seeds: Step-by-Step Instructions
Ready to plant? Here are the step-by-step instructions for both starting seeds indoors and sowing directly in your garden. We’ll cover the key details like depth, spacing, and watering, giving you the confidence to get those seeds sprouting.
Method 1: Starting Marigold Seeds Indoors
Starting seeds indoors gives you a head start on the growing season, especially in cooler climates. Here’s how to plant marigold seeds inside:
- Prepare Your Containers: Fill clean seed trays, pots, or cell packs with a moist, sterile seed starting mix. Using clean containers is crucial to prevent fungal diseases like damping off, which can quickly kill young seedlings.
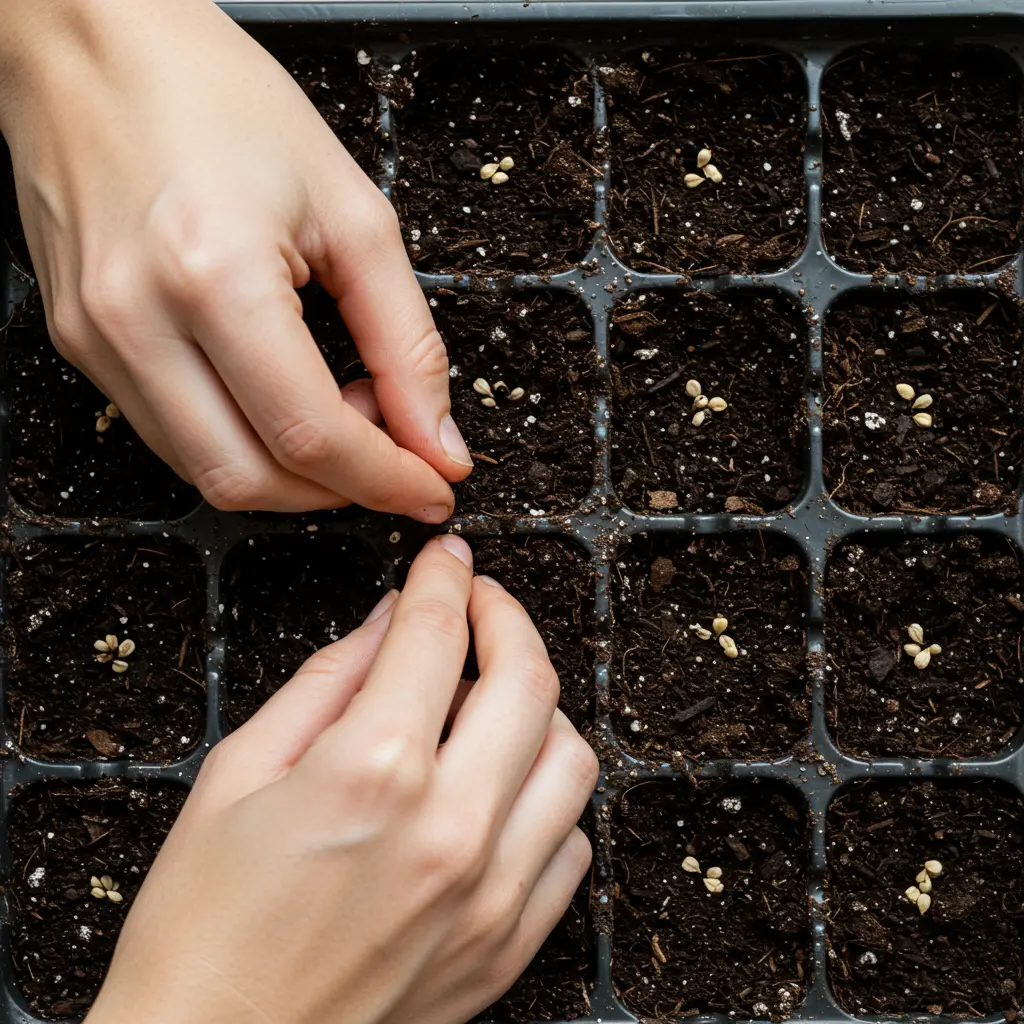
- Sow the Seeds: Place 1-2 marigold seeds onto the surface of the mix in each container or cell.
- Cover Lightly: Gently cover the seeds with about 1/4 inch of the seed starting mix. Don’t pack it down too firmly.
- Water Gently: Water the containers carefully to avoid dislodging the seeds. Misting the surface or watering from the bottom (setting the containers in a tray of water until the surface is moist) works well.
- Provide Warmth: Place the containers in a consistently warm location, aiming for a soil temperature between 70-75°F (21-24°C) for optimal germination. A heat mat can be helpful but isn’t strictly necessary if the room is warm.

- Add Light (Post-Germination): Marigold seeds don’t need light to germinate, but once the seedlings emerge, they require plenty of light. Move them immediately to a sunny windowsill or place them under grow lights for 14-16 hours per day.

Method 2: Sowing Marigold Seeds Directly Outdoors
If you live in a warmer climate or prefer a simpler approach, you can sow marigold seeds directly into your garden beds after the last frost date has passed and the soil has warmed up.
Prepare the Garden Bed: Choose a sunny spot. Clear the area of weeds and loosen the top few inches of soil with a rake or trowel to create a fine, crumbly texture.
Sow the Seeds: Following the specific depth and spacing guidelines discussed next (and on your seed packet), sow the marigold seeds directly into the prepared soil. Knowing how to plant marigold seeds correctly at this stage is key.
Cover Lightly: Gently cover the seeds with about 1/4 inch of fine soil.
Water Gently: Water the seeded area thoroughly but gently, using a watering can with a fine rose or a gentle hose setting. Keep the soil consistently moist until the seedlings emerge.
Key Details: Planting Depth, Spacing, and Seed Orientation
Whether starting indoors or sowing directly, getting these details right boosts your success rate:
- Planting Depth: The ideal planting depth for marigold seeds is approximately 1/4 inch. This depth provides enough cover to keep the seed moist and in darkness for germination, but it’s shallow enough for the emerging seedling to easily push through to the surface and access sunlight. Planting too deep can exhaust the seedling’s energy reserves before it reaches light.
- Spacing: Proper spacing is vital for healthy growth, reducing competition for sunlight, water, and nutrients later on. While general guidelines suggest spacing smaller dwarf varieties 6-8 inches apart and larger African marigolds 10-12 inches apart, always refer to your specific seed packet. Varieties differ significantly in mature size, and the packet provides the most accurate recommendation. Following these guidelines helps prevent overcrowding and promotes better air circulation, reducing disease risk.
- Seed Orientation (Helpful Tip): Marigold seeds are elongated, often with a pointy end and a slightly darker, broader, sometimes tufted end. While not strictly necessary, some gardeners find they get slightly better or faster germination by orienting the seed vertically in the soil with the pointy end down (or the darker/tufted end pointing up). This potentially helps the root emerge downwards more easily. Give it a try if you like, but don’t worry if you just lay them flat – they’ll usually figure it out!
Key Details: Watering and Light Needs for Germination
Consistent moisture and the right temperature are crucial during the germination phase:
- Watering: The most critical factor is keeping the soil or seed starting mix consistently moist but not waterlogged. Consistent moisture softens the seed coat and activates the internal processes needed for the seed to sprout. However, overly wet or soggy conditions prevent oxygen from reaching the seed and create an environment where fungal diseases thrive, potentially causing the seed to rot before it can germinate. Use gentle watering techniques like misting or a fine-rosed watering can to avoid washing away the seeds. Maintaining this balance is key, similar to general watering principles for established plants, but even more critical for vulnerable seeds.
- Light: A common question is, “Do marigold seeds need light to germinate?” The answer is typically no. Marigold seeds germinate best in darkness, covered by that 1/4 inch of soil or mix. Light only becomes essential after the seedlings have emerged from the soil.
- Temperature: Remember the ideal soil temperature range for germination is 70-75°F (21-24°C). Consistent warmth speeds up the germination process significantly.
Q: Should you soak marigold seeds before planting?
A: Generally, no, soaking marigold seeds before planting is not necessary or recommended. Marigolds are known for germinating relatively easily and quickly under the right conditions (consistent moisture, warmth) without this extra step. Soaking can sometimes make the small, elongated seeds more difficult to handle and potentially damage them if done improperly or for too long. Stick to planting them directly into moist soil or seed starting mix for reliable results.
Now that you know exactly how to plant your marigold seeds, you’re well on your way. However, sometimes issues can still arise; let’s look at troubleshooting common problems you might encounter.
Chapter 4: Troubleshooting Common Marigold Seed Starting Problems
Sometimes things don’t go exactly as planned when starting seeds. Don’t worry, this is a normal part of learning! Here’s how to identify and fix common issues beginners face when starting marigold seeds, complete with visual cues to help you diagnose any problems.
Marigold Germination Time
Q: How long does it take for marigold seeds to germinate?
A: You can typically expect your marigold seeds to sprout within 5 to 10 days after planting. However, this marigold germination time assumes you’ve provided optimal conditions. Key factors include consistent warmth (ideally around 70-75°F or 21-24°C) and steady moisture in the soil. Keep in mind that slight variations are normal; some seeds might pop up a bit earlier or later depending on the specific variety and your exact growing environment. Patience is key!
Problem: Seeds Not Sprouting
Q: Why Didn’t My Marigold Seeds Sprout? (And How to Fix It)
A: It can be disheartening when seeds don’t sprout, but there are usually simple reasons behind it. Let’s explore the common causes of these marigold seed germination problems and how to address them:
- Old or Non-Viable Seeds: Seeds lose their ability to germinate over time. Always check the “packed for” or expiration date on your seed packet. If they’re several years old, viability might be low. Try a germination test first next time, or simply start with fresh seeds.
- Planted Too Deep: Marigold seeds only need to be lightly covered. Planting them deeper than the recommended 1/4 inch can prevent them from reaching the surface. Ensure you’re just barely covering them with soil or seed starting mix.
- Soil Too Cold or Too Hot: Marigolds prefer warm soil (70-75°F / 21-24°C) for germination. Cold soil significantly slows or stops the process, while excessively hot soil can also be detrimental. Using a heat mat (for indoor starting) or waiting for consistently warm weather (for direct sowing) can make a big difference.
- Soil Too Dry or Too Wet: Consistent moisture is crucial. If the soil dries out completely, germination will stop. Conversely, if the soil is constantly waterlogged, the seeds can rot or succumb to fungal diseases. Aim for soil that feels like a damp sponge – moist but not soaking wet.
“If seeds fail to sprout, revisit the basics: ensure seeds aren’t old, soil is consistently moist (not soaked!), and temperatures are warm enough, ideally 70-75°F.” – PlantMD horticultural expert. Reviewing these basics often solves most germination failures.
Problem: Seedlings Rotting
Q: Identifying and Preventing Damping Off
A: Seeing your newly sprouted seedlings suddenly collapse can be frustrating. This is often caused by “damping off,” a common fungal disease affecting young plants.
- Symptoms: Look closely at the base of the seedling stem, right at the soil line. If it appears thin, pinched, constricted, or water-soaked, and the seedling has toppled over despite the leaves looking initially healthy, you’re likely dealing with damping off.

- Cause: Damping off is caused by various soil-borne fungi or fungus-like organisms (like Pythium, Rhizoctonia, and Fusarium). These pathogens thrive in cool, overly wet soil conditions and where air circulation is poor. Understanding that it’s a fungal issue helps explain why the prevention methods work.
- Prevention and Solutions: Unfortunately, once a seedling has damped off, it cannot be saved. Prevention is the best strategy for avoiding these marigold seed germination problems:
- Use Sterile Mix: Always start seeds in a sterile, soil-less seed starting mix, not garden soil which can harbor fungal spores.
- Clean Containers: Ensure your pots, trays, and tools are clean. Wash them with soapy water and rinse well before use.
- Avoid Overwatering: This is critical. Allow the soil surface to dry slightly between waterings. Water from the bottom if possible, letting the mix absorb water upwards, and discard excess water.
- Ensure Good Air Circulation: Remove plastic domes once seeds germinate. Provide gentle airflow with a small fan (on a low setting, not pointed directly at seedlings) or ensure adequate spacing.
- Thin Seedlings: If seedlings are overcrowded, thin them promptly to improve air circulation around the stems.

Problem: Tall, Weak Seedlings
Q: What Causes Leggy Seedlings and How to Avoid It
A: Have your marigold seedlings grown surprisingly tall but look thin, pale, and floppy? This is known as legginess.
- Symptoms: Leggy seedlings have abnormally long, often pale or whitish, thin stems relative to their leaf size. They may struggle to stand upright and often lean heavily towards the nearest light source.
- Cause: The primary culprit for legginess is insufficient light. When seedlings don’t receive enough bright light, their natural hormonal response is to stretch rapidly upwards, searching for better illumination. This rapid, weak growth results in the characteristic leggy appearance.
- Solutions:
- Increase Light Immediately: As soon as you notice legginess, move your seedlings to a much brighter location. If growing indoors under lights, lower the lights so they are just a few inches above the seedlings (check manufacturer’s recommendations). If using window light, choose the sunniest, unobstructed window available (south-facing is often best) and rotate the container daily. If seedlings are ready and weather permits, gradually acclimate them to direct outdoor sunlight.
- Gentle Brushing: You can encourage sturdier stems by gently brushing the tops of your seedlings with your hand back and forth for a minute or two each day. This mimics wind and can signal the plant to produce shorter, stockier growth.
Problem: Seedling Pests or Diseases
Q: Dealing with Common Seedling Pests or Issues
A: While damping off is the most common disease issue, you might occasionally encounter minor pests.
- Fungus Gnats: These tiny, dark flies resemble fruit flies and are often seen hovering around moist soil. Their larvae live in the top layer of soil and feed on fungi and sometimes seedling roots. They thrive in consistently wet conditions.
- Control: The best control is prevention by avoiding overwatering and allowing the soil surface to dry out between waterings. Yellow sticky traps placed near the pots can catch the adults.
- Aphids: Less common indoors on seedlings but possible, aphids are small, pear-shaped insects (often green, black, or brown) that cluster on new growth and undersides of leaves, sucking sap.
- Control: If you see only a few, you can often wipe them off with a damp cloth or dislodge them with a gentle spray of water.
Focusing on providing the right growing conditions (light, water, air circulation) is the best defense against most pest and disease issues at this early stage.
Expert Tips
Don’t be discouraged if you encounter some of these issues! Careful observation is your best tool. Check your seedlings daily, note any changes, and refer back to these potential causes and solutions. Patience and willingness to adjust your approach are key skills every gardener develops. Think of each challenge as a learning opportunity on your way to growing beautiful marigolds.
With these troubleshooting tips in hand, you’re better equipped to handle common seed starting hurdles, setting the stage for nurturing your young plants.
Chapter 5: Caring for Your Marigold Seedlings After Germination
Congratulations, your seeds have sprouted! Seeing those first green shoots is always exciting. Now, the focus shifts to nurturing these young marigold seedlings. Here’s how to care for them properly to ensure they grow strong and healthy, ready for the garden.
Once your marigold seeds have germinated, their light requirements change significantly. While seeds needed only warmth and moisture to sprout, your new seedlings need lots of light to thrive.  Adequate light is crucial for strong, stocky growth and prevents them from becoming weak and ‘leggy’ (tall and spindly). This shift happens because the seedlings have now begun the process of photosynthesis, where they use light energy to create their own food. Without enough light energy, their growth will be stunted. If your seedlings are outdoors and already somewhat hardened off, aim for several hours of direct sunlight daily. For seedlings growing indoors, you’ll need strong grow lights positioned just a few inches above the plants. Keep these lights on for about 12 to 16 hours per day to mimic long, sunny days.
Watering needs also adjust now that active growth is underway. While you kept the soil consistently moist for germination, you can now allow the very top surface of the soil to dry out slightly between waterings. Check the soil daily by touching the surface. If it feels dry, it’s time to water. Aim the water directly at the soil level, trying to avoid wetting the delicate leaves and stems. Wet foliage can encourage fungal diseases, which young seedlings are susceptible to. Ensure your containers have drainage holes, and never let the seedlings sit in waterlogged soil, as this can lead to root rot. Consistent, but not excessive, moisture is key.
If you sowed multiple seeds per cell or pot and more than one sprouted, you’ll need to thin them out. It might feel counterintuitive to remove seedlings, but thinning is essential. Crowded seedlings compete fiercely for limited resources like light, water, and nutrients, resulting in weaker plants overall. The goal is to leave just one strong seedling per pot or designated space. The best way to thin is to choose the healthiest-looking seedling in each group and carefully snip the others off at the soil line using small, sharp scissors or snips. Avoid pulling the extra seedlings out, as this can disturb the fragile roots of the seedling you want to keep, potentially damaging it. Snipping is the safer method.
Seedlings started indoors require a crucial step called ‘hardening off’ before they can be planted outside. Indoor conditions are much gentler than the outdoors – there’s no direct sun, wind, or fluctuating temperatures. Suddenly moving delicate seedlings into these harsher conditions can cause shock, sunburn, or even kill them. Hardening off is the process of gradually acclimatizing them to the outdoor environment. Start about 7 to 10 days before your target planting date (after the last frost). Begin by placing the seedlings outdoors in a sheltered spot (dappled shade, protected from strong wind) for just an hour or two. Each day, gradually increase the time they spend outside and slowly introduce them to more direct sunlight and gentle breezes. Bring them back indoors each night initially. By the end of the hardening-off period, your seedlings should be tough enough to handle a full day outdoors, ready for transplanting.
Once your marigold seedlings have been successfully hardened off, boast several sets of true leaves (not just the initial seed leaves or cotyledons), and the weather outside is consistently warm and settled after all danger of frost has passed, they are ready for transplanting! Gently remove each seedling from its container, handling it carefully by the root ball or leaves rather than the delicate stem. Plant them in your garden bed or larger containers at the same depth they were growing in their starter pots. Space them according to the variety’s mature size recommendations. After planting, water them well to help settle the soil around the roots and reduce transplant shock.
With your seedlings now properly cared for and potentially hardened off or transplanted, you’ve successfully navigated the journey from seed to young plant.
Growing vibrant marigolds from seed is simpler than you might think. You’re now equipped with the knowledge to succeed, from choosing the perfect time and preparing your soil to deciding whether starting indoors or direct sowing best suits your needs. Following the clear, step-by-step planting instructions ensures your seeds get the best start, covering everything from optimal depth to gentle watering. You also have visual troubleshooting tips for common germination issues, removing guesswork and boosting your confidence. With an understanding of how to care for your seedlings after sprouting, you’re well on your way. Embrace the process, trust these steps, and get ready to enjoy the cheerful blooms you grew yourself!
