Table of Contents
You brought home a beautiful snake plant, heard they’re easy, but now you’re seeing conflicting advice and maybe even worrying about that soggy soil it came in from the store. The biggest fear? Causing root rot by giving it too much water. Figuring out how often do you water snake plants feels like a guessing game, and you just want clear steps to keep yours healthy and thriving.
Stop guessing and worrying. This guide cuts through the confusion, explaining why watering advice isn’t one-size-fits-all and showing you the simple, reliable method to check your plant’s actual needs. We’ll even tackle that common problem of bringing home a potentially overwatered plant from the big box store and how to rescue it. Ready to feel confident about watering? Let’s understand what determines your snake plant’s watering needs and the crucial step of checking the soil.
Why Snake Plant Watering is Different: The Golden Rules
Snake plants require infrequent watering due to their unique nature. Understanding this helps avoid common pitfalls and empowers you with the knowledge to stop guessing based on varied advice.
Understanding Your Snake Plant: Built for Dry Conditions
Why does snake plant watering frequency seem so tricky? It starts with their origins. Native to arid environments, their thick, succulent leaves act like reservoirs, storing water efficiently.  This natural adaptation makes them highly drought-tolerant, thriving on much less water than many other houseplants. Grasping this is fundamental to avoiding common, often fatal, watering mistakes.
The #1 Killer: What is Root Rot and Why Snake Plants Hate Wet Feet?
Consistently giving too much water is the primary way snake plants perish. This leads directly to a devastating condition called “snake plant root rot.” Simply put, when the roots constantly sit in overly wet, soggy soil, they suffocate and begin to decay. These damaged roots can no longer take up the water or nutrients the plant needs to survive. Understanding this serious risk is crucial.
Decoding Watering Advice: Factors That Change Everything (Light, Temp, Pot, Soil)
Feeling confused by conflicting advice on snake plant watering frequency? You’re not alone! Factors like light levels, temperature, humidity, pot size and material, and soil mix drastically change how often your specific plant needs water – more light or porous terracotta pots mean faster drying. Fixed schedules are therefore unreliable. As a PlantMD horticultural expert notes, “Many new snake plant owners look for a magic number for watering… But the truth is, your plant’s environment dictates its thirst; a fixed schedule is a recipe for problems, usually overwatering.” Adapting to your plant’s unique conditions is essential.
Embracing the ‘Golden Rule’: When in Doubt, Don’t Water
Remember this simple golden rule: when in doubt about watering, wait. Snake plants tolerate being too dry far better than being too wet, directly because of their drought-tolerant nature discussed earlier. Holding off a few more days if you’re unsure is always the safer, reassuring approach, especially for beginners.
Now that you understand why snake plants need careful watering, let’s learn the foolproof method for how to do it right.
The Foolproof Method: How to Actually Know When and How to Water
This section provides actionable steps to determine when and how to water your snake plant by checking soil dryness and considering its environment. Learn the reliable way to meet your plant’s needs, moving beyond guesswork and potentially harmful schedules.
The Only Watering Rule You Need: Check the Soil First!
Forget strict schedules; the only reliable way to know how often do you water snake plants is by checking the soil.  Based on expert consensus, this is the definitive method. Water only when the soil is completely dry throughout the entire pot. This practice prevents the guesswork that often leads to overwatering.
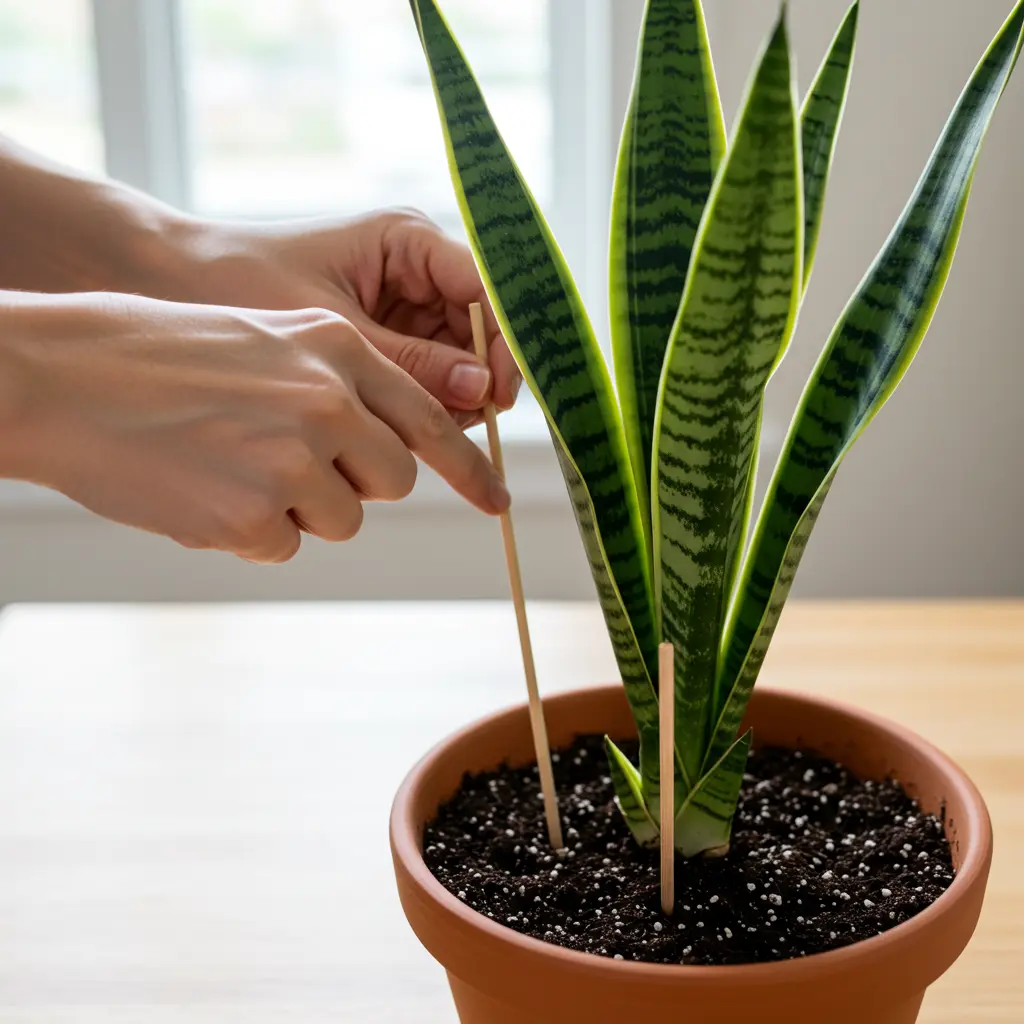
How to Check Soil Moisture Like a Pro
How do I know if my snake plant soil is too wet? Use these reliable methods to check snake plant soil deeply, not just the surface:
- Finger Test: Insert your finger about 2 inches down into the soil. If you feel any moisture at that depth, wait longer before watering.
- Wooden Skewer/Dowel: Push a clean, plain wooden skewer or chopstick carefully towards the bottom of the pot. If it comes out damp or with moist soil clinging to it, the soil is still wet.
Always check the entire depth to ensure the soil is truly dry before you water. These methods directly answer whether the soil is too wet.
Proper Watering Technique
Follow these steps for how to water snake plant correctly once the soil is completely dry:
- Water the soil thoroughly, allowing water to flow freely from the drainage holes. This ensures all the roots throughout the pot receive moisture.
- Let the pot drain completely for about 10-15 minutes in a sink or tub.
- Crucially, empty any excess water collected in the saucer or cache pot. Never let your snake plant sit in standing water, as this prevents “wet feet” and is a critical step in avoiding root rot.
Beyond the Soil Check: How Light, Temperature, and Seasons Affect Watering
Even when diligently checking the soil, remember that your plant’s environment constantly influences its thirst. Environmental factors like light levels, temperature, humidity, and the season affect how quickly the soil dries. Plants near a sunny window or in warmer rooms will dry out faster than those in darker corners. Watering needs decrease significantly during winter dormancy, so reduce frequency then. Always factor these conditions in.
Signs Your Snake Plant is Thirsty (Subtle Clues to Look For)
While checking the soil is paramount, you might notice subtle underwatered snake plant signs indicating thirst:
- Leaves slightly wrinkling, puckering, or losing firmness.
- Leaf edges starting to curl inward slightly.
However, always confirm with a thorough soil check before watering, as these visual cues can sometimes indicate other issues like root damage. Relying on the soil check remains the most foolproof method.
Mastering this foolproof soil-checking method sets you up for success, preparing you to tackle the specific challenges often found with newly purchased plants.
The Big Box Store Challenge: Your New Snake Plant Rescue Plan
This section tackles the common issue of overwatered snake plants from big box stores, providing a rescue plan to ensure your new plant thrives. Learn immediate steps to take.
It’s a common scenario: you bring home a new snake plant from a large retailer, and the soil feels suspiciously damp.  Often, these plants sit in dense, moisture-retentive soil designed more for shipping stability than long-term plant health, and they may receive generic, frequent watering. As a PlantMD horticultural expert notes, “It’s a frequent scenario… This is often due to generic care routines and soil designed for transport, not the plant’s long-term health.” This environment isn’t ideal for your snake plant’s future.
Immediate Steps for a New Store-Bought Snake Plant
Wondering what to do immediately after buying a snake plant from a big box store? Acting quickly is key to successful new snake plant care. Here’s your checklist for the first 24 hours:
- Check Soil Moisture: Don’t just touch the topsoil. Gently probe deeper into the pot with your finger or a moisture meter. Is it soggy several inches down?
- Inspect Thoroughly: Look closely at the leaves, stems, and soil surface for any signs of pests (like spider mites or mealybugs) or mushy, dark areas indicating potential rot near the base.
- Assess the Situation: If the soil is only slightly damp and drains well, you might be okay.
- Consider Wicking (If Soaked): If the soil is heavily saturated, proceed to the next step for immediate moisture reduction.
Dealing with Saturated Soil
If your new plant’s soil is truly waterlogged, take these emergency steps to help save your overwatered snake plant:
- Remove Outer Pot: If the nursery pot is inside a decorative cachepot with no drainage, take it out immediately to allow airflow.
- Boost Air Circulation: Place the nursery pot where air can circulate freely around the drainage holes. Don’t place it on a solid saucer that traps moisture.
- Wick Away Excess Water: Gently insert absorbent materials like rolled-up paper towels or even tampons into the drainage holes. This helps pull excess water out of the saturated soil faster. Replace them as they become wet.
- Avoid Direct Sun: Keep the stressed plant out of harsh, direct sunlight while it recovers.
Deciding whether emergency repotting snake plant from store is necessary requires careful observation. Consider repotting into fresh, well-draining soil if: the current soil is extremely dense and mud-like, it remains saturated for more than 5-7 days despite wicking efforts, or you see clear signs of spreading root rot (mushy, black roots). guidelines for emergency repotting If these criteria aren’t met, it’s often better to let the plant dry out significantly and acclimate to your home for a week or two before the stress of repotting.
Having navigated the initial rescue for a store-bought plant, you’re better equipped to handle potential issues. What if watering problems arise later? Let’s look at identifying and fixing common watering mistakes.
Watering Gone Wrong? Identifying and Fixing Common Issues
Learn how to identify and fix common snake plant watering problems, including the dreaded root rot and stunted growth, and save your plant.
Red Flags: Recognizing the Telltale Signs of Overwatering
Don’t worry if you suspect you’ve given your snake plant too much water; recognizing the problem is the first step. Watch out for these common snake plant overwatering signs. Catching them early increases your chances of fixing the issue. Seeing multiple signs together is a stronger indicator of a problem. Key indicators include:
- Yellowing leaves, especially lower ones
- A mushy or soft base near the soil line
- Leaves feeling soft, droopy, or easily bending
- A foul, rotten smell coming from the soil
- Small flying insects (fungus gnats) around the soil surface


Is it Root Rot? How to Inspect Your Plant’s Roots Safely
If you see signs of severe overwatering, you need to check for root rot. To diagnose snake plant root rot, gently slide the plant out of its pot, supporting the base. Be careful not to damage the roots further. Healthy roots are firm and typically whitish or light tan. Rotted roots, however, will be brown or black, feel mushy or slimy to the touch, and may even smell unpleasant.
How to Save a Snake Plant from Root Rot
So, can you save a snake plant with root rot? As the PlantMD horticultural expert confirms, “Yes, snake plants can often be saved from root rot if caught early. The key is decisive action: remove all affected roots and repot into fresh, dry, well-draining soil. Then, be patient and water very sparingly.” This snake plant root rot treatment involves a few critical steps:
- Using clean, sterile scissors or shears, carefully trim away all brown, mushy roots. Be thorough – leave only healthy, firm root tissue.
- (Optional) You can lightly dust the remaining healthy roots with a fungicide powder to help prevent further infection.
- Repot the plant into a clean pot (preferably terracotta with drainage holes) using fresh, well-draining cactus/succulent soil mix.
Wait at least a week before watering lightly, and then resume a very cautious watering schedule only when the soil is completely dry.
Why is My Snake Plant Not Growing? (Troubleshooting Water and Other Factors)
Is your snake plant alive but just… not growing? While slow growth is normal, a complete standstill might indicate an issue. If your snake plant is not growing, improper watering (both over and under) is a common culprit, but other factors can also be responsible. Assess the plant’s overall conditions, looking at these possibilities:
- Insufficient Light: While tolerant, they need some light (bright, indirect is best) for growth.
- Incorrect Watering: Consistently too wet or too dry stresses the plant.
- Root-Bound: The pot might be too small, restricting root growth.
- Dormancy: Growth naturally slows or stops in cooler winter months.
Less Common but Still a Problem: Signs of Underwatering
Though overwatering is the more frequent issue, an underwatered snake plant will also show signs of stress. These are less common but worth knowing. Look for:
- Leaves appearing wrinkled, shriveled, or curling inwards
- Leaf tips turning brown and crispy
- Soil pulling away from the sides of the pot and feeling bone dry
As always, confirm the soil is completely dry before watering.
Having learned how to spot and fix watering woes, let’s focus on setting your plant up for long-term success with the right foundation.
Long-Term Health: Choosing the Right Soil and Pot for Happy Snake Plants
Preventative care is key for long-term snake plant health. Selecting the right soil and pot, along with proper repotting techniques, will ensure your plant thrives.
The Importance of Well-Draining Soil and Recommended Mixes
Providing the right foundation starts with the soil. Using well-draining soil is absolutely non-negotiable to prevent the dreaded root rot, the most common snake plant killer. Aim for the best soil mix for snake plants: either a pre-bagged cactus/succulent mix or create your own.  A good DIY recipe involves standard potting soil amended with perlite or pumice, and coarse sand for excellent drainage.
Pot Perfection: Choosing the Ideal Home for Your Plant (Size, Material, Drainage)
Choosing the best pot for snake plant success involves a few key factors:
- Drainage is Critical: Non-negotiable! Ensure your pot has at least one drainage hole to let excess water escape.
- Material Matters: Terracotta (clay) pots are excellent choices as their porous nature helps the soil dry out more evenly and quickly.
- Size Appropriately: Select a pot that’s just slightly larger than the root ball. Avoid overly large pots, which hold excess moisture and increase root rot risk. Proper choosing the right pot size is essential.
Repotting Your Snake Plant: When and How to Do It Right
Repotting snake plant isn’t needed often; they prefer being slightly root-bound. Plan to repot every 2-5 years, or when you see roots emerging from drainage holes or cracking the pot. When it’s time, choose a new pot only 1-2 inches wider than the old one. Gently remove the plant, refresh with new, well-draining soil, and crucially, wait about a week before watering to allow any damaged roots to heal.
A Quick Note on Light and Temperature for Overall Health
While soil and pots are foundational, remember environment matters too. Snake plants thrive in bright, indirect light but are famously tolerant of lower light conditions. Ideal temperatures range from 70-90°F (21-32°C); protect them from cold drafts. Understanding these snake plant light requirements and temperature preferences helps you fine-tune watering, contributing to overall robust health.
By providing the right soil, pot, and environmental conditions, you set your snake plant up for years of healthy, low-maintenance growth.
Navigating snake plant watering advice can feel overwhelming, but you now hold the key: ditch the schedule and check the soil. Understanding why conditions matter empowers you to adapt, while knowing how to assess and rescue a potentially waterlogged store-bought plant tackles a common frustration head-on.
From identifying the first signs of trouble to choosing the right pot and soil mix, you’ve gained the tools to prevent the dreaded root rot. You’re no longer just guessing; you’re equipped to confidently nurture a thriving, resilient snake plant.
