Table of Contents
Ever googled “tomato plant care” and felt instantly overwhelmed? You’re not alone. Conflicting advice about pruning, especially removing those lower leaves, is everywhere, making it tough to know what’s best for your precious plants. As a new tomato grower, it’s easy to feel confused: should you really snip off leaves? When is the right time, especially for young plants? And specifically, when planting, should you remove lower tomato leaves? What about those first little leaves, the cotyledons?
This guide cuts through the confusion, offering clear, consolidated advice on when and why to remove lower tomato leaves at every stage, from seedling to mature plant. We’ll clarify key distinctions (like cotyledons vs. true leaves), explain the actual benefits (like encouraging deeper roots when transplanting and reducing disease risk), and even tackle common myths head-on, like the one linking lower leaves to blossom end rot. By the end, you’ll have the confidence to make informed decisions for healthier, more productive tomato plants.
Ready to gain clarity? Let’s start by understanding the key reasons why removing lower leaves can be beneficial.
Unlocking Healthier Tomatoes: Why Pruning Lower Leaves Matters
Removing lower tomato leaves offers tangible benefits that lead to healthier plants and a more bountiful harvest. This practice is a key part of good tomato care, helping prevent diseases and encouraging stronger growth. Understanding these advantages will give you the confidence to prune effectively.
Benefit 1: Letting in Light and Air for Healthier Growth
One of the primary benefits of removing lower tomato leaves is improved light penetration and air circulation. When you trim these leaves, you allow more sunlight to reach the inner parts of the plant, which aids overall vigor and can help your tomatoes ripen more evenly. When tomato plants experience better air circulation, their leaves dry faster after rain or watering.  This quick drying is crucial because it significantly reduces the risk of fungal diseases taking hold. So yes, it’s definitely OK to cut off bottom leaves!
Benefit 2: Your First Line of Defense Against Soil-Borne Diseases
Those lower leaves closest to the ground can be a direct pathway for trouble. Removing them is a key preventative measure for disease prevention in tomato plant care. When it rains or you water, soil containing harmful pathogens can splash up onto these low-hanging leaves. This is a common way for issues like early blight or septoria leaf spot preventing common soil-borne tomato diseases to infect your plants. By pruning these leaves, you create a buffer, making it much harder for soil-borne pathogens to reach your tomato plant.
Benefit 3: Paving the Way for Deeper Planting and More Roots
When you’re transplanting your young tomato plants, removing the lowest sets of leaves offers a fantastic advantage for stronger tomato root growth. This allows for deeper planting tomatoes; you can bury a significant portion of the stem. Tomato stems have the amazing ability to grow new roots (called adventitious roots) from any part that’s underground. More roots mean a more robust and resilient plant, better able to find water and nutrients. Many experienced gardeners agree that when planting, you should remove lower tomato leaves for this very reason.
Benefit 4: Channeling Energy for a Bountiful Harvest
Your tomato plant, like any plant, has a limited amount of energy to spend. By removing unnecessary lower leaves, especially those that are old, yellowing, or heavily shaded, you help your plant redirect its resources more efficiently. Think of it as focusing the plant’s energy where it counts most: towards developing those delicious fruits and supporting healthy new growth above. This strategic pruning can contribute to better fruit production by optimizing the plant’s energy. Understanding these benefits makes it clear why pruning is often recommended.
With these compelling reasons for removing lower leaves in mind, you’re likely wondering about the best time to do it. Now, let’s explore timing your trim with a stage-by-stage guide.
Timing Your Trim: A Stage-by-Stage Guide to Removing Lower Leaves
Specific, actionable guidance follows on when to remove lower tomato leaves at critical plant stages: seedling, transplanting, and established growth. It clarifies key distinctions like cotyledons vs. true leaves to help beginners prune at the right time, ensuring your young plants get the best start.
Seedling Stage: The Cotyledon Question and First True Leaves
When your tomato seedlings first sprout, you’ll notice two initial leaves; these are called cotyledons, or “seed leaves.” They look different from the true leaves that develop later.  Understanding this difference—cotyledons vs true leaves—is key for early care.
Many new gardeners ask, “Should I remove cotyledons from tomato seedlings?” The answer is generally no, not prematurely. Removing cotyledons too soon deprives the seedling of its initial energy source. A PlantMD horticultural expert advises, “New gardeners often worry about cotyledons, but these first ‘seed leaves’ are vital for initial seedling energy. It’s best to wait for several sets of true leaves before considering any pruning at this delicate stage.” Wait until your seedling has at least three to four sets of true leaves. Often, cotyledons will naturally yellow and fall off. Pruning tomato seedlings lower leaves, specifically the true leaves, is typically only needed if they are damaged or show signs of disease.
Transplanting Time: Pruning for a Stronger Start in the Ground
When it’s time to move your young tomato plants to their final garden spot or a larger pot, a little pruning can make a big difference. Before transplanting tomatoes, remove any lower leaves that would end up below the soil line once planted. This practice is widely recommended because it allows you to plant the seedling deeper. Planting deeper encourages new roots to sprout along the buried portion of the stem, leading to a stronger, more robust root system. This not only anchors the plant better but also helps prevent potential rot or disease issues that can arise from leaves being in constant contact with moist soil. This simple step helps your tomatoes establish quickly and thrive.
Established Plants: Routine Lower Leaf Removal for Ongoing Health
Once your tomato plants are established and growing vigorously, ongoing lower leaf removal becomes a routine part of their care. For established tomato plants, regularly check and remove any lower leaves that are touching the soil or are very close to it. This is crucial for disease prevention, as soil can harbor pathogens that splash onto leaves during watering. As the plant matures, also prune away any lower leaves that turn yellow or become damaged. You might wonder why tomato leaves might be yellowing; often it’s natural aging. Removing these leaves not only keeps the plant looking tidy but, more importantly, improves air circulation around the base of the plant, further reducing the risk of fungal diseases. This routine pruning contributes significantly to the overall health and productivity of your plants.
Spot the Signs: Identifying Which Lower Leaves to Remove (And When)
Knowing which lower leaves to remove and when is key to successful pruning. You don’t need to remove all lower leaves, only those that fit specific criteria. Generally, you should identify tomato leaves to prune if they are:
- Yellowing: These leaves are often aging naturally and no longer contributing significantly to the plant’s energy.
- Damaged: Leaves showing signs of pest damage or disease should be removed promptly to prevent spread.
- Touching the soil: As mentioned, these pose a risk for soil-borne diseases.
- Very close to the soil: Even if not touching, leaves near the ground can reduce airflow and increase humidity, favoring diseases.
Healthy green leaves higher up on the plant, even if they are lower branches, should generally be kept unless they are extremely dense and significantly obstructing airflow to the inner parts of the plant.
Understanding when and which leaves to remove sets the stage for healthy growth. Now that you know the timing for different stages, let’s explore the gentle snip and how to safely remove lower tomato leaves.
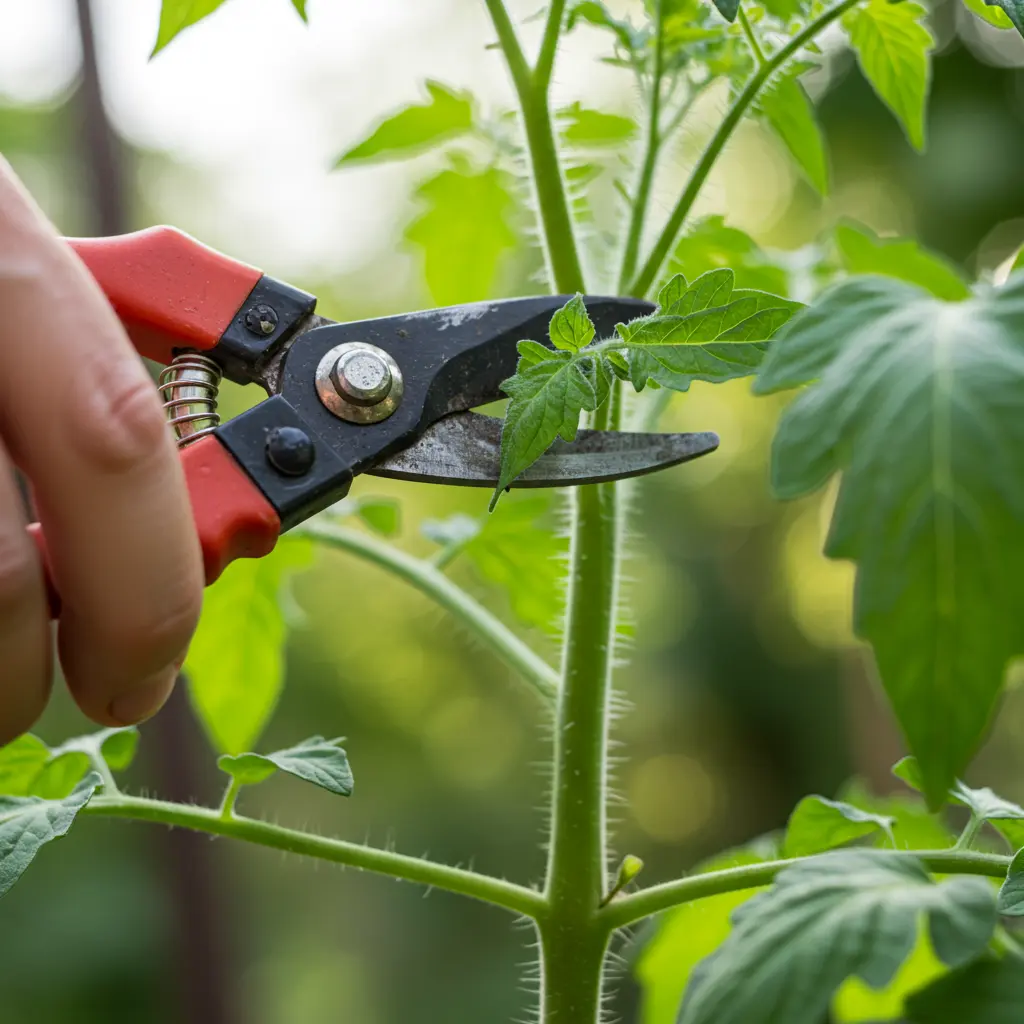
The Gentle Snip: How to Safely Remove Lower Tomato Leaves
Clear, step-by-step instructions follow on the physical act of removing lower tomato leaves safely and effectively. It aims to build confidence in execution with practical tips.
Your Pruning Toolkit: Clean Hands, Snips, or Scissors?
Gathering your pruning toolkit is simple. The key is cleanliness to protect your tomato plants.
- For very young, tender leaf stems: Your clean fingers can often do the trick, gently pinching them off.
- For sturdier leaves: Use sharp pruning snips or dedicated scissors. These are essential tools for pruning tomatoes effectively.

- Crucially, ensure clean pruning tools: Sterilize them with rubbing alcohol, especially when moving between plants, to prevent disease spread. Find out sterilizing your pruning tools.

The Right Moves: Pinching vs. Cutting Lower Leaves Safely
When removing lower leaves, you have two main techniques. For very small, young leaf stems, pinching tomato leaves is often best. Simply grip the stem near its base and pinch it off cleanly. This minimizes stress on the plant. For thicker, more mature stems, it’s better to learn how to cut tomato leaves properly. Use your clean, sharp snips or scissors to make a precise cut, being careful not to tear the main stem.
Where to Make the Cut: Ensuring Healthy Healing
Knowing exactly where to cut tomato leaves promotes quick healing and prevents issues. Aim to make your cut close to the main stem, but not perfectly flush with it, as this can damage the main stem. Leaving a very tiny stub, about 1/8 to 1/4 inch, or cutting near the slight swelling (collar) at the leaf stem’s base is ideal. Avoid leaving long stubs, as these can attract pests or rot.
Post-Pruning Care: Tips for Quick Recovery
A little care after pruning helps your tomato plants recover swiftly. For good tomato plant care after pruning:
- Prune on a dry day: If possible, choose a dry day. This helps pruning wounds seal quickly, reducing infection risk.
- Water at the base: Avoid overhead watering on freshly pruned areas. Learn about proper watering techniques.
- Monitor plants: Keep an eye on them for a day or two post-pruning to ensure they are healing well.
Now that you know how to safely perform the gentle snip, you’re well on your way to healthier tomato plants. Next, we’ll clear up some common tomato pruning myths and then explore the topic of tomato suckers.
Tomato Pruning Myths vs. Facts: What Beginners Need to Know
Common misunderstandings about removing tomato leaves need clarification. This will clear up confusion, especially around blossom end rot, so you can feel confident in your gardening choices. Busting pesky tomato pruning myths and providing facts helps you make informed decisions.
Myth Debunked: Pruning Lower Leaves and Blossom End Rot (BER)
Q: Does removing lower tomato leaves prevent blossom end rot? 
A: No, this is a common misconception and one of the biggest tomato pruning myths. Many beginners wonder if removing lower tomato leaves stops blossom end rot (BER), but it doesn’t. PlantMD horticultural expert clarifies, “It’s a persistent myth that pruning lower leaves cures blossom end rot. The truth is, BER is a physiological disorder primarily related to calcium availability and consistent watering, not the presence of lower leaves.” So, pruning those lower leaves won’t fix or prevent BER. It’s actually an issue with calcium uptake by the plant.
The Real Culprits Behind BER: Calcium, Water, and Tomato Health
So, what are the real causes of blossom end rot? BER happens when your tomatoes can’t get enough calcium to the developing fruit. This isn’t usually because your soil lacks calcium, but more often due to inconsistent watering. importance of consistent watering Fluctuating moisture levels disrupt the plant’s ability to absorb and transport calcium effectively. Sometimes, an actual calcium deficiency in tomatoes can be the issue, but good watering practices are your first line of defense. understanding blossom end rot causes Addressing these factors is key to healthy, rot-free tomatoes.
Yellowing Lower Leaves: Natural Aging vs. Cause for Concern
Seeing yellowing tomato leaves on the lower part of your plant can be worrying, but it’s not always a problem. It’s perfectly normal for the oldest, lowest leaves to gradually yellow and die off as the plant matures – this is a natural process called senescence in tomato leaves. However, if you see rapid yellowing, distinct patterns, or the yellowing spreads upwards, it might signal issues like nutrient deficiencies or disease. diagnosing yellow tomato leaves Understanding these differences helps you care for your plants effectively.
With these pruning myths clarified, we can now explore another key pruning topic: tomato ‘suckers’.
Decoding Tomato ‘Suckers’: To Prune or Not to Prune?
Tomato ‘suckers’ are defined here, along with how to identify them and the pros and cons of their removal. It provides nuanced guidance to help beginners decide whether to prune suckers on their plants.
What is a Tomato Sucker and How to Identify It
Understanding what tomato suckers are is key to making good pruning choices. A tomato sucker is a new shoot that grows in the ‘axil’ – that’s the V-shaped spot where a side branch (leaf stem) meets the main stem.  This new growth will attempt to become another main stem if left alone. You can easily identify tomato suckers by looking for these small shoots in those tell-tale V-junctions on your plant.
The Great Sucker Debate: Pros and Cons of Pruning Them
Deciding to prune suckers? Consider the pros and cons. Pruning can mean larger fruits and better airflow, but fewer total tomatoes. It’s a trade-off. As PlantMD horticultural expert advises, “To prune suckers or not? It’s a key decision for tomato growers. For indeterminate varieties, it can lead to larger, albeit fewer, fruits. For determinate types, however, removing suckers might actually reduce your overall yield. Understanding your plant’s growth habit is crucial here.” Your variety and goals are key.
Safely Removing Suckers (If You Decide To)
If you choose to prune, safely removing tomato suckers is straightforward, especially for beginners. It’s best to remove them when they are small, about 2-4 inches long. At this size, you can usually pinch or snap them off cleanly with your fingers right at the base where they meet the stem. For any larger or tougher suckers, use clean, sharp snips or pruners to make a neat cut. This prevents tearing the main stem and keeps your plant healthy.
With a clear understanding of how to manage tomato suckers, you’re now equipped with key pruning strategies to nurture thriving tomato plants and look forward to a bountiful harvest.
Deciding if and when to remove lower tomato leaves, especially during planting, or how to handle suckers, should now feel far less daunting. This guide has demystified the process, clarifying why strategic pruning boosts plant health, when to act at each growth stage—from seedling cotyledons to established plants—and how to do so safely. By sifting myths from facts and understanding the distinct needs of your tomatoes at different times, you’ve gained reliable insights. Ultimately, you’re now equipped with the confidence and knowledge to make informed pruning decisions, fostering better air circulation, minimizing disease, and paving the way for a thriving tomato harvest.
