Table of Contents
Receiving a stunning amaryllis bulb, often around the holidays, brings the promise of spectacular blooms. Planting it is exciting, watching the stalk emerge and the flower unfurl. But after the initial show fades, a common question arises: how do you get this magnificent bulb to bloom again next year?
If you’ve searched for answers, you’ve likely encountered conflicting advice, particularly regarding whether amaryllis bulbs truly need a period of dormancy to rebloom successfully indoors. Navigating the different methods and recommendations can be confusing.
This guide cuts through the confusion. We’ll walk you through the simple steps for how to plant amaryllis bulbs in pots to ensure a dazzling first display. More importantly, we’ll tackle the post-bloom care debate head-on, exploring the popular dormancy method alongside alternative approaches. Drawing on practical grower experiences, we’ll help you choose the best strategy for your plant. You’ll also find actionable tips for troubleshooting common issues, like bulbs that only produce leaves.
Let’s start by getting your amaryllis bulb properly planted for success.
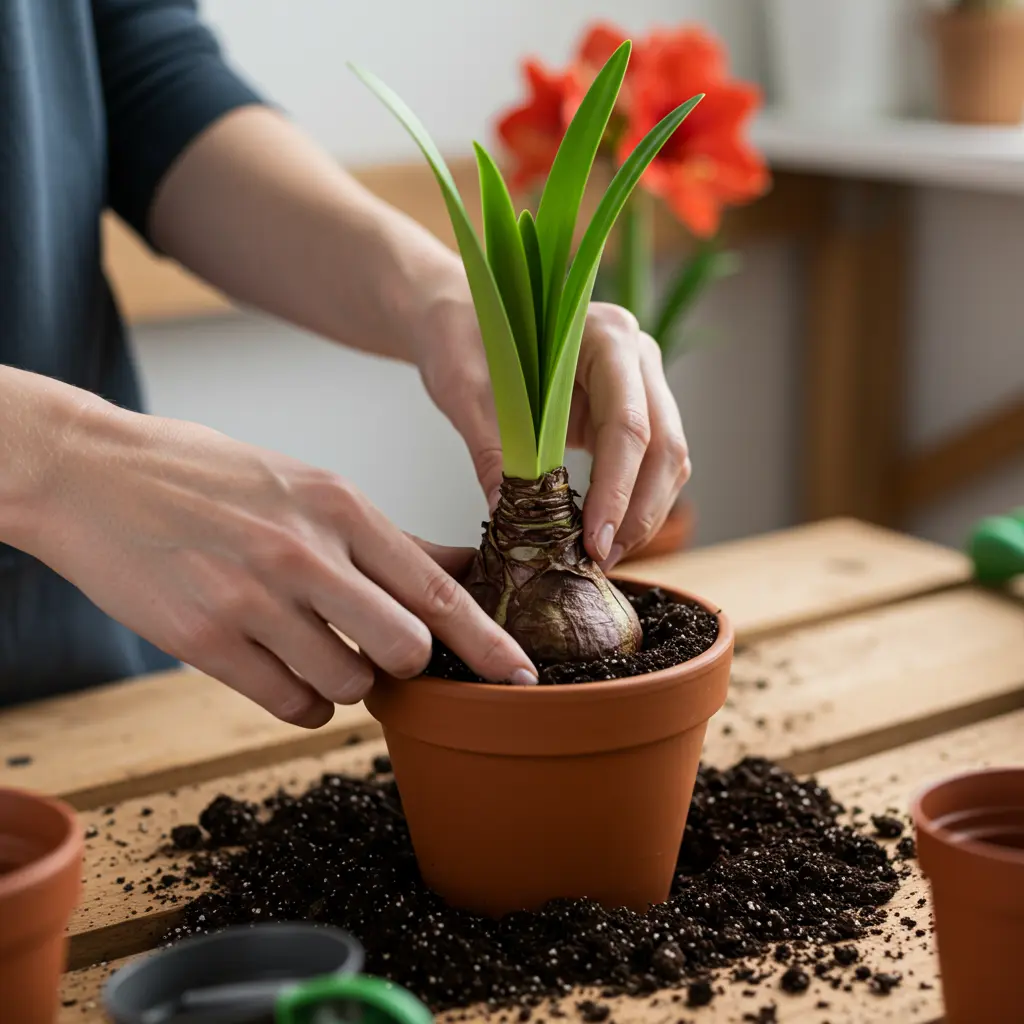
Planting Your Amaryllis Bulb: A Step-by-Step Guide
Get started with your amaryllis by following these clear steps for planting. Choosing the right materials is key to ensuring stunning initial blooms.
Gathering Your Supplies
Begin by gathering your essential amaryllis planting supplies. Having everything ready makes the process smooth and enjoyable. You’ll need just a few key items to give your bulb the best start.
 An Amaryllis bulb
- A Pot (approx. 6-inch for one bulb, with drainage holes)
- Well-draining potting mix
- Water
 An Amaryllis bulb
Choosing the Right Pot
Selecting the perfect pot is crucial for your amaryllis’s health. Choose a container that is slightly larger than the bulb, allowing about 1-2 inches of clearance between the bulb and the pot sides. This snug fit helps prevent excess wet soil, which encourages flowering rather than just root growth. Proper amaryllis pot size is often around 6 inches for a single standard bulb. Critically, ensure the pot has adequate amaryllis pot drainage holes; good drainage is vital to prevent the bulb from rotting, a common issue for beginners.
Selecting the Best Soil Mix
Your amaryllis needs a quality, well-draining soil to thrive. Avoid using heavy garden soil, as it’s too dense and retains too much moisture, leading to bulb rot. Instead, opt for a good commercial amaryllis soil mix. Look for mixes containing components like perlite or sand; these materials improve aeration and drainage, which is crucial for preventing rot. A loose, breathable mix provides the ideal environment for your bulb.
Planting Your Bulb
Now you’re ready to plant! Follow these simple steps for how to plant amaryllis bulbs in pots:
- Place the bulb in the pot, pointed end facing upwards.
- Fill the pot with your chosen soil mix around the bulb.
- Leave the top one-third of the bulb exposed above the soil line. This is important as it helps prevent crown rot and allows the flower stalk to emerge easily.
- Firm the soil gently around the base of the bulb to secure it.
Initial Watering
Proper watering amaryllis after planting is key. Water thoroughly right after planting to help settle the soil around the bulb. Then, be patient! Do not water again until you see about 2 inches of new green growth emerge from the top of the bulb. Overwatering during this initial period before active growth begins is a primary cause of bulb rot, so resist the urge to water frequently. Once growth appears, you can transition to more general houseplant watering guidelines.
Finding the Right Spot
Finally, place your newly potted amaryllis in a suitable location. The ideal amaryllis temperature is warm, around 68-75°F (20-24°C), to encourage growth. It also needs bright, indirect sunlight. Meeting these amaryllis light requirements initially encourages the flower stalk to grow tall and strong without scorching the emerging leaves or buds. Direct sun can be too intense at this stage. You’ve successfully planted your bulb and set the stage for beautiful blooms!
With your amaryllis bulb correctly planted and positioned, let’s move on to caring for it after flowering.
Caring for Your Amaryllis After Flowering
Once the initial blooms fade, proper care is crucial for the bulb’s health and future reblooming potential. Here’s what to do next.
After the Blooms Fade
Immediately after your amaryllis finishes blooming, it’s time for some simple cleanup. Cut the faded flower stalk off about 1-2 inches above the bulb.  Critically, do not cut off the leaves. These are absolutely essential for the bulb to gather energy for future flowers, a key aspect of amaryllis care after flowering.
Why Leaves Matter
The amaryllis leaves play a vital role after flowering. Through photosynthesis, they capture energy from sunlight, converting it into food that replenishes the bulb. This period of “vegetative growth,” where the plant focuses on developing foliage rather than flowers, is critical for storing enough energy. This stored energy fuels the next cycle of spectacular blooms.
Ongoing Care
After the flowers are gone, continue to treat your amaryllis much like a regular houseplant. For watering amaryllis after flowering, provide moisture when the top inch of soil feels dry; you can find general tips on how often to water houseplants. Ensure it receives plenty of bright, indirect sunlight. If all danger of frost has passed, you can even move it outdoors for the summer months.
Should I fertilize my amaryllis bulb after it blooms?
Yes, fertilizing amaryllis after blooming is beneficial. Feeding during active leaf growth helps the bulb replenish its energy reserves, crucial for developing the next set of flowers. Use a balanced liquid houseplant fertilizer, like one you might find when looking for the choosing a suitable fertilizer, applying it every 2-4 weeks. Always adhere to the specific instructions on your fertilizer’s packaging.
Preparing for Rest
As late summer or early fall arrives, you will likely observe the amaryllis leaves yellowing and starting to wither. This is a completely normal process, so there’s no need for concern. It indicates the bulb is preparing to enter a rest period, also known as dormancy. Begin to reduce watering as the leaves die back, signaling to the bulb that it’s time to rest.
Having managed post-bloom care, your amaryllis is set for its next cycle. Now, let’s delve into reblooming your amaryllis, considering dormancy versus continuous growth.
Reblooming Your Amaryllis: Dormancy vs. Continuous Growth
Getting your amaryllis to bloom again involves a choice between two main approaches often debated by growers: forcing dormancy or providing continuous care. Let’s explore both methods to understand how to make amaryllis rebloom.
The Reblooming Goal
The primary aim is to encourage a new flowering cycle. This objective hinges on the bulb having successfully stored enough energy during its post-bloom leaf growth phase, a crucial step we’ve discussed. Successfully triggering this new cycle means you can enjoy those stunning blooms year after year.
Do amaryllis bulbs need a dormant period to flower again?
It’s a common question, and advice can be confusing! Traditionally, an amaryllis dormancy period of 8-12 weeks in a cool, dark place was considered essential. However, many growers now successfully rebloom amaryllis indoors using a continuous growth method, skipping forced dormancy. Both approaches can yield results. As one Horticultural Expert notes, “The ‘great dormancy debate’ for amaryllis is real! While traditional methods swear by a cool rest, many home growers find success with continuous care. The best approach often depends on your specific bulb and growing conditions.” Deciding if your amaryllis bulbs need dormancy often comes down to your environment and preferences.
The Traditional Dormancy Method
This method involves forcing amaryllis dormancy to mimic its natural rest cycle. Here are the typical steps:
- Stop Watering: Once the leaves naturally yellow and die back, usually in late summer or early fall, cease watering completely.
- Cool, Dark Storage: Move the potted bulb to a cool, dark, and dry location. Ideal temperatures are between 50-60°F (10-15°C). A basement, closet, or unheated garage can work.

- Rest Period: Leave the bulb undisturbed in these conditions for a minimum of 8-12 weeks. Do not water it during this time.
- Wake Up: After the dormancy period, bring the pot back into a warm, brightly lit area. You can repot it now if needed. Begin watering very sparingly until new growth appears, signaling it’s ready to start its next bloom cycle.
This carefully controlled rest often leads to robust reblooming.

The Continuous Growth Alternative
The continuous growth approach for your amaryllis means you skip a formal dormancy period. Instead, you maintain amaryllis bulb care indoors year-round. Keep the plant in a location with bright, indirect light. Continue your regular watering and fertilizing schedule, though you might reduce frequency slightly during the fall and winter months. This method attempts to mimic the conditions of some amaryllis varieties in their native, warmer climates where they don’t experience a pronounced cold dormancy. While this technique for trying to rebloom amaryllis without dormancy can be simpler, be aware that bloom timing might be less predictable compared to forcing dormancy.
Which Method to Choose?
Deciding between amaryllis dormancy vs continuous growth depends on your goals and growing conditions. Many growers share varied experiences.
- Forcing Dormancy:
- Pros: Often results in more predictable bloom timing and potentially larger flowers, as the bulb has had a concentrated rest.
- Cons: Requires a dedicated cool, dark space for 8-12 weeks, which not everyone has.
- Continuous Growth:
- Pros: Simpler, as it doesn’t require special storage conditions. You continue basic care.
- Cons: Bloom timing can be less predictable, and some community members find it may not work as consistently for all bulbs or in all home environments.
Consider your available space and how important precise bloom timing is for you.
Getting Holiday Blooms
Timing amaryllis blooms for a specific occasion like Christmas is achievable with planning. Amaryllis typically flower about 6-8 weeks after they break dormancy and active growth resumes. To aim for a Christmas bloom, count back approximately 8-10 weeks from late December. This date is when you should end the dormancy period (if using that method) by bringing the bulb into warmth and light, and starting to water it. Careful timing helps ensure festive flowers.
Whether you choose to induce dormancy or opt for continuous growth, you have options for encouraging your amaryllis to rebloom. Understanding these methods empowers you to make the best choice for your plant and situation.
Understanding these reblooming strategies helps you enjoy your amaryllis for years. However, if challenges arise, our next section covers troubleshooting common amaryllis problems.
Troubleshooting Common Amaryllis Problems
Even with careful planning, you might encounter issues. Here’s how to address common amaryllis problems, especially related to reblooming.
It’s a common and understandable frustration: your amaryllis produces lush, green leaves, but no flower stalk emerges. Why might this happen?
Q: Why is my amaryllis growing long leaves but no flower stalk?
A: There are a few likely reasons for amaryllis leaves but no flowers:
- Insufficient Stored Energy: The bulb didn’t gather enough energy after its last bloom. Ensure it received adequate light and fertilizer during its post-bloom growth phase, as detailed earlier.
- Improper Dormancy: If you induced dormancy, the period might have been too short, too long, too warm, or not dry enough. Review the dormancy conditions discussed previously.
- Bulb Immaturity/Size: A very young or small bulb may prioritize leaf growth over flowering.


Carefully reviewing the post-bloom care and dormancy steps you followed can often reveal why no flower stalk appeared on your amaryllis.
Problem: Soft or Rotted Bulb
Discovering a soft amaryllis bulb is disappointing, often signaling rot. This is typically caused by overwatering or planting in soil that doesn’t drain well. Always use a pot with drainage holes and a well-draining potting mix. Water sparingly, especially before active growth begins. Critically, check bulb firmness before planting; if an amaryllis bulb feels significantly soft or mushy, it’s best to discard it to avoid introducing potential amaryllis bulb rot issues.
Problem: Pests
Keep an eye out for common amaryllis pests. You might notice:
- Fine webbing, indicating spider mites.
- White, cottony spots, signaling mealybugs.
If you spot these signs, act promptly. Often, simply wiping the leaves thoroughly with a damp cloth is effective. For more stubborn infestations, consider using insecticidal soap following product instructions treating common houseplant pests. Always isolate affected plants to prevent pests like spider mites on your amaryllis from spreading.
Problem: Diseases
Amaryllis diseases can occur, with red blotch (Stagonospora curtisii) being relatively common. This fungal issue appears as red streaks or spots on leaves and stalks. To manage red blotch amaryllis, improve air circulation around the plant, avoid wetting the foliage when watering, and promptly remove any affected leaves. managing red blotch disease
If Reblooming Fails
If your amaryllis is not reblooming despite your efforts, systematically review the key factors discussed throughout this guide:
- Was the post-bloom care adequate (sufficient light, water, fertilizer)?
- Was the dormancy period handled correctly (if you chose that method)?
- Is the bulb still firm, healthy, and mature enough?
- Is the pot size appropriate (not excessively large)?
Don’t be discouraged if reblooming doesn’t happen the first time. By carefully reviewing these points, you can often diagnose the issue and adjust your approach for future success.
With these troubleshooting tips, you’re better equipped to diagnose and resolve common amaryllis issues, increasing your chances of enjoying beautiful blooms year after year.
Planting your amaryllis bulb correctly sets the stage for spectacular blooms, and this guide provided the clear steps to get you started. We’ve navigated the journey beyond that first flower, covering essential post-bloom care and demystifying the often-confusing choice between dormancy and continuous growth for successful reblooming.
By tackling common problems head-on and clarifying these debated methods based on real grower insights, you can confidently choose the best path for your plant. Ultimately, achieving those repeat blooms year after year is well within reach. With this knowledge, you’re equipped to nurture your amaryllis back to flowering glory.
