Table of Contents
Ever put cantaloupe seeds in the ground or a pot, waited patiently, and seen… nothing? Or perhaps just a few weak sprouts that quickly faded? It’s incredibly frustrating when your dreams of harvesting sweet, juicy melons don’t even make it past the starting line. Getting those tiny cantaloupe seeds to germinate successfully can feel like a mystery, especially for beginner gardeners unsure about the exact conditions needed for them to thrive.
This comprehensive guide is here to take the guesswork out of how to plant cantaloupe seeds. We’ll provide clear, step-by-step instructions covering everything from selecting the best seeds and preparing your planting mix to ensuring the absolutely crucial warmth they need – we’ll demystify why a consistent 80°F (27°C) soil temperature is key, not just the air temp! You’ll also find practical advice for troubleshooting common germination failures and specific tips for successfully growing cantaloupe in containers or small spaces.
Ready to ditch the germination worries and confidently start your journey towards a rewarding homegrown cantaloupe harvest? Let’s begin by gathering your supplies and preparing for planting.
Before You Plant: Essential Preparations for Cantaloupe Success
Understanding the essential preparations before planting cantaloupes is key to success. This includes selecting the right seeds, recognizing critical soil needs like the ideal 80°F (27°C) temperature, and timing your planting correctly.
Cantaloupe 101: Sun, Space, and Growing Season Essentials
Embarking on your journey of growing cantaloupe starts with understanding a few essentials. Cantaloupes thrive with:
- Full Sun: At least 6+ hours daily. Sun is vital as it fuels photosynthesis, directly impacting the sugar development and sweetness of your fruits.

- Ample Space: Their sprawling vines need room to grow.
- Long, Warm Growing Season: This typically means a period of at least 3-4 months consistently free from frost, with average daily temperatures supporting vigorous growth.
With these foundations, you’re ready to choose your seeds.

Selecting the Best Cantaloupe Seeds for Your Garden and Goals
Choosing the right seeds is crucial when learning how to plant cantaloupe seeds. Select varieties suited to your climate; check the ‘days to maturity’ against your local growing season length, and consider . Prioritize disease-resistant types, especially as a beginner, as this reduces potential crop loss and frustration. Fresh, viable seeds give you the best start. Once you have your seeds, understanding soil temperature is the next critical step.
The Golden Rule of Germination: Why 80°F (27°C) Soil Temperature is Non-Negotiable
The key to cantaloupe seed germination is 80°F (27°C) soil temperature—not air, a common point of confusion for many gardeners. This minimum soil temperature for cantaloupe seed germination ensures optimal enzyme activity for sprouting. As PlantMD horticultural expert states, “Don’t gamble with germination; 80°F soil temperature is the non-negotiable key for cantaloupe seeds. It ensures rapid, even sprouting and prevents the rot that plagues seeds planted in cooler soil.” Always use a soil thermometer to check. But what if it’s colder?
Answering: What Temperature is Too Cold for Cantaloupe Seeds?
Q: What temperature is too cold for cantaloupe seeds?
A: Soil below 70°F (21°C) is too cold for reliable cantaloupe seed germination; sprouting will be slow, erratic, or fail. While 80°F (27°C) is ideal, soil consistently below 60-65°F (15-18°C) often causes seeds to rot. Maintaining this minimum soil temperature is crucial for success. Next, let’s prepare your planting site.
Preparing Your Garden Bed or Containers for Planting
Proper site preparation is key for growing cantaloupe and learning how to plant cantaloupe seeds.
- Choose a full sun location.
- Amend soil with compost: Cantaloupes are heavy feeders; compost adds vital nutrients and improves soil structure for better drainage.
- Warm the soil if needed: In cooler areas, using black plastic to warm soil laid over the soil for a few weeks can help raise temperatures.
With your site ready, timing is next.
When to Plant Cantaloupe Seeds: Indoors vs. Outdoors Timing
Knowing when to plant is vital. For a head start in shorter seasons, consider starting cantaloupe seeds indoors 3-4 weeks before your last frost. If direct sowing, only plant when soil is consistently 80°F (27°C), crucial for how to plant cantaloupe seeds successfully. Understanding these key preparations—sun, space, seeds, soil warmth, and timing—sets you up for success.
With these essential preparations understood, you’re now ready to plant your cantaloupe seeds.
Planting Your Cantaloupe Seeds: A Step-by-Step Guide
Now, let’s walk through the clear, actionable instructions for planting cantaloupe seeds, whether you’re starting them indoors for warmth or direct sowing into prepared garden soil.
Option 1: Starting Cantaloupe Seeds Indoors for a Head Start
Starting cantaloupe seeds indoors gives your plants a valuable head start, especially in cooler climates. Peat pots are excellent as they minimize transplant shock later, making the move to the garden easier on your seedlings.
Here’s how to begin:
- Use peat pots or seed starting trays.

- Plant 2-3 seeds per pot, about 1/2 inch deep.
- Maintain consistent moisture and warmth; the ideal soil temperature when starting cantaloupe seeds indoors is around 80°F (27°C). Consistent conditions are key for successful germination.
Once seeds are planted, maintaining that crucial warmth is the next focus.

How to Keep Soil Warm for Cantaloupe Germination Indoors
Maintaining the ideal cantaloupe seed germination temperature of 80°F (27°C) is vital when starting cantaloupe seeds indoors. Many gardeners find success with these methods:
- Use a seedling heat mat under your seed trays for reliable, direct warmth; this is a popular community solution.
- Place trays in a naturally warm spot, like on top of a refrigerator or near a gentle heat source.
- Cover trays with a plastic dome to retain both heat and humidity until sprouts appear; this creates a mini-greenhouse effect crucial for germination.
These techniques ensure your seeds get the consistent warmth they need. Next, consider direct sowing outdoors if conditions allow.
Option 2: Direct Sowing Cantaloupe Seeds Outdoors (When Soil is Ready)
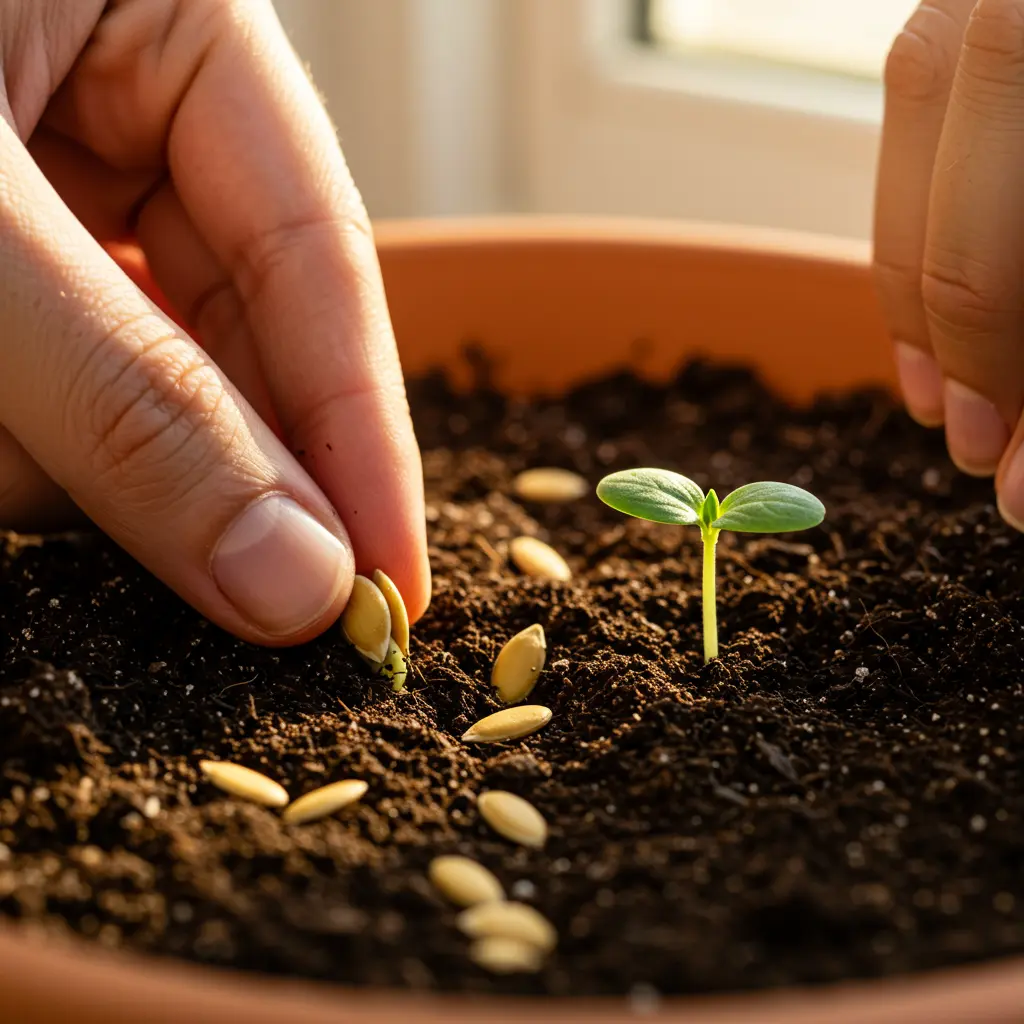
If your climate allows, direct sowing is a straightforward way how to plant cantaloupe seeds. Before you begin, critically, ensure your garden soil has warmed to at least 80°F (27°C); this soil temperature is crucial for success and must be checked before planting.
Follow these steps:
- Confirm soil temperature is 80°F (27°C).
- Plant seeds 1/2 inch deep in prepared hills or rows.
- Space hills 3-4 feet apart, or rows 5-6 feet apart. This spacing allows ample room for vine growth and promotes good air circulation, reducing disease risk.
- Sow 4-5 seeds per hill.
Understanding the right technique for depth and spacing is key.
Planting Technique: Correct Depth, Spacing, and Grouping for Seeds
Proper technique is essential when learning how to plant cantaloupe seeds for optimal growth. Always plant seeds about 1/2 inch deep; this depth provides protection and access to moisture. Planting multiple seeds per spot, whether in hills or pots, is a good strategy to help ensure at least one strong seedling emerges, as not all seeds may germinate.
Here’s a quick guide:
- For direct sowing: Group 4-5 seeds in hills spaced 3-4 feet apart. Alternatively, plant single seeds every 12 inches in rows that are 5-6 feet apart.
- For starting indoors: Sow 2-3 seeds per individual pot.
This strategic planting sets the stage for healthy development. Now, let’s discuss initial watering.
Watering Your Newly Planted Cantaloupe Seeds
After you plant cantaloupe seeds, proper watering is your next crucial step. Water gently but thoroughly immediately after planting to settle the soil around the seeds. Your goal is to keep the soil consistently moist, like a wrung-out sponge, but never waterlogged, until germination occurs. consistent watering Overly wet soil can cause seeds to rot. Be careful with your watering technique, especially using a gentle stream, to avoid dislodging the newly planted seeds. This initial care helps ensure your seeds have the best chance to sprout. With seeds planted and watered, you’re on your way to growing delicious cantaloupes.
With your cantaloupe seeds successfully planted and initially watered, the next step is caring for them as they sprout and grow into seedlings.
From Sprout to Seedling: Caring for Young Cantaloupe Plants
Once your cantaloupe seeds have germinated, essential care for young seedlings is crucial. This involves managing their first appearance, light, water, thinning, and preparing them for the outdoors to ensure your young plants thrive.
They’ve Sprouted! What Now?
Congratulations, your cantaloupe seeds have sprouted!  Now, remove any plastic covers immediately; this allows vital air circulation and helps prevent damping-off disease. Your seedlings need ample light right away to start growing strong. Keep the soil consistently moist but not waterlogged. Proper early care is key when growing cantaloupe and sets the stage for healthy development, starting with providing the right light.
Light Requirements: Preventing Leggy Cantaloupe Seedlings
Young cantaloupe seedlings crave strong light. If growing indoors, provide 12-16 hours daily under or place them in your sunniest window. Without enough intense light, seedlings stretch desperately towards the source, a condition called etiolation. This results in weak, “leggy” stems unable to support the plant. Adequate light ensures sturdy growth, preparing them for proper watering.
Watering Your Growing Cantaloupe Seedlings
Keep your cantaloupe seedlings consistently moist, but avoid soggy soil. Check the soil daily; water thoroughly when the top inch feels dry to the touch. Aim water directly at the base of the plant, keeping the leaves dry to help prevent fungal diseases. Overwatering is a common mistake that can lead to root rot or damping-off. Following proper watering techniques ensures your seedlings get the hydration they need without drowning. Next, let’s address giving them adequate space.
Thinning Seedlings for Healthier Plants
Once your seedlings develop their first set of “true leaves” (not the initial seed leaves), it’s time to thin them. Choose the strongest one or two seedlings per pot or hill and remove the others. Snip the unwanted seedlings off at the soil level using small scissors. Snipping is better than pulling, as it avoids disturbing the delicate roots of the seedling you keep. Thinning reduces competition for light, water, and nutrients. Now, let’s prepare indoor seedlings for the outdoors.
Hardening Off Indoor-Started Cantaloupe Seedlings
If you’re starting cantaloupe seeds indoors, you must gradually acclimate your seedlings to outdoor conditions before transplanting. This “hardening off” process prevents shock from sudden changes in temperature, sunlight, and wind. Follow these steps over 7-10 days:
- Start by placing seedlings in a shady, protected spot outdoors for just 1-2 hours.
- Gradually increase the time outdoors and exposure to direct sunlight each day.
- Bring them back inside each night initially.
- Reduce watering slightly during the final days.
Understanding leaf types helps identify the right time for crucial steps like thinning.
Understanding Cotyledons vs. True Leaves
When your cantaloupe first sprouts, you’ll see two initial leaves called cotyledons, or “seed leaves.” These look different from the plant’s mature leaves and provide initial energy from the seed. Soon after, the “true leaves” emerge, which resemble the familiar lobed leaves of a cantaloupe plant. Waiting for true leaves before thinning helps you better judge which seedlings are the most vigorous for growing cantaloupe.
With your seedlings properly cared for, thinned, and hardened off, you’ve navigated the crucial early stages. Now, you’re equipped to identify and address potential problems with common seed and seedling issues.
Help! Solving Common Cantaloupe Seed & Seedling Issues
This troubleshooting section addresses common problems beginner gardeners face with cantaloupe seeds and seedlings, offering solutions based on expert advice and community insights. Don’t worry if things aren’t going perfectly; many early challenges are easily fixable with a little know-how.
Why Aren’t My Cantaloupe Seeds Sprouting?
It’s frustrating when seeds fail to emerge. Often, the issue is simple to diagnose and fix.  Based on community experience and expert consensus, the most frequent culprit is soil temperature.
Q: What stops cantaloupe seeds from sprouting?
- Soil Too Cold: This is the most common issue. Cantaloupe seed germination temperature needs to be consistently warm, ideally around 80°F (27°C).
- Old Seeds: Seed viability decreases over time. Check the packet date or .
- Incorrect Moisture: Soil that’s constantly waterlogged or completely dried out prevents germination.
- Planted Too Deep: Planting deeper than recommended (usually ½ to 1 inch) makes it hard for sprouts to reach the surface.
As a PlantMD horticultural expert notes, “Nine times out of ten, cantaloupe seeds fail because the soil is too cold – remember that 80°F sweet spot! Before blaming the seeds, grab a soil thermometer; it’s the most crucial diagnostic tool for germination issues.” Knowing how long cantaloupe seeds take to sprout (typically 5-10 days) helps gauge if there’s truly a problem. If temperature seems right, consider other possibilities like rot or pests.
What if My Seeds Rotted, Were Eaten, or Disappeared?
Discovering mushy seeds or empty planting holes is disheartening. Understanding the likely causes helps prevent future issues when learning how to plant cantaloupe seeds.
Q: What happened to my missing or rotted seeds?
- Rotted Seeds: Often caused by overly wet, cold soil conditions, which encourage fungal growth before the seed can sprout. Ensure good drainage and wait for proper soil warmth.
- Eaten/Vanished Seeds: Common culprits include mice, voles, birds, or soil insects like cutworms . These pests dig up or consume seeds before they germinate. Consider simple protective measures like row covers, netting, or collars if pests are suspected protecting seeds from pests.
If your seeds vanished or rotted, adjust your watering or employ protective tactics next time. Next, let’s look at issues once seedlings emerge, like legginess.
Why Are My Cantaloupe Seedlings Leggy (Tall and Spindly)?
Tall, pale, and weak seedlings stretching desperately are a common sight for indoor seed starters. This “legginess” signals a specific environmental need isn’t being met.
Q: What causes leggy cantaloupe seedlings?
Legginess, or etiolation, happens when seedlings don’t receive enough light. They instinctively stretch upwards, seeking a stronger light source, resulting in thin, weak stems. To fix this while growing cantaloupe, ensure they receive much brighter light, either by moving them to a sunnier location or using dedicated grow lights positioned closer to the plants, as detailed earlier.
Legginess is usually fixable with adjustments, but other issues like discoloration can also appear.
Seedling Discoloration: Purple or Yellow Leaves Explained
Seeing unusual colors like purple or yellow on your cantaloupe seedling leaves can be alarming, but it often points to specific, correctable issues related to nutrients or environment.
Q: Why are my cantaloupe seedlings turning purple or yellow?
- Purple Leaves: Seedlings turning purple often indicates a phosphorus deficiency. Interestingly, this is frequently triggered by cold soil, which prevents the roots from absorbing available phosphorus, even if it’s present. Warming the soil may resolve this.
- Yellow Leaves: This commonly signals a nitrogen deficiency. Other causes include overwatering (leading to root rot and nutrient uptake issues) or sometimes insufficient light. Check your watering practices and ensure adequate light. common causes of yellowing leaves
Adjusting care, like ensuring warm soil, proper watering, and potentially using a very dilute fertilizer if a deficiency is suspected, can often resolve these discoloration issues while growing cantaloupe. Another serious issue is damping-off.
What is Damping-Off and How to Prevent It?
Damping-off is a swift and fatal fungal disease that affects young seedlings, causing them to suddenly wilt and collapse at the soil line. Prevention is key, as there’s no cure once it strikes.
Q: How can I prevent damping-off in my cantaloupe seedlings?
This fungal issue thrives in cool, damp conditions with poor air circulation. To prevent it when growing cantaloupe: use sterile potting mix and clean containers, ensure good airflow around seedlings (a small fan can help indoors), avoid overwatering, and maintain appropriate soil temperature. Affected seedlings cannot be saved and should be removed immediately to prevent spread. preventing damping-off
Preventing damping-off relies on good hygiene and environmental control. Finally, let’s consider early pest pressures.
Identifying and Managing Early Pests
Even young cantaloupe seedlings can attract pests that can quickly damage or destroy them. Regular inspection is crucial for early detection and management.
Q: What pests attack young cantaloupe plants and how do I manage them?
- Common Pests: Keep an eye out for aphids (small, pear-shaped insects, often clustered), cucumber beetles (striped or spotted), and spider mites (tiny, causing stippling on leaves). Inspect plants regularly, especially the undersides of leaves.
- Control Methods: For minor infestations while growing cantaloupe, try handpicking larger pests or using a strong spray of water. If needed, use least-toxic options like insecticidal soap or neem oil, following label directions carefully. safely removing aphids
By recognizing and addressing these common seed and seedling problems, from germination failures to early pests, you’re better equipped to nurture your young cantaloupe plants successfully. Now, you might be considering alternative growing methods like containers.
Growing Cantaloupe in Pots or Small Gardens: Tips for Success
Successfully growing cantaloupes in containers or small garden spaces is achievable with specific advice addressing common challenges like space, soil, and light.
Can You Grow Cantaloupe in a Pot? Absolutely!
Q: Can you successfully grow cantaloupe in a pot?
A: Absolutely! Growing cantaloupe in containers is entirely possible with the right approach. You’ll need a suitable compact variety and a large enough pot—at least 5 gallons, though 10-15 gallons is preferred.  This method gives you excellent control over soil and location, ensuring your plant gets plenty of sun. Next, let’s pick the best container and variety.
Choosing Containers and Compact Cantaloupe Varieties
When growing cantaloupe in containers, your choice of pot and plant variety is key.
- Select large pots, at least 5 gallons, but 10-15 gallons per plant is ideal. Ensure they have excellent drainage holes.
- Opt for like ‘Minnesota Midget’ or ‘Sugar Cube’.
These choices set you up for success. Now, consider the soil.
Best Soil Mix for Potted Cantaloupes
When growing cantaloupe in containers, avoid garden soil as it compacts. Use a high-quality potting mix amended with compost. This ensures soil rich in organic matter for nutrients and good drainage, crucial for healthy plants. You might even consider self-watering pots. Next up: sunlight needs.
Sunlight and Heat Management for Container Cantaloupes
Place your cantaloupe pots in full sun, ensuring 6-8+ hours daily. Containers can overheat, especially dark ones; monitor soil temperature. Light-colored pots help, and you may need to move them for optimal sun or provide afternoon shade in extreme heat. This is vital for growing cantaloupe in containers. Next, watering.
Watering and Fertilizing Cantaloupes in Pots
Potted cantaloupes dry out faster, so check soil moisture often; learn how often to water container plants. Consistent watering is vital for growing cantaloupe in containers. Once established, fertilize every 2-3 weeks using a balanced liquid fertilizing container cantaloupes suitable for fruiting plants. Next, explore trellising options.
Trellising Cantaloupe: Vertical Growing in Small Spaces
Save space when growing cantaloupe in containers by training vines vertically on a trellis or cage. Support ripening heavy fruits with slings made from fabric or netting to prevent vine damage. This method makes a bountiful harvest achievable even in small spaces.
Equipped with these insights, from initial preparation and planting to nurturing young plants and even growing in compact spaces, you’re now well-prepared to enjoy your own homegrown cantaloupes.
Embarking on your cantaloupe growing journey, from essential soil preparation and precise seed planting to nurturing those first tender sprouts, no longer needs to be a mystery. This guide has equipped you with a clear, step-by-step path, crucially highlighting the game-changing importance of 80°F soil warmth for germination—a common hurdle for beginners. We’ve also tackled troubleshooting common seedling issues and explored how to achieve a sweet harvest even in pots. With these insights, you’re ready to confidently plant cantaloupe seeds and anticipate those delicious, homegrown melons. What are your go-to tricks for cantaloupe success? #
