Table of Contents
Imagine your garden graced by those stunning, towering spires of foxgloves, humming with bees. Growing these enchanting flowers from seed is incredibly rewarding, but if you’re new to it, you might wonder where to start. Do they need light to sprout? When’s the best time to plant? Is sowing indoors better than outdoors? You’ve got questions, and this guide has the clear, simple answers you need.
This step-by-step resource is designed specifically for beginner gardeners, demystifying the process of planting foxglove seeds. We’ll walk you through everything: choosing the right soil, understanding crucial light requirements for germination, picking the perfect timing for your area, and deciding whether to start indoors or sow directly outside. Forget the guesswork; you’ll find practical, easy-to-follow instructions and insider tips here to help you achieve successful germination and watch your beautiful foxgloves thrive. Let’s get planting!
Getting Started: Why, When, and What You Need
Before you start planting, let’s cover the basics: why growing foxgloves from seed is rewarding, some key plant facts you should know, the best time to plant for success, and the essential materials you’ll need to get started. Understanding these fundamentals will build a strong foundation for your foxglove growing journey.
Why Grow Foxgloves from Seed?
There’s immense satisfaction in watching a plant grow from a tiny seed into a towering, bloom-filled spectacle. Foxgloves, with their dramatic flower spikes, offer a particularly rewarding visual payoff. For beginner gardeners, the idea of starting flowers from seed might seem daunting, leading to questions like, “Are foxgloves hard to grow from seed?” The good news is they aren’t! With the right guidance and a few simple steps, growing foxgloves from seed is a manageable and enjoyable process. Starting from seed also gives you access to a wider variety of unique colors and forms than you might find in garden centers, often at a much lower cost than buying established plants. This guide aims to demystify the process, making success achievable for anyone new to seed starting.
Understanding Foxgloves: Key Considerations
Most common foxgloves, particularly Digitalis purpurea, are biennials. This means their life cycle spans two years. In the first year, the plant focuses on growing foliage – a rosette of leaves close to the ground. It’s during the second year that it sends up the impressive flower spike, blooms, sets seed, and then typically dies. While this guide focuses on starting from seed, it’s important to know what to expect in that crucial first year of leafy growth. It’s also worth noting that some newer foxglove varieties or other Digitalis species might behave as short-lived perennials, blooming for a few years.
It is vital to understand that all parts of the foxglove plant are poisonous if ingested. This includes the leaves, flowers, seeds, and roots. Handle plants with care, always washing your hands after touching them. Exercise particular caution if you have young children or pets who might be tempted to chew on plants. For more important toxicity information, consult authoritative sources.
When to Plant Foxglove Seeds
Timing is key when asking, “What month should I plant foxglove seeds?” The best time depends on whether you’re starting indoors or sowing directly into the garden. For starting seeds indoors, aim for 6-10 weeks before your area’s last expected frost date in spring. This gives seedlings a head start.
If you prefer to direct sow outdoors, you have a couple of options. You can sow seeds in late spring or early summer after the danger of frost has passed. Alternatively, you can sow them in late summer or early fall. Fall sowing allows the seeds to germinate and establish small rosettes before winter, potentially leading to stronger plants and earlier blooms the following year, especially in milder climates. The ideal timing can vary based on your specific climate zone; checking your local average frost dates is always recommended for the most accurate guidance. Remember that seeds sown in spring will typically produce foliage the first year and bloom the second year, while fall sowing might also result in second-year blooms.
Materials You’ll Need
Gathering your supplies before you begin makes the planting process much smoother. Here are the essential materials you’ll need for starting foxglove seeds:
- Foxglove Seeds: Choose a variety you love!
- Seed Starting Mix: This fine, sterile mix provides the ideal drainage and aeration for tiny seedlings and is preferred over heavier garden soil.
- Containers: Seed trays with cells or small pots with drainage holes are perfect.
- Grow Lights (Optional but Recommended for Indoors): If you don’t have a very bright, south-facing window, grow lights are crucial to prevent seedlings from becoming leggy.
- Watering Can with a Fine Rose or Spray Bottle: Foxglove seeds are tiny and can be easily washed away or buried by heavy watering.
- Plant Labels: Essential for remembering which variety is in which container.
- Clear Plastic Dome or Plastic Wrap: Used to cover indoor seed trays to maintain humidity until germination.

Having these items ready will prepare you for the next step: the actual planting process.
How to Plant Foxglove Seeds Indoors (Step-by-Step)
Starting foxglove seeds indoors gives you a head start on the growing season. This controlled environment can be particularly helpful for delicate seeds. Follow these steps carefully, paying close attention to their light requirements for successful germination.
For many beginner gardeners, the question arises: is it better to start foxglove seeds indoors or outdoors? Starting indoors offers a controlled environment, protecting tiny seedlings from harsh weather and pests, and allows you to get a jump start on the season, resulting in earlier blooms. However, it does require specific equipment like grow lights and necessitates transplanting later. Direct sowing outdoors is simpler but relies more on unpredictable weather and timing. If you want maximum control and an earlier display, starting indoors is a great choice.
Here is a simple, step-by-step guide on how to plant foxglove seeds indoors:
Indoor Sowing Steps
- Prepare Containers & Soil: Choose clean seed starting trays or small pots with drainage holes. Fill them with a moist, sterile seed starting mix. Gently firm the soil surface but avoid compacting it.
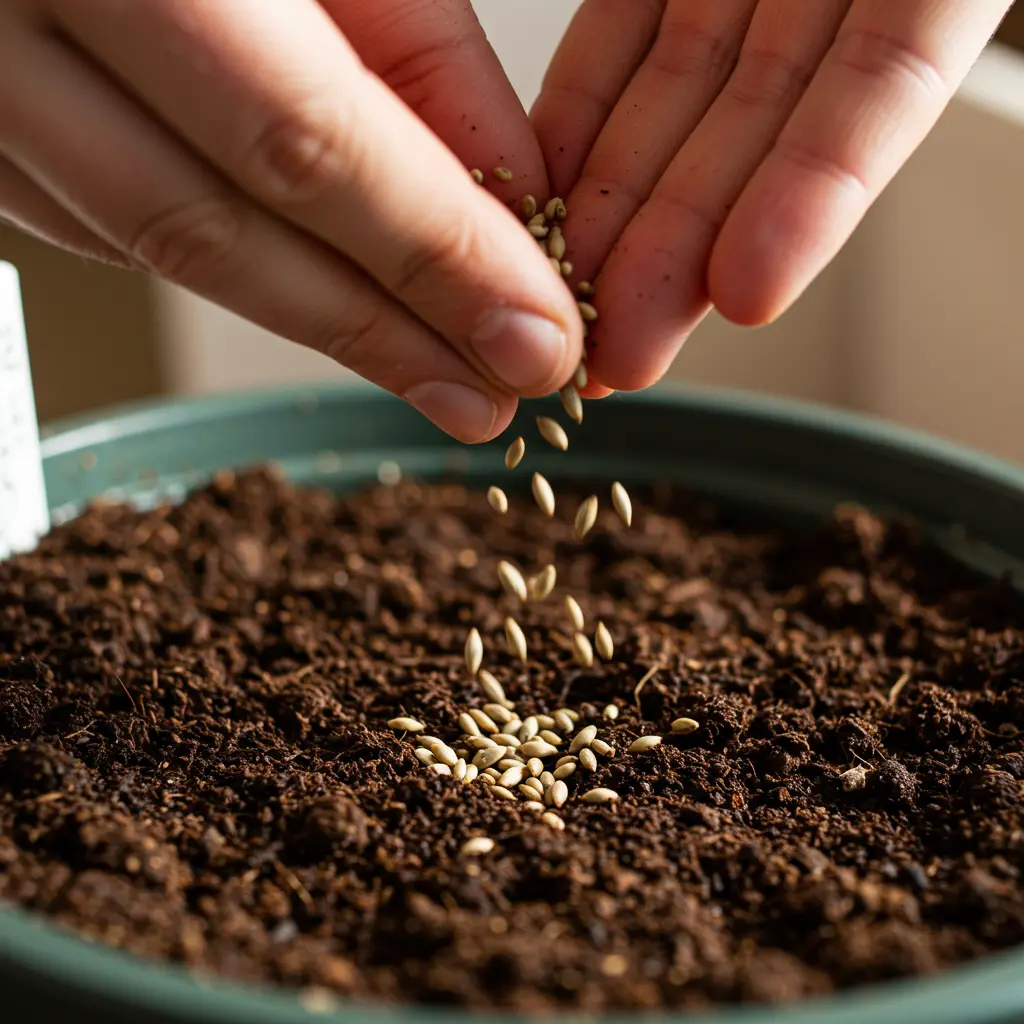
- Sow the Seeds: Foxglove seeds are incredibly tiny, almost like dust
 . Scatter the seeds very thinly on the surface of the prepared soil mix. Try not to clump them together.
 - Do NOT Cover Seeds: This is a critical step! Do foxglove seeds need light to germinate? Yes, they absolutely do. This is a common point of failure for many gardeners. Foxglove seeds require light to break dormancy and sprout. Covering them with soil will prevent them from germinating.
- Gently Water: After sowing, moisten the soil gently. You can use a misting bottle to avoid disturbing the tiny seeds or water from the bottom by placing the tray in a shallow dish of water and letting the soil wick up moisture. Avoid overhead watering that could wash the seeds away.
- Provide Light: Place your seed trays immediately under grow lights or in a very bright south-facing window. Foxglove seeds need plenty of light to germinate, ideally 12-16 hours per day under grow lights.
This video demonstrates the crucial surface sowing technique and reinforces the need for light for successful germination.
- Maintain Moisture & Warmth: Cover the trays with a clear plastic dome or plastic wrap to help maintain high humidity and consistent moisture. Keep the soil consistently moist but not waterlogged. Maintain a temperature of around 65-70°F (18-21°C).
 . Scatter the seeds very thinly on the surface of the prepared soil mix. Try not to clump them together.
With the right conditions, you should see tiny seedlings emerge in 14-28 days. Once your foxglove seedlings have sprouted, it’s time to think about their initial care.
How to Direct Sow Foxglove Seeds Outdoors (Step-by-Step)
If you prefer planting directly in your garden beds, here’s how to sow foxglove seeds outdoors for success. Direct sowing offers a simpler approach, avoiding the need for transplanting delicate seedlings later. While it gives you less control over germination conditions compared to starting indoors, it can still be a very effective method, especially in areas with mild climates.
Here are the steps for direct sowing foxglove seeds in your garden:
Outdoor Sowing Steps
- Choose the Right Location: Select a spot in your garden that receives partial shade to full sun. Foxgloves tolerate various light conditions but often thrive with some afternoon shade, especially in hot climates. Ensure the soil is well-draining, as soggy conditions can lead to root rot.
- Prepare the Soil: Loosen the soil surface gently with a rake or trowel to about an inch deep. If your soil is heavy clay or very poor, you might consider amending it with a little compost to improve drainage and fertility, keeping in mind [Foxglove soil requirements]. Rake the surface smooth afterward.
- Sow the Seeds: Foxglove seeds are tiny! Scatter them very thinly over the prepared soil surface. Aim for just a few seeds per square inch, as you’ll thin them later.
- Do NOT Cover Seeds: This step is critical! This is because foxglove seeds require light to germinate. So, if you’re wondering, ‘Should you cover foxglove seeds?’ the answer is a firm no. This light requirement is key to [Foxglove seed germination light].
- Gently Press Seeds: After scattering, lightly press the seeds onto the soil surface using your hand or a flat board. This ensures good contact between the seed and the soil without covering them.
- Water Carefully: Use a watering can with a fine rose or a spray bottle to gently moisten the soil surface. Be very careful not to use a strong spray that could wash the tiny seeds away. The goal is to keep the soil consistently moist but not saturated.
- Mark the Area: Since the seeds are small and will take time to sprout, use a plant marker to clearly label the spot where you sowed the foxglove seeds. This prevents accidental weeding or disturbing the area.

With your foxglove seeds successfully sown directly into the garden, the next step is to monitor and care for them as they begin to sprout and grow into seedlings.
Caring for Your Foxglove Seedlings
Once your foxglove seeds sprout, proper care is essential to help them grow strong and healthy. The transition from tiny seed to robust seedling requires attention to ensure they have the best start before eventually moving to their final location.
Seedling Care Essentials
After successful germination, you’ll see tiny green shoots emerge. Foxglove seedlings are initially small and delicate, often starting with two small round leaves (cotyledons) before developing their first set of true leaves, which will look more like miniature foxglove foliage.  Typically, you can expect foxglove seeds to sprout within 10 to 21 days, though this can vary depending on conditions like temperature and light. So, if you’re asking “How long does it take for foxglove seeds to sprout?”, plan for a couple of weeks.
Caring for these young plants involves consistent attention to a few key areas. Watering foxglove seedlings requires a gentle touch; use a fine spray bottle or water from the bottom to avoid dislodging the tiny plants or compacting the soil. The goal is to keep the soil consistently moist but never waterlogged, as this can lead to problems like damping off, a common fungal disease that affects seedlings. For guidance on maintaining moisture levels, understanding consistent watering practices is helpful.
Seedlings need bright light to prevent them from becoming leggy and weak. If you started them under covers or domes, remove these as soon as germination occurs to improve air circulation and light exposure. If you have multiple seedlings growing close together, thinning is important. Once they have their first true leaves, snip the weaker seedlings at the soil line, leaving the strongest ones spaced a few inches apart. This gives the remaining seedlings room to grow without competing for resources.
If you started your foxglove seeds indoors, they will need a period of hardening off before transplanting foxglove seedlings outdoors. This gradual process helps them adjust to outdoor conditions like sun, wind, and temperature fluctuations. Keep an eye out for common seedling pests or signs of disease, addressing issues promptly to protect your young plants.
With careful attention during this crucial stage, your foxglove seedlings will grow strong and ready for the next step in their journey.
Troubleshooting Common Issues & Foxglove FAQs
Even with care, you might encounter issues when starting foxglove seeds. Don’t worry, this is normal! Here are answers to common questions and helpful troubleshooting tips to navigate potential challenges during your foxglove seed starting journey.
Common Questions & Solutions
Starting foxglove seeds can be quite manageable, but like any gardening endeavor, sometimes things don’t go exactly as planned. Understanding potential pitfalls and having answers to common questions can make a big difference.
One frequent question is: Do foxglove seeds need light to germinate? Yes, absolutely. As reiterated earlier in this guide, foxglove seeds require light to sprout successfully. Never cover them with soil when planting.
What month should I plant foxglove seeds? The timing depends on your method. For starting indoors, aim for late winter or early spring, about 6-8 weeks before your last expected frost. If you’re direct sowing outdoors, wait until late spring or early summer after the danger of frost has passed and the soil has warmed slightly.
Is it better to start foxglove seeds indoors or outdoors? Both methods are viable, and the “better” choice often depends on your climate and goals. Starting indoors gives you more control over conditions like light and temperature, often resulting in earlier blooms the following year. Direct sowing is simpler and allows plants to establish naturally, but germination can be less predictable due to weather and pests.
Should you cover foxglove seeds when planting? No, and this is a critical point. Foxglove seeds are tiny and need light for germination. Covering them with soil will prevent them from sprouting. Simply press them gently onto the surface of the soil or seed starting mix.
Are foxgloves hard to grow from seed? Not if you follow a few key steps! While they have specific needs like light for germination, providing the right conditions (light, moisture, temperature) makes them quite manageable for beginners. They are generally considered moderately easy to grow from seed with attention to detail.
Do foxglove seeds need cold stratification before planting? This is a common question, especially for perennial seeds. However, for the most common garden foxglove, Digitalis purpurea, cold stratification is typically not required for successful germination. You can sow them directly without a chilling period. This addresses the common question about [Foxglove cold stratification].
If you experience poor germination or other [Foxglove seed germination problems], consider these potential causes:
- Old Seed: Seed viability decreases over time. Use fresh seeds.
- Covering Seeds: As mentioned, covering prevents light access, inhibiting germination.
- Wrong Temperature: Soil that is too cold or too hot can hinder sprouting. Aim for temperatures around 65-70°F (18-21°C).
- Lack of Light: Ensure seeds receive adequate light from a grow light or sunny windowsill immediately after sowing.
‘Leggy seedlings’ are another common issue, characterized by thin, stretched stems. This almost always indicates insufficient light. Move seedlings closer to a grow light or supplement natural light.
Finally, watch out for ‘damping off seedlings’. This is a fungal disease where young seedlings suddenly collapse at the soil line and die.  It’s often caused by overly wet soil, poor air circulation, or contaminated soil. To prevent it, use sterile seed starting mix, avoid overwatering, and ensure good airflow around your seedlings.
By understanding these common issues and answers, you’re well-equipped to tackle the challenges of starting foxglove from seed.
Successfully growing foxgloves from seed, from tiny sprout to mature plant, is a rewarding process!
You’ve now got the essential steps to successfully plant foxglove seeds, whether you choose to start them indoors or sow them directly. We’ve demystified the process, focusing on critical details like their need for light to germinate and providing clear, actionable steps to avoid common pitfalls. With this guide, you’re equipped to overcome the initial challenges and nurture those tiny seeds into the promise of stunning, tall blooms that will grace your garden. Growing from seed is a rewarding journey, and starting with foxgloves is a wonderful way to see your efforts blossom. Trust the process, follow these tips, and look forward to the beauty you’ll create.
Enjoyed learning how to start foxgloves? Subscribe for more beginner-friendly guides and tips to make your gardening journey successful and rewarding!
